Dual boot MacOS and Ubuntu
Step-by-step instructions on how to install macOS and Ubuntu on a Mac computer.
There are four parts:
01: Prepare Your Stuff
Requirements
- A 4GB or larger USB flash drive to create a bootable image
- (Optional but recommended) Another 4+GB USB drive or external HD to store the files that you will download later
- At least 40GB free on the Mac HD
Downloading Files
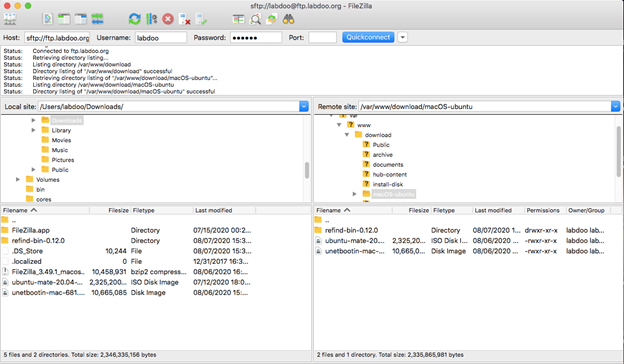
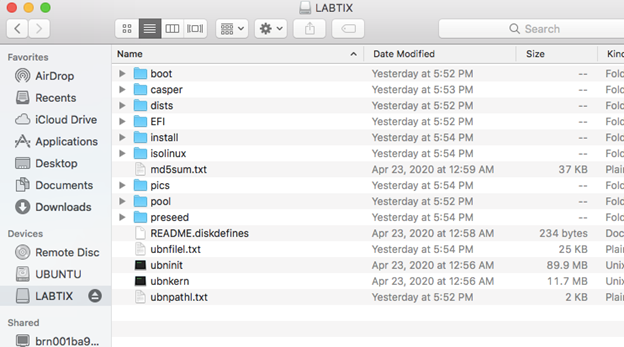
Download the following files from labdoo@ftp.labdoo.org:/macOS-ubuntu:
- refind-bin-0.12.0
- ubuntu-mate-20.04-desktop-amd64.iso
- unetbootin-mac-681.dmg
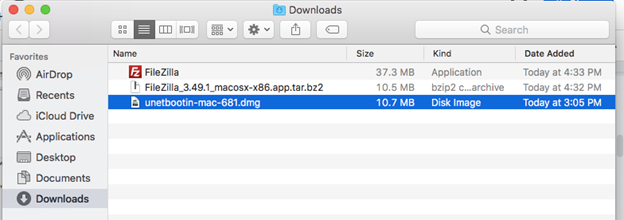
It is strongly recommended that you install and use a download manager software (e.g. FileZilla) to download the files since the iso file is huge, and the download manager can resume the download just in case you lost the connection. Save the files to a USB drive or external HD. Below is a screenshot using FileZilla:
Create Bootable USB
Do the following on a working Mac. Otherwise, complete “The Mac Side” section and come back here.
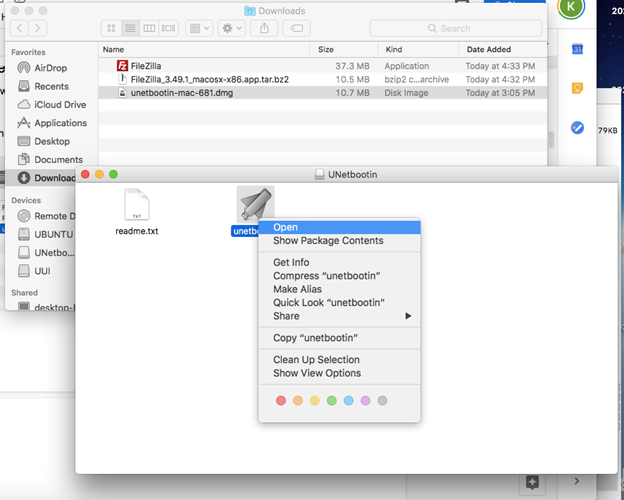
- Insert a blank USB
- Double click on the file unetbootin-mac-681.dmg that you downloaded earlier
- Right-click and select Open
- Click the Open button
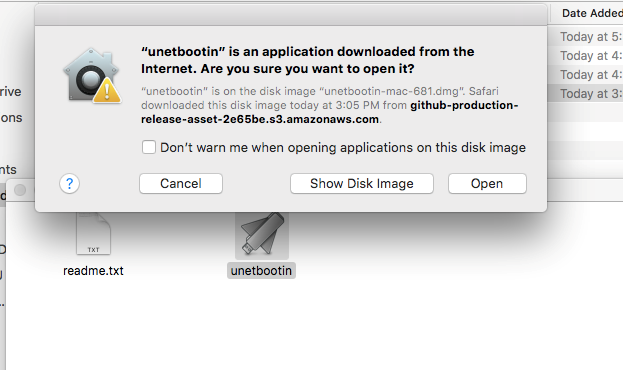
- Enter the password if prompted. The UnetBootin application will open. Select “Disk Image” option and the Ubuntu ISO file you downloaded earlier
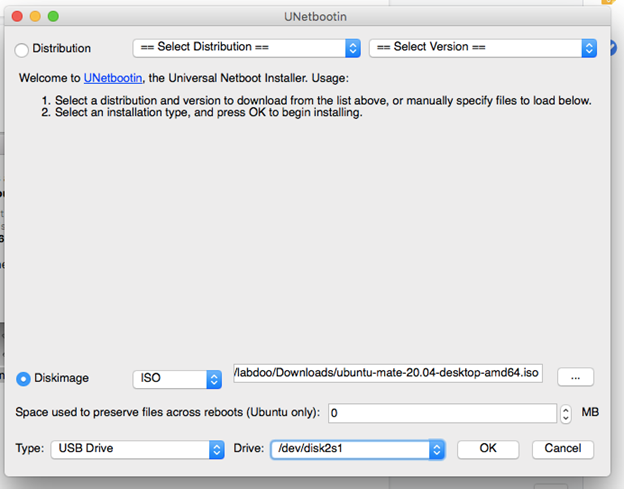
- Click OK. UnetBootin will extract and copy a bunch of files to the USB drive.
- When it’s done, eject the USB drive by clicking on the Eject icon:
The USB drive now can be used to boot any Mac.
02: The Mac Side
If MacOS is missing
You will need to have Wifi and internet access to reinstall macOS.
- Booting the laptop.
- If it prompts you to install a new OS, simply connect to your WiFi and follow the screen
- Otherwise, reboot the laptop, holding both the Command and R keys until you see the Apple logo. Then select “Reinstall macOS” from the menu
If MacOS is present
If you know the password of the admin user, congratulations!. Otherwise, follow these steps to reset the password:
- Reboot the laptop, hold the Command + R keys until the Apple logo appears.
- Select Utilities -> Terminal to launch a terminal.
- Type resetpassword (yes, one word) at the terminal. Follow the screen to reset the password for each existing account.
- Restart and log in using the new password
“Labdooing” the Mac
Create Labdoo Accounts
You will use the existing admin account to create two new accounts: “student” and “labdoo” and then remove all non-labdoo accounts.
- Log in as the current admin account
- Select “System Preferences” -> “Users & Groups”
- Click the lock icon to unlock. Type password when prompted
- Click ‘+’ to add a new account. A new account form will pop up
- Create “labdoo” account - fill in the form with the following values:
- New Account: Administrator
- Full Name: labdoo
- Account Name: labdoo
- Password: labdooadmin
- Verify: repeat the password
- Password hint: can leave blank
- Create “student” account - fill in the form with the following values:
- New Account: Standard
- Full Name: student
- Account Name: student
- Password: labdoo
- Verify: repeat the password
- Password hint: can leave blank
Delete Non-labdoo Accounts
- Log in as “labdoo”
- Select “System Preferences” -> “Users & Groups”
- Click the lock icon to unlock. Type password when prompted
- Select a non-labdoo account, click the ‘-’ to remove the account
- Select “delete user directory” option. Confirm deletion when prompted
- Repeat step 4 and 5 for all remaining non-labdoo accounts
Change the Computer Name:
We will change the computer name to the labdoo Tag ID:
- Generate a tag ID for this computer if it doesn’t have one yet
- Click “System Preference” -> “Sharing”
- Change the computer name to labdoo-000xxxxxx, where xxxxxx is the tag ID.
Create a Partition for Ubuntu
- Run Disk Utility: Select Go -> Utilities -> Disk Utility

- Disk Utility screen
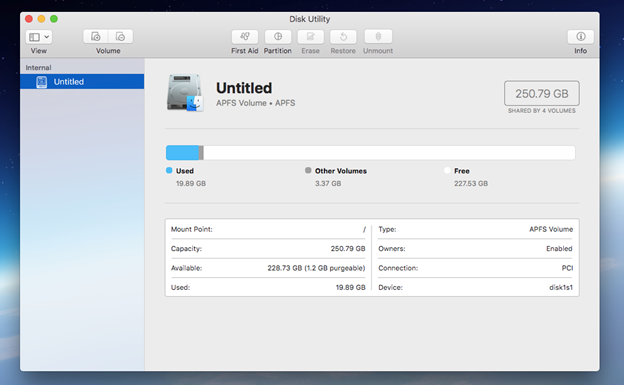
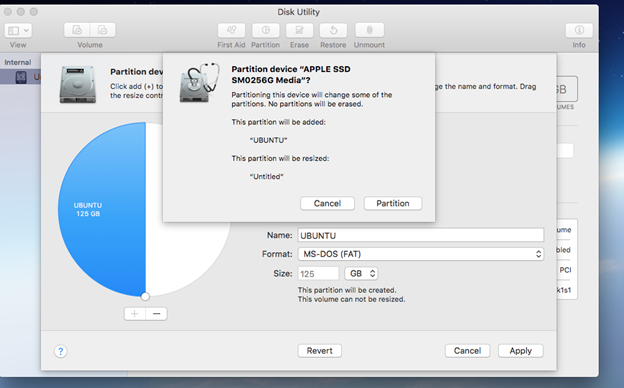
- Click “Partition”. A dialog box will pop up. Click Partition again

-
Click the ‘+’ sign. A new partition will be added. We now have 2 partitions, each occupies 50% of the disk space. Name the new partition “UBUNTU” and set its format to MS-DOS(FAT).
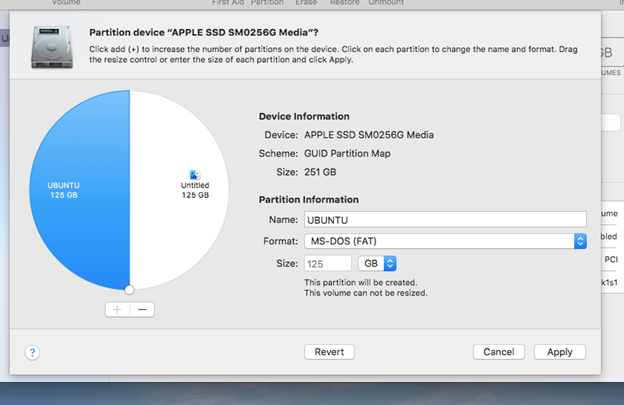
-
Click Apply
-
Click Partition
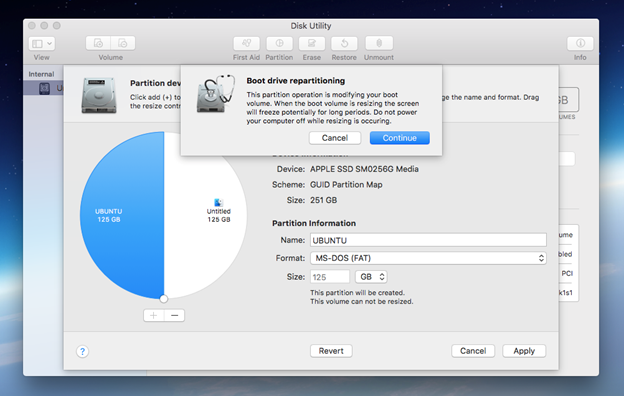
- Click Continue. The process may take a while.
We are now ready to install Ubuntu on the new partition. But there is one task left: to install a boot manager.
Install rEFInd Boot Manager
Disable SIP (System Integrity Protection)
SIP protects critical areas on the disk from being altered, and rEFInd needs to write to one of those areas. Thus, we need to disable SIP before installing rEFInd
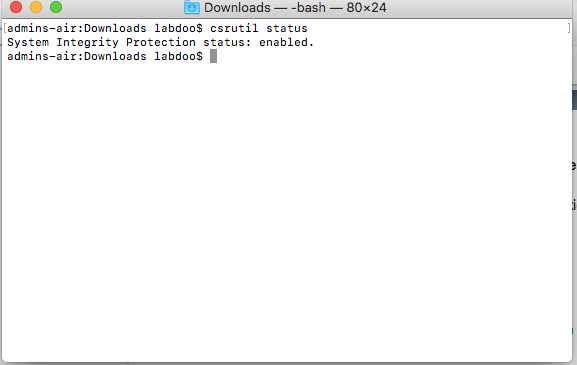
- Check to see if SIP is enabled or disabled. Open a Terminal and type “csrutil status”
- Reboot and hold the Command + R key until you see the Apple logo. It will boot into Recovery mode.
- Select “Utilities” -> “Terminal”
- At the terminal, type csrutil disable
- Reboot and log back in as labdoo
If it says “enabled” like in the capture above, follow the steps below to disable it
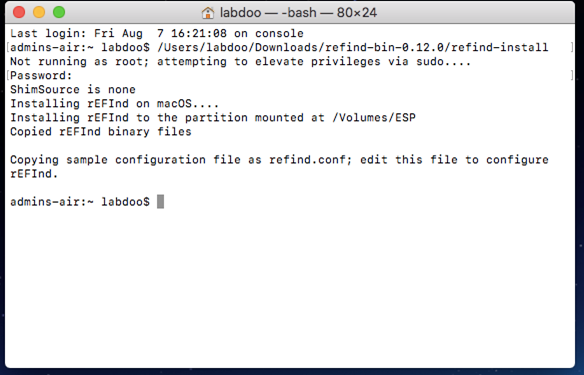
Installing rEFInd
- Open a Terminal
- Open the folder where you downloaded the files earlier
- Arrange the Terminal window and the folder window so you can see both at the same time:
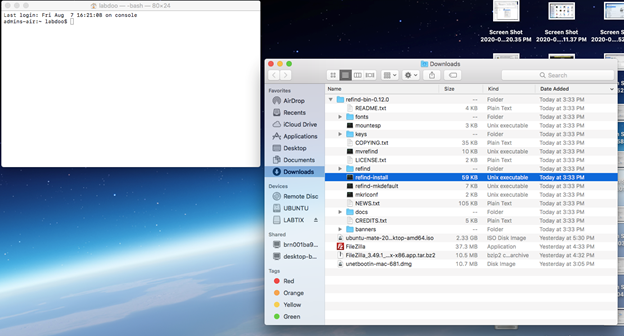
- Drag and drop the “refind-install” file into the Terminal folder
- In the Terminal window, hit Enter or Return key to execute the command. Enter the password when prompted
We are now ready to install Ubuntu.
03: Install Ubuntu Mate
- Insert the bootable USB drive that you created earlier
- Reboot. The rEFInd boot menu will show
- Select EFI\BOOT\grubx64.rfi from {your USB drive name} and hit Enter
- Select “Try Ubuntu MATE without installing”
- After a few minutes or so, you should see the Ubuntu desktop
- Click on Install Ubuntu MATE 20.04LTS
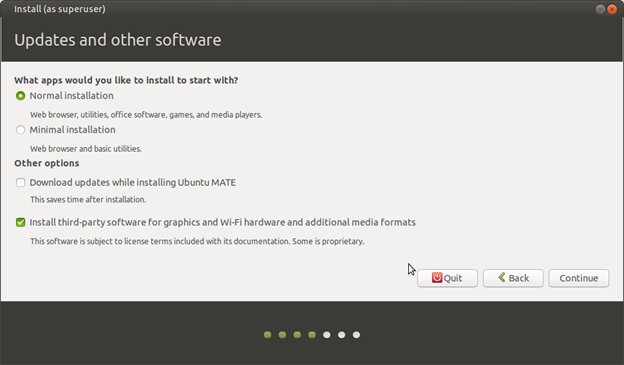
- Follow the screens to complete the installation. IMPORTANT:
- Under the “Updates and other software” screen, make sure you select “Install third-party software for graphics and WiFi hardware and additional media formats”. Click Continue. Then connect to your WiFi network when prompted.
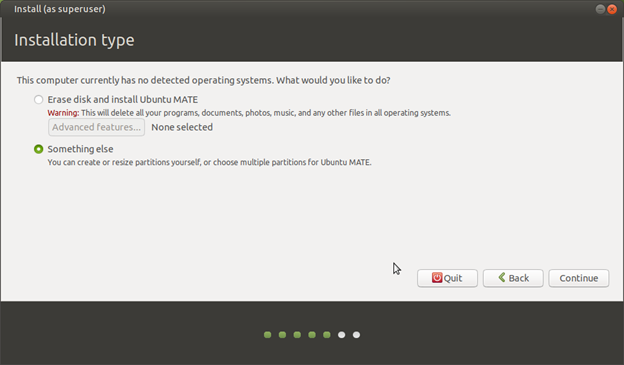
- Under the “Installation Type” select “Something else” option
- Select the partition with format fat32 which we created earlier using Disk Utility
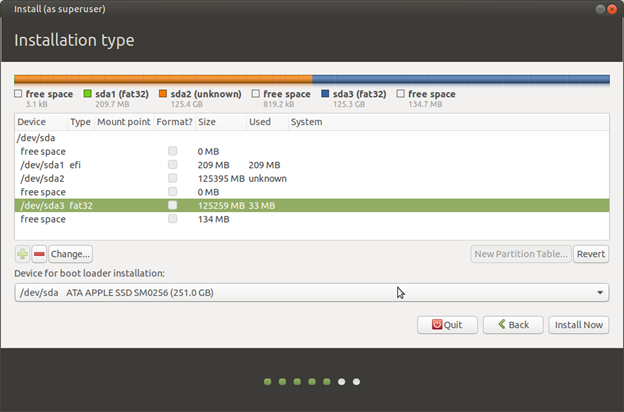
- Double-click the highlighted entry. A dialog box will pop up. Select:
Ext4 journaling file system
Check “Format the partition”
Mount point: /
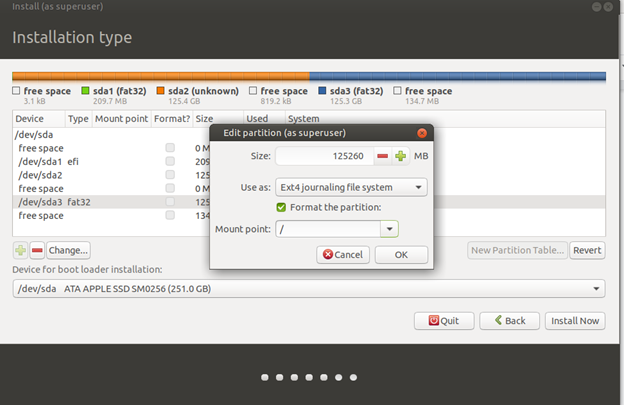
- Click OK
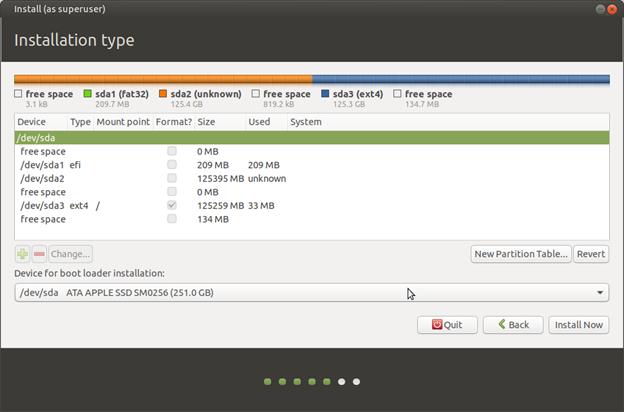
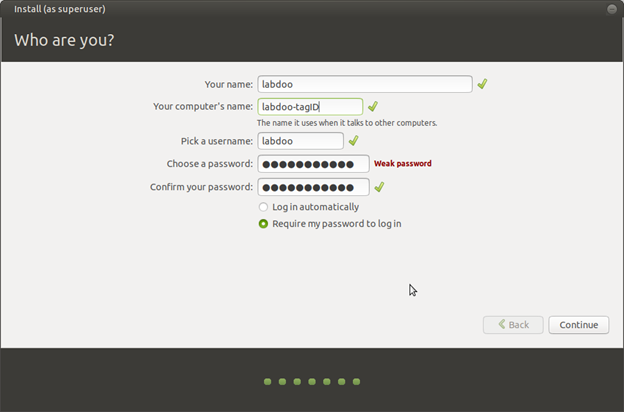
- Click “Install Now” and follow the screens to complete the installation. At the “Who are you” screen, create the labdoo account and use the tagID for the hostname:
- When the installation completes, click restart to reboot the system. Hold the Option key while the system reboots until you see the original boot menu
IMPORTANT NOTE:
The installation of Ubuntu overwrites the EFI boot area that we created earlier in the “Installing rEFInd” section. But without the EFI boot area, the Ubuntu installation would fail for some reason that I haven’t figured out. Thus, we’ll have to install rEFInd again. - Select booting from macOS partition and hit Enter key
- Repeat the steps in the Installing rEFInd section again
04: Post Installation
Enable SIP
- Reboot into recovery mode: hold Command + R key while rebooting until the Apple logo appears
- Select Utilities->Terminal to open a terminal
- Type “csrutil enable” and hit Enter key
- Reboot