About Teams
Labdoo provides a communication tool to help labdooers manage their own projects and activities in collaboration with other labdooers. We call this feature "Labdoo Teams". Each team organizes around a theme or topic, and users can join a team or several teams depending on their interests.
To access the list of Labdoo Teams, go to the 'Teams' menu located at the top of each page and select the option 'List all teams'. This will take you to this page. You can then click on any of the teams from that page.
Teams overview
Inside each team, you will see on the right column a list of possible actions you can perform. These actions include:
- View the wall of that team and engage in existing discussions.
- Start a new conversation.
- Create a task and assign it to a yourself or some other user in your team.
- Create an event in a calendar (e.g., a typical example of event is a laptop sanitation event).
- View the calendar of events in that team.
- Do searches inside that team.
- Subscribe and unsubscribe from that team.
| Figure. The teams page allows you to manage your own project activities and collaborate with other labdooers. |

|
Managing Teams
If your Labdoo account has assigned the role of 'team manager', you will be able to configure and manage those teams that you create.
To manage a team that you have created, do as follows:
1. Go to that team's home page. You will see three tabs: 'View', 'Edit' and 'Team'. Click on the tab 'Team'.
2. In that page, you will see various options to help manage your team, as illustrated in the next figure.
| Figure. Go to the team's home page and click on the tab 'Team' to access the following management page. |

|
3. For instance, to see the list of users currently in your team, click on 'People'. To add users to your team, click on 'Add people'. You can also assign the role of admin to any of the users in the team, so that user can also have rights to add other users. Notice also that depending on your role, some of the settings may be read-only.
| Figure. You can add users to your team by clicking on 'Add people' which will take you to the following page. |

|
Creating and Managing Labdoo Events
As part of a team, you will be able to create your own community events. Events are locally organized activities which allow Labdooers to get together and perform group activities. Here are examples of events that you may want to create:
- When organizing a laptop sanitation workshop to clean up laptops and load them with the educational software.
- When organizing an event to collect unused laptops from your local community.
- When organizing your own Labdoo Conference (these are normally organized once a year in certain cities of the world).
- Be creative, you can create your events for pretty much any activities (from small gatherings to larger workshops or conferences) that require getting people together around the topics of spreading education and make our planet a more sustainable place.
The feature "Labdoo Events" allows you to create and manage your own events within the Labdoo platform. It provides functions such as creating the event, announcing the event to your community, allowing people to register to your event so you can track the head count, manage your events calendars, or sending messages to your registrants to keep them up to date about the event details, among others functions.
To create an event follow the next simple steps:
- Click on the 'Teams' menu found on the top of each Labdoo page and select 'List all teams'. This will show you the list of all Labdoo teams. Then select the most suitable team where you want to create your event according to the subject of your event.
- Once you are in your selected team page, you will find a set of icons on the right side (note: please make sure first that you are subscribed to this team by clicking on the icon 'Subscribe to this team', as you can only create events for teams that you are subscribed to). Click on the icon 'Start event'. This will open a form to create your event. Enter the 'Title' of your event, a 'Description', the 'Dates' and 'Location' of the event, an optional image (e.g., the event flyer), and select whether you want to automatically announce this event to all members of the team through the option 'Send to all members of this team'.
- Under the 'Registration' field, select the option 'Enable event registration' if you would like to enable the registration form. This will allow you to manage labdooers' registration to this event as well as send them event-related email notifications.
- Click on 'Save'.
Your event is now created. You can now share it by clicking on the social network buttons that you will find in your event page (for Google+, Facebook, Twitter or any of your favorite platforms) or you can also copy the URL of the new event and share it.
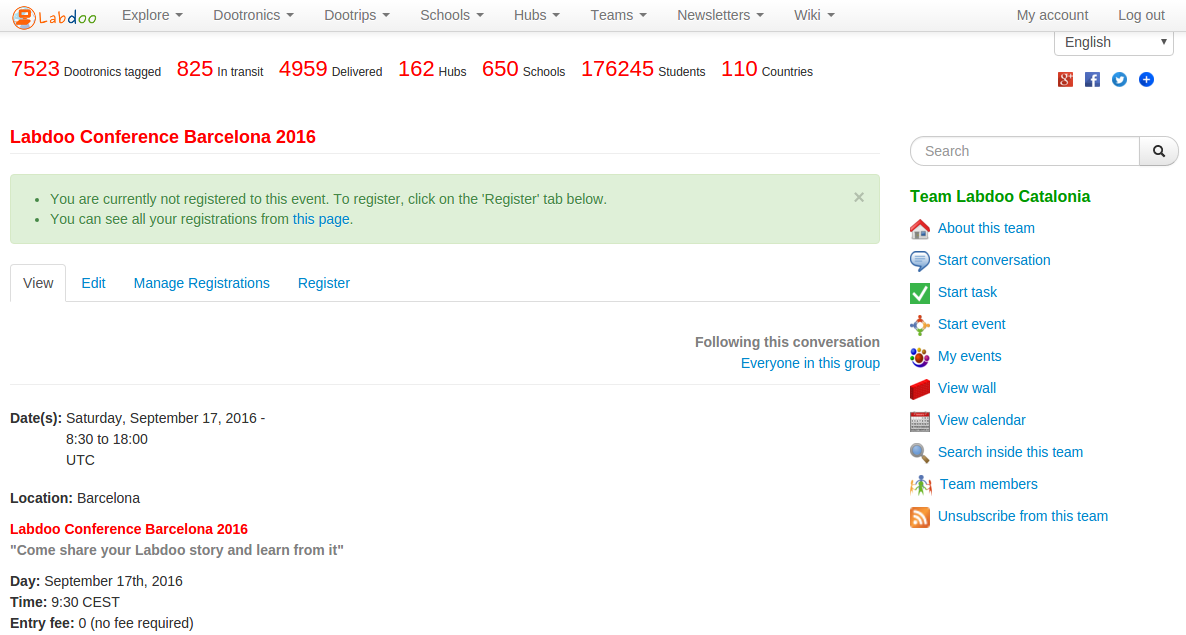
If you enabled the option 'Enable event registration', you will be allowed to manage your event registrations. In that case, your event page will have two extra tabs: 'Manage registrations' and 'Register', as shown in the picture below:
| Figure. Event example. If you enabled the option 'Enable event registration', your event will include two more tabs: 'Manage registrations' and 'Register'. |

|
By clicking on the 'Register' tab, you will be able to register yourself to the event. Other Labdoo users will see this tab to register themselves too. When sharing your event, you need to provide the URL of this event page so that users can register themselves by clicking on this 'Register' tab. Notice that the 'Register' tab is also available to users who don't have a Labdoo account, allowing these users to register to your events using their email address.
By clicking on the 'Manage registrations' tab, you will enter a sub-menu with options to configure your event registrations, to see the current list of registrants and to send the registrants email announcements, among other functions (this tab is only visible to the event manager). All these functions are designed to ensure you run a successful event!
We hope this text helped you understand how you can create and manage Labdoo events. As always, if you have any further questions, don't hesitate to write them on the Labdoo Global Support Team Wall and some Labdooer will help you resolve them. Happy teaming.
Writing a message to all hub and/or edoovillage managers
From time to time we need to send a message to all hub and/or edoovillage managers. For instance, when there is an announcement to be made about a new platform feature or a new release of the Labdoo educational software images. This can be done from the special Team called "The Coffee Shop": https://www.labdoo.org/content/coffee-shop/activities
To write a message to reach out to all hub and/or edoovillage managers, do as follows:
- Go to the Coffee Shop team: https://www.labdoo.org/content/coffee-shop/activities
- Click on "Start conversation"
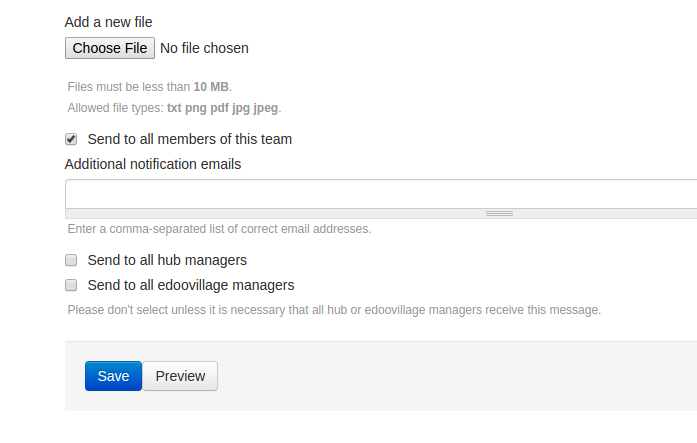
- Write a message just like you do for any other team conversation. At the end of the page, you will now see two check boxes: "Send to all hub managers" and "Send to all edoovillage managers". Select any (or both) of these chech boxes if you want your message to be broadcasted to all hub/edoovillage managers.
Remember that this is a powerful feature as it allows you to instantly send a message to all hub and edoovillage managers, so please use it wisely and make sure your message will be of relevant interest to the managers.
| Figure. Conversations in the Coffee Shop Team have the special options to allow you to broadcast your message to hub and edoovillage managers. |

|
How to share a conversation with other teams and users
Some times you may want to start a conversation within a team but make it also available to other teams. Or you may also want to have a finer control on what users your conversation is shared with. When creating a new conversation, this can be done via the "Sharing options" panel, as shown in the following picture:
| Figure. Click on "Sharing options" to select who you want to share your conversation with. |

|
If you to don't want to share the message with all the members of the team, uncheck the option "Share with all members of this team".
If you want to share the conversation with other teams, use the field "Share with additional teams".
If you want to share with specific users (even if they are not in the selected team), use the field "Share with additional users".
If you want to share with a person's email address (e.g., someone who does not have a Labdoo account), use the field "Share with additional email addresses".
Posting a conversation to a team
To post a message to a team wall, do as follows:
- First make sure you have a Labdoo account. If you don't have a Labdoo account, you can create one by going to this link: https://www.labdoo.org/user/register. After you have created your Labdoo account, log in and follow on to the next step.
- Go to the list of teams: https://www.labdoo.org/teams
- Select the team that you want to post your message to. For instance, if you want to post a message to the Coffee Shop Team, click on the "Coffee Shop" team link.
- Click on "Subscribe to this team" and accept the subscription.
- Click on "Start conversation". This will take you to a page where you can write your message and post it. Click on "Save", your message is now posted and broadcasted via email to all members of that team. You will also receive via email a copy of your own message. Check from time to time your email and the wall to see if someone follows up with a reply.