Labdoo 社交網路-它是如何運作
關於Labdoo專案
Labdoo 是一個社交網路,旨在由基層做起服務社會。我們稱Labdoo為非營利社交網路,因為目標是不是為了賺錢,而是要凝聚力量共同為公益事業的努力。因此,Labdoo 具有幾個屬性:
• 它是非營利
• 它是共同協作
• 它的架構是分佈式的 •
• 社會網路平台架構的軟件源碼是開放和自由軟體 (GPLv3)
• 每一個人都可以參與 •
• 整個流程設計不會導致額外的二氧化碳排放量
• 它沒有需要資金運行
• 它不受任何類型廣告影響 (因為它不需要資金來維持生存)
如上所述,運行 Labdoo是免費的。事實上,你可以在您的電腦安裝 Labdoo 社交網路上的任何部分。如果您想要,你也可以將代碼複製,修改它,創建你自己的社交網路, 代碼是可從下面的鏈接下載 HTTPs://github.com/Labdoo。
本文檔是用來提供 Labdoo 社交網路的架構說明
• 原始程式碼和體系結構
• 五大基本要素
• 管理使用者角色
• 主要操作清單 (MNM)
• 視覺化儀表板
• Labdoo 團隊
• 活動資料
• 如何翻譯 Labdoo 社交網路
• Labdoo 百科
• 全球庫存檢查 (GICs)
• 活動中心管理
• 超級活動中心
• Dootrip 系統
• 管理訂閱
• 小貼士
• 正在進行的工作
平台源碼和架設
Labdoo 大部分使用 PHP和JavaScript 寫成。源碼是使用GPLv3的自由和公開授權。這表示你可以自由地下載代碼,安裝,或者改善它,用於回饋社會。該代碼可從Git的鏈接下載https://github.com/Labdoo/Labdoo-2.0.
Labdoo平台是架設於Drupal, 一個GNU自由和開放源碼的內容管理框架。其主要特點是採用獨立的模塊。這有助於保持專案模塊化,便於管理,維護和合作開發平台。
Labdoo源碼是由軟件工程師為促進社會發展,貢獻他們的時間共同完成。
五大基本要素
在labdoo社交網路裡,主要是基於五大類型的人事物來運作:labdooers, dootronics, dootrips, edoovillages 和 活動中心(hubs).
• Labdooers: Labdoo 的成員們.
• Dootronics: Labdoo objects.Labdoo 的捐贈品,電腦硬体設備. 我們會將筆記本電腦、 平板電腦等載入教育應用程式,並運送給有需要的學校。.
• Dootrips: Labdoo 運送旅行。降低二氧化碳的運送法:將筆記本電腦從某個國家攜帶到另一個國家。Dootrips是由遊客、 非政府組織志願人員 (例如無國界醫生、 無國界工程師、 和人道主義工作者等)、 國際學生、 國際公司員工等人進行的旅行。
• Edoovillages:接收 dootronics( 載入教育軟體的 筆記型電腦或平板電腦)的學校或機構.
• 活動中心(hubs):每個人都可以參與 (例如放學回家後,和工作後等),labdooers 通常會在自己所在地附近組成志願的組織。活動中心,就是一群 labdooers分布在特定區域中 ,聚在一起執行 Labdoo 任務。
管理用戶角色
用戶可以具有下列角色之一:
· 匿名用戶︰ 適用於訪問 labdoo.org 無需登錄的用戶。這些用戶只可以做"查看"類型的活動。
· 經過身份驗證的用戶:適用於基本的labdoo用戶。這是用戶首次向系統登記時,预设的角色。這種類型的帳戶允許用戶執行所有的基本功能,例如登記筆記本電腦或登記dootrip。
· 活動中心管理員 ︰ 提供額外的权限來管理中心,包括編輯您自己活動中心的信息、 將管理員分配給您的活動中心,或將圖片上傳到您活動中心的相冊。通常此角色同时具有 edoovillage 管理员角色以便中心管理员可以創建並分配新的 edoovillages 中心帳戶。
· Edoovillage 管理員︰ 提供額外的權限來管理 edoovillages,包括創建和編輯 edoovillages,提供其他 edoovillages編輯權限,或將圖片上傳到 edoovillages 的相冊。
· 電子報管理員︰ 提供額外的權限,以管理、 編輯和發布電子報。
· wiki 作家︰ 提供額外的權限來編寫新的 wiki 文檔。此角色可以創建新的 wiki 頁面,編輯現有的和發布或取消發布它們。
· 團隊管理員︰ 提供額外的權限來管理 Labdoo 團隊,包括創建新的 Labdoo 團隊、 管理團隊內的用戶部分或分配團隊管理角色給其他用戶。
管理您的用戶角色
您可以通過“我的賬戶“檢查當前的角色分配去,然後按一下選項卡的‘我的角色‘按一下選項卡。
如上文所述,當您第一次創建您的用戶,你默認指派"經過身份驗證的用戶"的作用。如果你需要額外的權限 (例如,你想要成為"edoovillage 管理員",創建您自己的edoovillages 或如果你想要成為一個"Wiki 作家",帮忙编辑文章),請聯繫Labdoo 團隊 contact@labdoo.org.
分配新角色
超級活動中心管理員可以為用戶分配特定的角色。 這有助於使平台更具有永續性,因為該管理員可以將角色授權給其他用戶來幫助他分配任務。 例如,超級活動中心管理員可以將“edoovillage管理員”的角色分配給另一個用戶,以便後者可以幫助管理新的edoovillage專案。
如果您被分配到了超級活動中心管理員的角色,您可以經由下面的步驟為用戶分配新角色(請確保您已經事先登錄):
1.到該用戶帳戶頁面(可以透過以下URL轉接到用戶帳戶頁面https://www.labdoo.org/user/$USERNAME,其中$USERNAME是用戶的名稱)
2.您會看到一個標籤叫做 “角色”,點擊它。
3.在該頁面中,您可以為該用戶分配或刪除角色。
有關 Dootronics
在Labdoo裡,我們使用dootronics這個專有名詞(代表labdoo的電子用品)dootronics 指的是任何我們準備用於教育的電腦設備。換言之,dootronic代表可以被安裝教育軟體的筆電ヽ平板電腦、 電子書的電腦設備,之後順利地被運送至貧困的學校。我們目前要求捐贈的筆記型電腦最低硬體條件是Pentium M CPU並搭載至少 756 mb 的 RAM(從 2016 年7月開始)。
在Labdoo社交網路中,Dootronics都有一個獨特的Labdoo ID作為大家可以進行追蹤的標籤,Labdoo ID有其專屬的9 位數和QR 代碼。QR碼都有相對應的dootronic URL提供公開追蹤的功能,幫助捐助者和參與者知道他們捐獻的設備運送狀況。
| 如圖所示,每個 dootronic都有一個相對應的 Labdoo ID。 |

|
在捐贈的dootronics輸入Labdoo系統後,會經過一系列的程序。從筆記本電腦重組成可以用的設備,一直到將這些設備交給學校,或甚至是進入回收階段, 每一個過程都允許所有的參與者在有秩序和公開的情況下,為每一台dootronics安排並進行相關的任務。
這一系列的程序包含:
S0:為dootronic 標記相對應的Labdoo ID
S1:已捐贈,等待通過品質檢查
S2︰通過品質檢查
S3:分配到edoovillage,dootronic等待運送至分發地區
S4:已完成運送並被學生使用
S5:等待回收
S6:回收
S7:(dootronic準備給學校圖書館)簽出
S8:(dootronic準備給學校圖書館)可使用狀態
S9:到達分發地點,但是卻不能使用
T1:正運送到edoovillage的途中
T2:在運送到回收工廠的過程中
L1:Dootronic遺失了
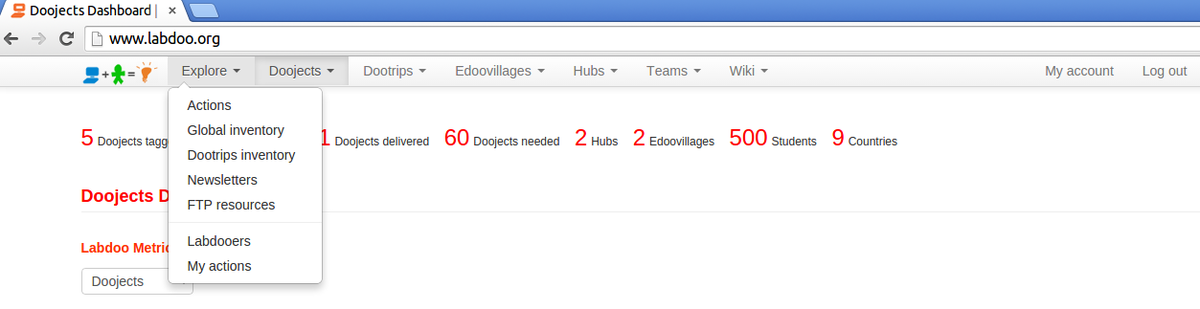
主要操作清單(MNM)
Labdoo 系統的外觀佈局可以由頁面最上方的主要操作清單(main navigation menu)編輯(以下簡稱MNM)。此清單在每個頁面皆可操作,讓使用者能更快速的移動到各個資源與工具頁面,MNM有一項重要的特性:眾多選項的可用性取決於使用者的角色,若使用者同時擔任越多角色,則所能看見的MNM選項越多。
鑑於其相關性,使用者可以在MNM的選項中找到五個基本物件:dootronics, dootrips, edoovillages, hubs 與 user account。此外,MNM包含其他清單選項,幫助使用者操作平台,例如可視化平板(visualization dashboards),維基頁面(wiki pages),通訊(newsletters),壁狀論壇(wall-like forum)或團隊與工作管理操作......等等。
圖例,主要操作清單 (MNM) 位於Labdoo頁面最上面
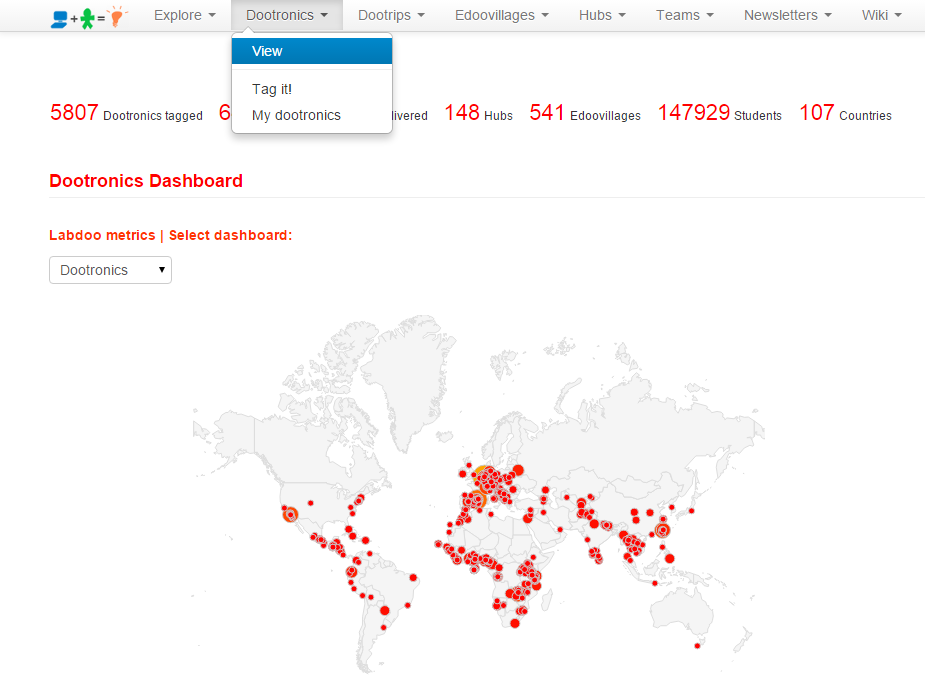
視覺化儀表板(英文版)
The design of the Labdoo social network puts special emphasis to providing transparency as one of the key mechanisms to facilitate the health of the system. To enable transparency, a series of dashboards are implemented allowing users to quickly know the status of the various objects (dootronics, dootrips, hubs, edoovillages, etc). These dashboards rely on a variety of mechanisms including geolocation maps, column charts, or dynamically configurable tables, to name a few. To access each dashboard, go to the Main Navigation Menu on the top of each page and click on one of the four Labdoo objects: 'Dootronics', 'Dootrips', 'Edoovillages' or 'Hubs'. Then click on 'View' to see the global dashboard for that type of object.
Figure. Example of visualization dashboard.
Optimized Cache to Speed Up Loading Time
The calculations that need to run in order to visualize each dashboard are quite computationally intensive due to the large amount of global data that they need to correlate. In order to speed up the loading of each dashboard and enhance the user experience, the Labdoo engine runs a caching scheme algorithm, which works by computing the dashboards in the background once every hour. That means that dashboards may not display the latest information. Any changes made in the Labdoo system will be reflected in the dashboards at the next turn of the hour. For instance, if you tag a new laptop at time 12:35pm, the dashboards will show that new laptop starting at 1:00pm.
Searching Inside Visualization Dashboards(英文版)
Within each visualization dashboard, you will find various tools to help you search, count, geolocate and track the status of any of the four main Labdoo objects (dootronics, dootrips, edoovillages and hubs). These tools include a geolocation map to position the displayed objects, a column chart that provides counting metrics, a search box and a set of drop down menu options to filter your search.
Of special interest is the search box "Free-Text Search", which allows you to search objects across pretty much any of their properties. For instance, you can search objects across Labdoo ID, status, country, assigned edoovillage, etc. One useful feature is that you can do automatically filtered searches by adding a prefix to your query. For instance, let's say that in the dootronics dashboard you want to find the device that has Labdoo ID equal to 000002358. To do so, you can type in the search box id:000002358. Or let's say that you want to find all dootrips that have as destination country Tanzania. To do so, you can go to the dootrips dashboard and type in the search box dstcountry:tanzania. The list of special keywords available for each of the four visualization dashboards is presented in the next table.
Table. List of keywords available to perform filtered searches
| Dashboard | Search keys |
|---|---|
| Dootronics | id, hub, edoovillage, status, notes, tagger, manager, emails, country, serialnumber, pickmeup, model, wh |
| Dootrips | title, capacity, numberdootrips, status, completed, srccountry, dstcountry |
| Edoovillages | title, hub, needed, intransit, delivered, remaining, pcompleted, status, country, completed, open |
| Hubs | title, needed, intransit, delivered, remaining, neededshared, remainingshared, pcompleted, country |
Labdoo 團隊
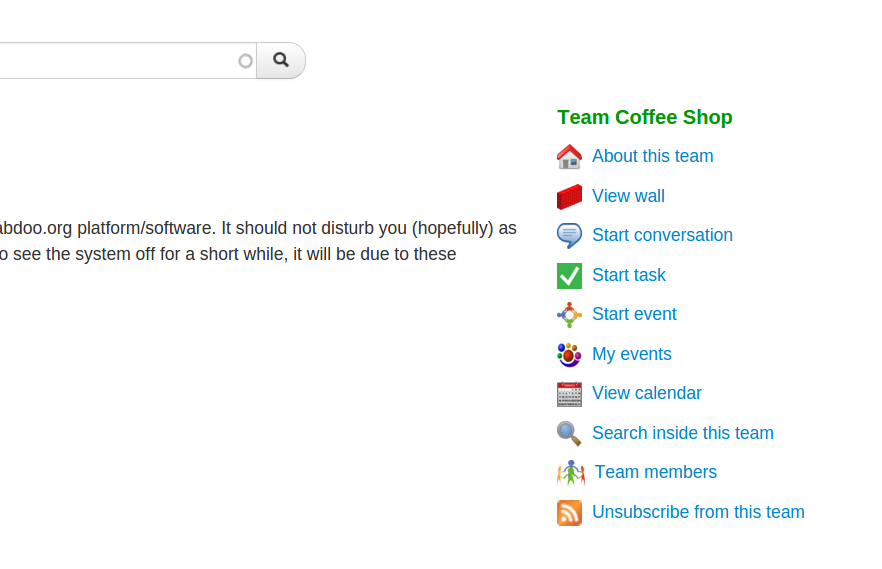
團隊 (Team) 概觀
在團隊 (Team) 裡面,Labdoo的用戶能夠處理以下事務:
- 創建新的對話。
- 創建已安排時間的事項。
- 在行事曆裡頭創立活動(筆電消毒是一個典型的活動例子)。
- 查看團隊的佈告欄,并參與討論。
- 查看團隊的行事曆。
圖片。團隊頁面能夠讓您管理自己的專案活動以及與其他Labdoo用戶合作。
團隊搜尋(英文版)
To do a search inside the teams framework, go to 'Teams' and then 'Search inside teams'. It will take you to a dashboard where you can search across all teams and across all types of activities.
團隊管理
若您的 Labdoo 帳號已經被指定為『團隊領導者(team manager)』,您將可以配置與管理您的團隊。
請遵照下列指示以便您管理您的團隊:
1.在團隊的首頁中,您將會看見三個選項:瀏覽('View),編輯('Edit)與團隊(Team),點擊團隊(Team)。
2. 在那頁面中,您將會看到能幫助您管理您的團隊的多個選項,說明如下。
到團隊的首頁並點擊團隊(Team)進入管理頁面。
3. 舉例而言,點擊成員(People)即可看到當下的成員清單,點擊加入成員(Add people)以新增成員。請注意有些設定可能為唯讀,其取決於您在團隊中的角色。
您可以點擊加入成員(Add people)進入以下頁面。
Activity Feeds (英文版)
So that all users (visitors, logged in users, participants, technology recipients, donors, etc.) can get a good sense of the activities carried out within the Labdoo network, the system provides various types of feeds. These feeds display both real time information of the activities being carried out as well as historical data of all past activities. Activity feeds can also be searched and filtered (for instance, you can specify to only display the activities carried out by you).
The main function of the activities feed is to help improve the transparency of the Labdoo system at all times to preserve the healthy state of the platform.
如何翻譯 Labdoo 社交網路 (英文版)
Please refer to https://www.labdoo.org/content/how-translate-labdoo-social-network for more detail
中文翻譯指引
•詳細閱讀需要翻譯的文件和要翻譯內容相關的文件
•最好準備一本英語詞典或者使用線上詞典以方便查閱生字,例如:Yahoo!奇摩字典;至於術語、縮寫等請先查閱 Wikipedia 文章、以 Google 搜尋、以及參考 Answers.com 上的內容等
•所以在翻譯時只要遇到不清楚原意的條目,請加入 "(Someone should review this)" 。與其翻譯錯誤讓瞭解中文與英文的人都看不懂,更希望能保留英文起碼讓懂英文的人瞭解。
•複審翻譯
•贴心小提示
•Labdoo 的常用名词翻譯
Labdoo 百科
Labdoo 平台讓使用者能夠建立屬於自己的百科頁面。在這之前,使用者需要擁有「書本作者」的職稱。如果您還沒有被分配到此職務,但又想要創立百科頁面的話,請電郵至 contact@labdoo.org。(您可以於「我的賬戶」的「我的職稱」中查看自己目前的職位)。
Best Practice (英文版)
編輯指南
While there is quite a bit of flexibility when writing your own wiki books, it is important to follow certain best practice rules to ensure that the content provided within the Labdoo platform is of good quality. As a wiki writer, please follow the next recommendations:
- Keep it simple. You have the option to use HTML markup tags, but it is recommended to only use them if you really need them. An important rule is to keep things simple so they are easier to maintain. When it comes to wiki, simple is better.
- Use links with relative paths. Please see XXX.
-
Ensure HTML tags are correctly written. To begin with, we start with an important best practice. If you use HTML tags to format your wiki pages, ensure that they are correctly written. All tags need to have an open clause and a closing clause. For instance:
<em>text here</em>. If your tag does not include any object inside (such as the new line tag<br>or the horizontal line tag<hr>), then you have two options: you can use either<br></br>(without any object between the clauses) or the more compact version<br/>. This first best practice is specially important because the Labdoo system provides automatic back ups of all the wiki content which needs to parse all the wiki pages, and if the tags are not correctly set up, the parsing process can break. - If in doubt, follow this wiki book as an example. The wiki book you are reading right now, is made using the same system that you use to write your own. Therefore, if in doubt on how to write a certain page, please come to this guide and check how it was written. As a book writer, you have enough user permissions to click on the "Edit" tab found on the top of each of the pages in this book (make sure you are logged in to see the "Edit" tab), which will allow you to see how each field was filled in.
- Capitalize titles. Please capitalize the first letter of the words in the title of each wiki page. For instance, the title of this page is "Best Practices", not "best practices" and not "Best practices". This helps keep consistency.
- Consistency. Please keep consistency across your document. Wiki books can be written in many different ways and styles, but once you decide to do things in a certain way, keep it consistent across your document. This will make your text more pleasant to readers.
- Spell check and proof read your text. Please ensure that there are no spelling and grammar errors in your text, and make sure you proof read it multiple times. It is very recommended that you have some one else read the text and help you correct it, if possible someone who is good at spelling and grammar. For instance, try to have in your team or community a volunteer that can help you with this task.
- Avoid long pages. If you have a very long text to write, try to break it down into small sections connecting them as a book.
- Save your text often. Make sure you save your text often, this will ensure that your work is properly stored and that your format is correct.
How to Structure Content (英文版)
The general structure of the Labdoo wiki system is similar to other standard wiki systems (such as the Wikipedia) and hence it is fairly free style. That means that there is no need to have a lot of synchronization on what types of documents are created. If you believe that a certain article or document belongs to the Labdoo wiki system, then in general you can go ahead and create it. The wiki is an open system and your work will be subject to peer reviewing by other Labdooers so that if the new document is inappropriate to the subjects of interest in the Labdoo platform, then you will be given instructions on how to edit the content. As in any open wiki system, inappropriate content can be unpublished at any time, to ensure the wiki abides to certain standards of quality and relevancy.
Besides the above general 'free style' principle, the wiki does have a few categories of documents that are considered core to the Labdoo platform and standard for all available languages. When writing a new document, one needs to first consider if the new page belongs to any of these categories and structure the document accordingly, ensuring that there is no overlapping and that the new text follows a smooth reading experience with respect to the core documents. Here is the list of core documents/categories:
- The Labdoo Social Network - How It Works. The user manual describing how the Labdoo system works from a user perspective. This page belongs to it. [link]
- Values, Philosophy and Principles of the Labdoo Project. A description of the principles of the Labdoo project, including the goals and the approach taken by the platform. [link]
- dootronic Sanitation Guide. This document provides a comprehensive guide on how to sanitize devices that can be used for education purposes. [link]
- Labdoo Toolkit. The 'Labdoo Toolkit' includes documents that are needed to carry out Labdoo activities, including request forms, logos and drawings that you can use to run your own local campaigns, email templates to simplify the process of replying to solicitors, dootripper letters that can be used when traveling, etc. [link]
- Education Applications. In this category, wiki writers provide descriptions of the education applications that are part of the devices deployed by Labdoo in schools. This can include descriptions of the offline wikipedia, of the applications found in the Edubuntu package, or in general of any of the many education applications that dootronics come preloaded with.
The general principle to add content to the wiki system is as follows: if the subject of the new wiki page belongs to any of the above core categories, then consider adding the new page as part of the above documents; otherwise, you can create a new wiki book.
Offline Access to the Labdoo Wiki(英文版)
Please refer to https://www.labdoo.org/content/offline-access-labdoo-wiki page
Publishing and Unpublishing(英文版)
It is important to not make a wiki page publicly available until its text has been carefully proofread and corrected from any typos and grammatical mistakes. This is to ensure that all content abides to a minimum standard of quality.
To accomplish this, each wiki page has a tag on its top called 'Publish/Unpublish' (this feature is only available to users who have the 'book writer' role enabled) that the wiki writer can use to control whether that page is publicly visible or not. Please use this feature to control when your page should be published.
Special HTML tags (英文版)
The body section of a wiki page allows writers to use a simplified form of HTML tags to help them format their content. While the page 'Compose tips' (a link to this page is provided at the bottom of the "body" field in each wiki form) provides a detail description of each of the HTML tags supported by the Labdoo wiki system, in this section we provide additional information for some of the tags that are a bit more advanced.
Inserting images
As explained in the 'Compose tips', you can insert an image using the <img> tag. For instance, the following tag:
<img src="/profiles/labdoo/files/pictures/laptop.png" width="50"/>
generates this image:

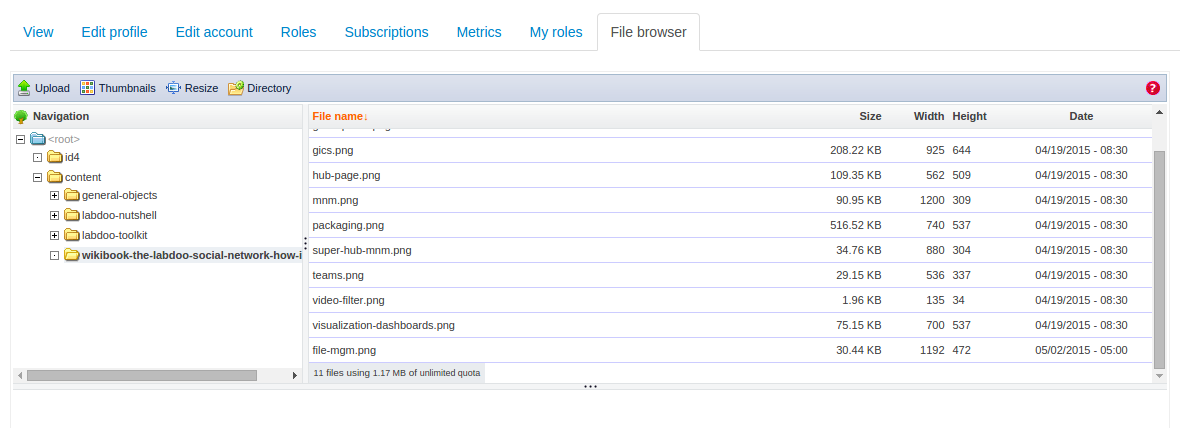
To upload the actual image, follow the next steps:
- Click on "My account" to go to your account.
- Click on the "File browser" tab. (If you don't see this tab, it's because you don't have enough permissions. Send an email to contact@labdoo.org to get your permissions upgraded.)
- You will see a file system directory tree. Next, make sure to select the folder 'content', as this is the folder used to upload images for wiki content. Please notice that if you select a folder outside 'content', your image may not correctly display in future releases of the Labdoo platform. As an option, you can also create a new directory inside 'content' by clicking on the "Directory" tab and select that new folder as the place where you upload your image. A general rule of thumb is that each new wiki book should have its own directory under the folder 'content'.
- Click on "Upload" to complete the uploading of your image.
- Double click on the image you just uploaded. This will take you to the new image page on a new browser page. You can now copy the URL of this image page from your browser. Use this URL in the "src=" field of your <img> tag.
| Figure. Through the file management interface, you can upload images and files. If you are adding images for the wiki, please make sure to upload your content inside the folder 'content'. Inside the folder 'content', it is also recommended that you create more folders to help you organize further your images and files, while reusing existing folders if the content belongs to the same category. |
|
Formatting figures in your wiki page
If you want to insert an image into your text, please follow the following format:
- Add a <hr> tag before and after your image to display a separating line.
- Add a 'Figure' capture inside <em> tags on top of the image.
- Add both the figure capture and the figure itself inside a table <table> center aligned.
Here is an example:
<hr/>

<table align="center">

<tr><td>

<em> Figure. This is the Labdoo logo.</em>

</td></tr>

<tr><td>

<img src="/profiles/labdoo/files/pictures/laptop.png" width="50"/>

</td></tr>

</table>

<hr/>
Which is displayed as follows:
| Figure. This is the Labdoo logo. |
|
|
Inserting videos
You may insert videos using the following simple tag:
For a good description on how to insert videos please directly refer to the 'Compose tips' page under the 'Video Filter' section.
Wiki Translations(英文版)
One of the goals of Labdoo is to break barriers so that education can reach out to all the regions of the world. A key to overcoming these barriers is the capability to write documents not just in one language but in as many as possible. To that end, the Labdoo wiki system provides a few simple functions facilitating the translation of any wiki doc into any other language. If you find a relevant wiki page or book that is not available in your language, we encourage you to take action and start a translation on your own.
Here are the steps to translate a wiki page or book:
- Go to 'Wiki' tab and select 'Add new content'. (Your account needs to have the role 'book writer' in order for this link to be activated. If you don't have that role enabled, send an email to contact@labdoo.org soliciting that role. You can check the list of roles assigned to your account by going to 'My account' and then clicking the tab 'My roles'.)
- Enter the translated title of the wiki page or book you are translating.
- In the field 'Language', select the language you are translating to. If your language does not show up in the list, send an email to contact@labdoo.org so that it can be added.
- Select the option 'It's a translation'.
- In the field 'Original book', select the original page or book that you are translating.
- In the 'body' field, translate the original body. It may simplify here to copy and paste the 'body' field of the original page into this field because this way you will be able to re-utilize all the HTML tags. To do so, on a separate browser tab, go to the original source page that you are translating, click on 'Edit' (as a wiki editor, you will have access to the 'Edit' tab), copy the 'body' field from there and paste it into your translated 'body' field. You can then exchange the words and sentences from the source language to the target language without altering the HTML tags.
- Just like any other book, in the field 'Book', select 'Create a new book' if this is the first page you are translating, or select the title of the translation book if otherwise.
- Select also the 'Parent item' appropriately.
何時該創建一個Wiki頁面
Labdoo平台依據wiki頁面的概念,允許用戶分享知識和最佳的實踐。當您要創建一個Wiki的頁面時,以下是一些最常見的情況:
- 編輯一個手冊來描述一個特定的過程。例如,關於如何清潔筆記型電腦或者如何使用Labdoo的社交網絡(如這個部分)的手冊是使用wiki頁面編寫的。
- 用來描述某個教育軟體應用程序的指南。例如,您可以使用wiki頁面來描述Edubuntu這個軟體中的應用程序。
- 當Labdoo社交網絡中需要一個一定級別的描述詳細訊息的頁面。例如,“關於Labdoo”或者“Labdoo的價值”的頁面是使用此Wiki系統編寫的。
- 用來翻譯任何現有wiki頁面。 Labdoo的目標之一是盡可能的包含全球的範圍。內容需要提供越多的語言越好。因此,創建wiki頁面的另一種情況是翻譯現有的wiki頁面或者書籍。
列印 Wiki 或匯出之PDF檔
在每個百科頁面的下方,都有一個叫做「列表機適用版本」的鏈接,可以提供讀者們一個可以被列印的版本。(若想進行測試,在此頁的最下方點擊「列表機適用版本」的鏈接。)若欲列印整本書,回到該本書的第一頁,并點擊該頁面最下方的「列表機適用版本」鏈接。這將帶您進入可以讓您列印一本完整的書的頁面。
這項功能也可以讓您把書本匯出之PDF檔。若與使用此功能,當您於瀏覽器中列印書本時,在選項的部份選擇「儲存至PDF檔」。(這個選項將會因瀏覽器而異。)
如何撰寫Wiki頁面
如要撰寫一個維基頁面,請遵照以下步驟:
- 點擊選單列"Wiki"並選擇"Add new content"
- 在維基表格內填入以下資訊:
- Title. 若您創造的頁面將是分類中的第一頁,此欄將是分類的標題,若此頁面將是分類中章節的第一頁,則此欄為章節標題。
- Language. 選擇您將要創作此頁維基所用之語言。
- Is this page part of an original book. 若您正在從另一個原始維基網站翻譯,在這個欄位請選擇 "It's a translation",其他情況請選擇 "It's the original" ,若您選擇前者,則會有另一欄選項,請選擇您正在翻譯的維基頁面之分類。
- Body. 在此寫下您的維基頁面的本文。此系統提供簡單的HTML語法使使用者能遵照想要的格式呈現(例如斜體,租體或標點等等。對於此類語法的描述請參考 Special HTML tags.
- Book outline. 在"Book"欄底下,若此頁面屬新分類,請點選 "create a new book",若您的新頁面與分類中的章節有關,請在清單中點選其所屬之分類,若是後者情況,在 "Parent item" 欄中選擇現存的父章節以加入成為其的子章節。
建立內部連結
若您想要在 Labdoo 網站內的頁面新增連結 (以一個維基百科連結為例),用以下字串表示相關路徑是很重要的:../. 若您想要新增維基百科的連結,請看下列範例:
<a href="../content/creating-internal-links">An example link to this wiki page</a>
以上將產生連結如下:
維基百科連結示例
在連結前加入字串 ../ 將有以下兩功用:
- 它將產生相對路徑,使得連結可以在URL路徑上被獨立使用(舉例而言,在開發者模式或要複製維基百科到其他主機時此點將會非常有用。)
- 連結將無關任何使用者所選定的語言(您可以嘗試看看改變此頁的語言後點擊連結,它將會導引至同一頁面並同時保存您所選擇的語言)
版本控制
Labdoo 百科系統提供每頁的百科 版本控制。每當使用者編輯百科頁面,其更動將會被記錄。這能夠讓使用者在必要的時候,把百科頁面還原至之前的版本,或者查看其更動。
慾使用其功能,請點擊位於百科頁面上方的「修訂」分頁。(這功能只對有「書本作者」職稱的使用者開放。)
Global Inventory Checks (GICs) (英文版)
At Labdoo, we all like the joy of seeing our laptops loaded with education software deployed in schools around the globe. But it is also very important that all the devices we deploy can eventually find their way to a recycling factory. The risk of not doing so is the generation of electronic waste in places that don't have the means to recycle technology, which is a potential problem that could defeat the good intentions of our efforts. The bias "deploy versus clean up" goes very similar to the dynamics we often see in a friends party: we all enjoy more preparing and being part of a party than to clean up the dishes after the party is over. Yet we cannot stress enough the importance of having the capability and will to recycle all electronic devices to help preserve our planet.
To help eliminate potential electronic waste, Labdoo incorporates a tool called Global Inventory Check or GIC (pronounced as in "jeek(s)"). The GIC mechanism works as follows:
-
Accessing GIC Tables. Each edoovillage project has a table (called the GIC table), in which each row corresponds to a dootronic assigned to that specific edoovillage. The table has two columns: one is for the Labdoo identifier of each dootronic and another one is used to reflect its current status. This table is used to provide an easy way to update the status of all dootronics assigned to an edoovillage.
Figure. GIC tables are found by clicking on the GIC tab of each edoovillage page.

-
Updating GIC Tables. Every 6 months (in January and in July), Labdoo issues a "call for GIC updates" and each project manager will need to do a quick inventory check of the dootronics in his/her edoovillage and update the GIC table according to the latest status of the devices. If a deployed dootronic stops working, its corresponding entry in the GIC table must be marked with the status "[S9] Deployed but not working".
Figure. If you find that a deployed dootronic stopped working, mark it with the status "[S9] Deployed but not working"

- Feedback communication. In order to update the GIC table, edoovillage managers need to be in communication with the corresponding point of contacts in the edoovillage site (the teachers, IT personnel or persons in general who are in charge of maintaining the deployed dootronics.) Through this communication, feedback can be collected to detect when a dootronic that stops working needs to be rescued.
- Rescuing dootronics. Once a dootronic is marked with the status "[S9] Deployed but not working", edoovillage managers and labdooers in charge of supporting the edoovillage need to activate a dootrip to rescue the broken dootronic and bring it back either to a hub where it can be fixed or to a proper recycling location if it cannot be repaired. If you or someone knows how to fix the dootronic, there is no need to bring it back to a hub, you can go ahead and fix it too.
A final comment about GICs is that besides using them to help you track broken deployed dootronics, they can generally be used to quickly update all the dootronics assigned to an edoovillage in one shot. Often, updating the status of a dootronic (e.g. from status T1 to status S4) needs to be done on several dootronics that are all associated with the same edoovillage. The GIC table shows you in one page all these dootronics, allowing you to change their status at once in just a few clicks.
Managing Hubs(英文版)
Labdoo is a distributed collaborative platform that operates with very little hierarchy. This is important to ensure a sustainable and organic growth path, since hierarchies tend to generate bottlenecks and often add unnecessary management overheads. That means that when it comes to take action to help bring education to children and help reduce electronic waste, everyone can participate, the young, the adults or the elders, from anywhere, whether you have 5 minutes or a few hours of spare time.
You can participate as an individual (e.g., sanitizing your own laptop once you no longer use it) as part of the grassroots and if you decide that you want to unite forces with some other friends and do more to serve the Labdoo cause, you can optionally create your own hub. As part of a hub, you will have some additional tools to help manage your inventory and increase your presence within the platform to better outreach the local and global communities.
Please find detail information about managing a Labdoo Hub here .
超級活動中心
超級活動中心是一個包含許多相同地理位置的活動中心的活動中心。超級活動中心為 Labdoo 系統提供了兩項額外的功能:
- 他們被允許在自己的區域裡創立活動中心。 這項功能使創立活動中心去中心化,提供一個更加穩定的成長路徑以及去除那些中心化的瓶頸。
- 他們能夠擁有屬於自己的網站頁面。 超級活動中心能夠創立屬於自己的 Labdoo 頁面,以便能夠讓一些區域性的活動更加的局部化。比如說,他們能夠使用特定的語言來撰寫一些資訊性的頁面,以便能夠讓更多位於該區域互動中心的使用者們閱讀。
再接下來的兩個部份,我們將會更加深入的討論上述兩項功能。
Adding a Superhub Page(英文版)
Users with the superhub role are also allowed to create new pages in the labdoo.org platform to help manage the outreaching activities in their own regions. This feature allows this type of users provide localized content that is specific to the region they are covering.
To create a superhub page, follow the next steps (you will need to have the superhub role assigned to your user):
-
Go to the main navigation menu and click on 'Hubs', then on "[Superhub] Create content".
Figure. This is the Labdoo logo.

-
Fill in the fields to generate a new page:
- Title. Choose a title to help identify your page (the title will not be displayed, it is only used to help you identify the page.)
- Type. Choose 'Page' to create a page with content. (Later we will choose "Menu block' to help create a table of contents for our pages.)
- Body. Create here the actual body of the page. To format your page, you can use any of the allowed HTML tags. See the sections 'Compose tips' and 'Special HTML tags' for descriptions on how to use HTML tags for your page body.
- Click 'Save'. At this point, you have created one single page of content. Next, repeat steps 1, 2 and 3 to create as many pages as you need to. Once you are done creating all your pages, go to the next step to create a menu block of your pages.
-
To create a menu block, do as if you wanted to create a page, except that in the field 'Type' you need to select the option 'Menu block'. A new field called 'Linked pages' will show up. In this field, add all the pages where you want your menu block to show up. Next, in the 'Body' field, you need to create a menu of all your pages. This is basically an HTML list of links, with each link pointing to one of your pages created in steps 1, 2 and 3, enabling site visitors a quick menu access to each of the pages. To create the body of your menu block, you can copy and paste the following code sample and modify it according to your pages:
<a href="URL1">Title Page 1</a>
<a href="URL2">Title Page 2</a>
<a href="URL3">Title Page 3</a>
<a href="URL4">Title Page 4</a>Substitute 'URL{1,2,3,4}' for the URLs of your pages removing the host name. For instance, if the URL of a page is
https://www.labdoo.org/content/adding-superhub-page, then use '/content/adding-superhub-page'. Substitute also 'Title Page {1,2,3,4}' for the title of each specific page.
When done, click on 'Save' to create your menu block.
At the end of this process, you will have created a set of pages and a menu block linked to the pages. Your site visitors will be able to browse all your pages by using the menu block.
If you also want to create a 'URL redirect' of your pages (for instance, if you want to map the URL https://www.labdoo.org/content/superhub-page-regionA to https://regionA.labdoo.org), please email contact@labdoo.org requesting the mapping.
Creating New Hubs(英文版)
Labdoo users who have the "superhub" role assigned are allowed to create new Labdoo hubs. (For information on what a hub is, please refer to the Hubs Section in the 'Values and Principles' wiki book.) The process of creating a new Labdoo hub is as follows:
- Initial contact. The group soliciting to create a hub contacts Labdoo. This can be done through different ways, including getting in touch with an existing neighbor hub or by directly emailing contact@labdoo.org. Such request is propagated to the Labdoo superhub in charge of the region where the new hub is to be created.
- Explaining what a Labdoo hub is. The superhub explains the potential hub manager candidates how a Labdoo hub works. It is recommended to do such communication using a phone call (can be a regular or Internet-based phone call) to ensure a proper conversation.
- Creation of Labdoo user accounts. Once decided that the hub is to be created, if the candidates don't have a Labdo user account yet, they need to create one for each of the users that will be managing the hub by going to https://www.labdoo.org/user/register.
-
Creation of the hub. The superhub creates the new hub by going to the create hub page (this page is available only to users who have superhub rights and it can be found under the 'Hub' tab in the 'Main Navigation Menu') and filling in all the necessary information:
- Title. Fill in the title following the naming convetion 'Labdoo Hub HUBNAME', where HUBNAME can be the name of the city or town where the hub is located, the name of a certain suburb, district or community inside a city, or the name of the organization (such as the name of the school, university, NGO or company) hosting the hub. For examples of names, look at the existing list of hubs.
- Location. Add the location of your hub and use the map interface to pin down its GPS coordinates.
- Hub manager(s). Add the usernames of the users who will be managing this hub.
- Parent hub. Some hubs exist as supporting branches of other hubs. For instance, in certain cities, a main hub will have the help of other smaller hubs distributed across various suburbs. These smaller hubs are generally referred as 'branch hubs'. If you are creating a branch hub, select in this field its parent hub. Otherwise, select 'None' in this field. To see tree view of all the hubs and branches, refer to the 'Hubs (tree view)' page under the 'Explore' tab.
- Hub type. Select the type of supporting functions the new hub will provide. If the hub can be used as a dropping and storage location where people can bring their contributed dootronics, then check the box 'Dropping point'. If the hub is capable of sanitizing dootronics, check the box 'Sanitizing point'. Multiple boxes can be checked at the same time.
- About this hub. If you want to add additional information about this hub, you can do so in this field.
- Additional editors. Besides the hub managers, if you would like to give other users the rights to edit this hub, you can do so by adding them in this field.
-
Assigning roles. In the last step, the users in charge of managing the hub need to be given the additional role of 'hub manager'. To do this, go to each user page
https://www.labdoo-dev.org/users/USERNAME(where USERNAME is the username of the user), click on the tab 'Roles', and activate the checkbox 'hub manager' as illustrated in the next figure.Figure. To assign the 'hub manager' role, go to that user's page, click on 'Roles' and select the appropriate checkbox. 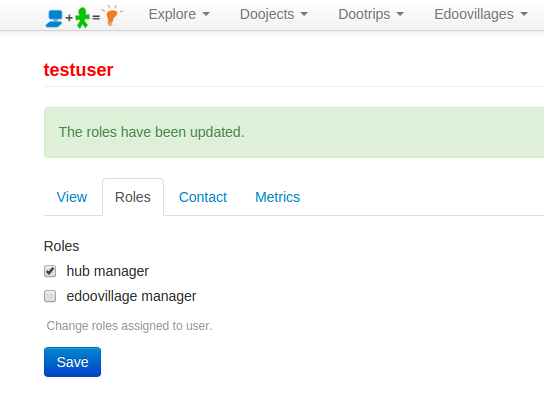
After the above steps, the new hub managers can start their hub activities as described in the Hubs Section of this wiki book.
管理 Dootrip
Dootrips, 或是 Labdoo 旅程,是用來載送筆記型電腦、平板電腦等的零二氧化碳排放的交通工具。
Dootrips 可以是由旅客、非政府組織的自願者、國際學生、國際性公司的職員等所規劃的旅途。Dootrips 是在整個 Labdoo 平台裡,期中重要的一環,用來把一些預載了教育軟體的筆記型電腦或平板電腦,在不排放額外的二氧化碳的情況下,提供給那些有需要的學校。
在下一個部份裡,我們將討論如何創立及管理 Dootrips.
Automatic Notifications and Managing your Dootrips(英文版)
To facilitate the process of communicating and managing dootrips, Labdoo users involved in a dootrip can receive any of the following automatic email notifications:
- Travelers and related users upon dootrip creation. Every time a dootrip is created, the travelers and users related to that dootrip receive a notification email.
- Labdoo users who have projects in the dootrip's destination country. When a dootrip is created, a notification email is sent out to all Labdoo users who manage an open edoovillage in a country equal to the destination country of the dootrip. This allows these users to know about the existence of that dootrip, giving them the option to claim the resource for the transport of dootronics to that edoovillage.
- Travelers and related users upon dootrip expiration. When a dootrip expires, if it's status is still pending, a notification email is sent out to travelers and users related to that dootrip to remind them to update the dootrip status.
How to Register a Dootrip(英文版)
Dootrips (or Labdoo trips) are CO2-neutral transportation means used to carry dootronics (laptops, tablets, etc.) from one location to another. Examples of dootrips are trips carried out by tourists, NGO volunteers (doctors and engineers without borders, humanitarian personnel, etc.), international students, employees of international corporations, etc. Dootrips constitute a key element within the Labdoo platform to help deliver laptops and tablets loaded with educational software to needy schools without incurring additional CO2 emissions on the planet.
If you are traveling and have place in your luggage to bring one or more dootronics (laptops, tablets, etc.), or if you are part of an organization or company which has people traveling or which transports goods from one place to another and have extra room to bring a few more goods, you can register a dootrip to the Labdoo platform. This allows the system to identify routes that connect places where there are unused dootronics with places where dootronics are needed for education purposes.
The steps to register a dootrip are as follows:
- In the 'Dootrips' tab located on the top of each Labdoo page, click on 'Create' (make sure you are logged in with your user account).
- Fill in as many fields in the form as you can. If you already know the dootronics that you will carry in your dootrip, you can add them in the field 'Dootronic identifiers'. If you don't know them yet, you can leave this field empty, and you or some one else can make the assignment some time in the future. Set the status as 'Pending'.
- Click on 'save'.
Once you have carried out your dootrip, it is important to modify the field 'Status' to 'Completed'. If for some reason the dootrip was cancelled, set this field to 'Cancelled'.
Managing Subscriptions (英文版)
Nice Tricks (英文版)
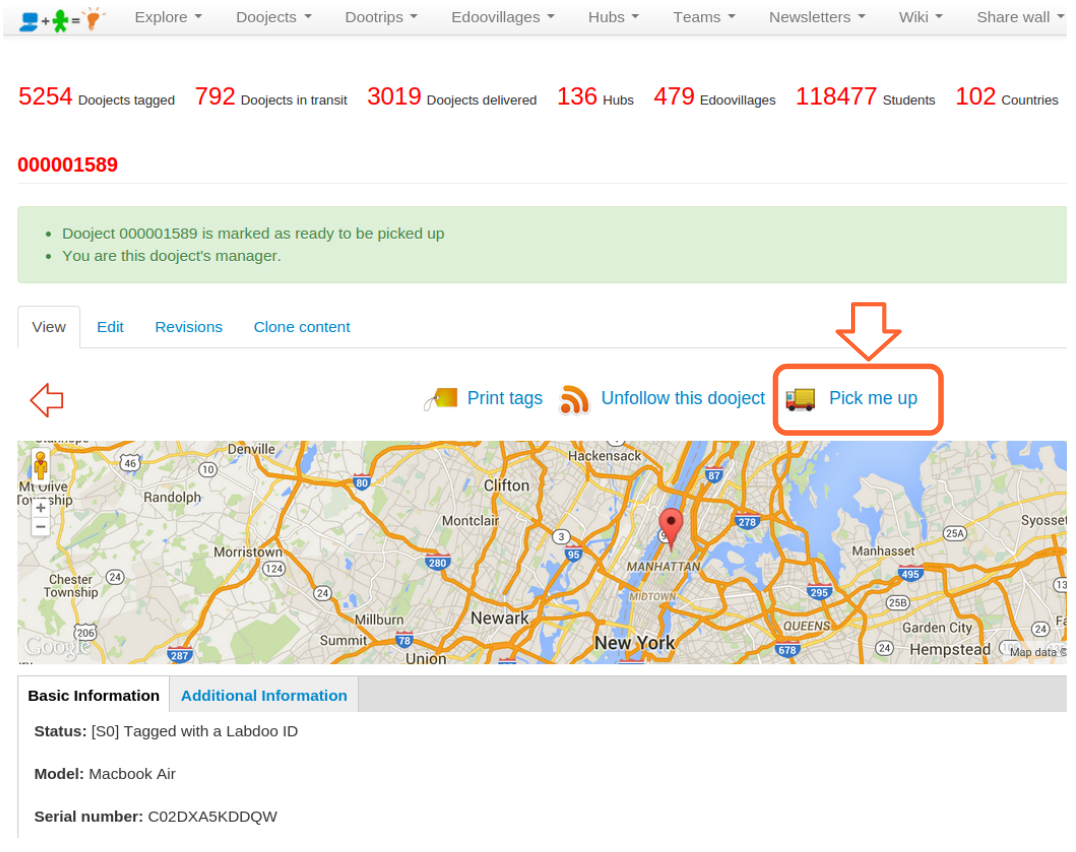
Pick Me Up - 準備交付
1. Dootronic參與者:
Pick me up“功能致使使貢獻dootronics(筆記本電腦,平板電腦等)的過程盡可能方便。原理很簡單:你有一個不再使用筆記型電腦在家裡,但是你是太忙沒有很多時間去 處理捐贈的問題嗎?按照這些非常簡單的步驟,應該只需要花幾分鐘的時間:
- 標記你捐獻的dootronic.你可以像往常一樣,點擊選單'dootronics',接着點選子選項'標記它!'。然後填寫表格上有關你dootronic的相關資料,然後單擊保存。 此步驟應該只需要花少於5分鐘的時間。
- 點擊打印標籤鏈接. 你可以像往常一樣,點擊選單'dootronics',接着點選子選項'標記它!'。然後填寫表格上有關你dootronic的相關資料,然後單擊保存。 此步驟應該只需要花少於5分鐘的時間。
- 接着點擊'Pick me up'的鏈接就完成了! 通過點擊'Pick me up'鏈接,你告訴了Labdoo團隊,可以從當前的位置领取你捐赠的筆記本電腦。由Labdoo中心志工定期讀取這些'Pick me up'的信息。應該有人從附近的Labdoo活動中心聯絡你領取您捐獻的dootronic。這點擊 Pick me up 鏈接的步驟應只需要花您幾秒鐘的時間!
使用'Pick me up'按鈕,连接到Labdoo後勤系統,讓你只花約10分鐘的時間就可以貢獻你的dootronic。我們的日常生活往往都是繁忙的,但我們的設計團隊盡量簡化捐贈過程,讓大家沒有理由不讓你未使用的筆記本電腦和教育設備幫助貧困的學校!
一如往常,如果您有任何提高這個和其他Labdoo功能的建議,請通過 '軟件開發團隊'分享它。
| 图示. 一旦你標記了一個dootronic,如果你希望附近的Labdoo中心的志工领取你的dootronic,请點擊“Pick me up”,。 |
|
2.活動中心團員:
如果您屬於一个活動中心,您可以由'dootronic'下點擊'查看'列表来檢查附近標記為'pick me up'的dootronics。這將帶你到dootronics全球儀表板。現在點擊'Fields '按鈕,選擇'Pick me up'選項。這將在每個dootronic添加一的'Pick me up'的標誌。點擊頂部的標題欄,對於那些需要被领取的dootronics,你會看到標記值為yes。請記住,你可以通過選擇國家/地區選項降低你的搜索範圍。
電子報
「電子報」這項功能能夠讓您創立自己的電子報,以便讓您能夠與您的區域團體保持聯繫。這項功能讓您:
- 維護一個已訂閱您的電子報的使用者名單。當使用者於 Labdoo.org 註冊時,他們將會被給予一個是否訂閱您的電子報選項(這項功能也可以位他們的用戶首頁中找到。這能夠讓您創立自己追隨者的社群,以及透過電子報定期的與他們聯繫。
- 創立,編輯,并定期的發佈文章。在報紙的管理界面裡頭,您可以創立并編輯您的文章。當您完成編輯時,在同一個界面里有著一個讓您發佈文章給您的追隨者的按鈕。該群讀者們將會透過電郵來接收您的電子報。
Managing Your Own Newsletters(英文版)
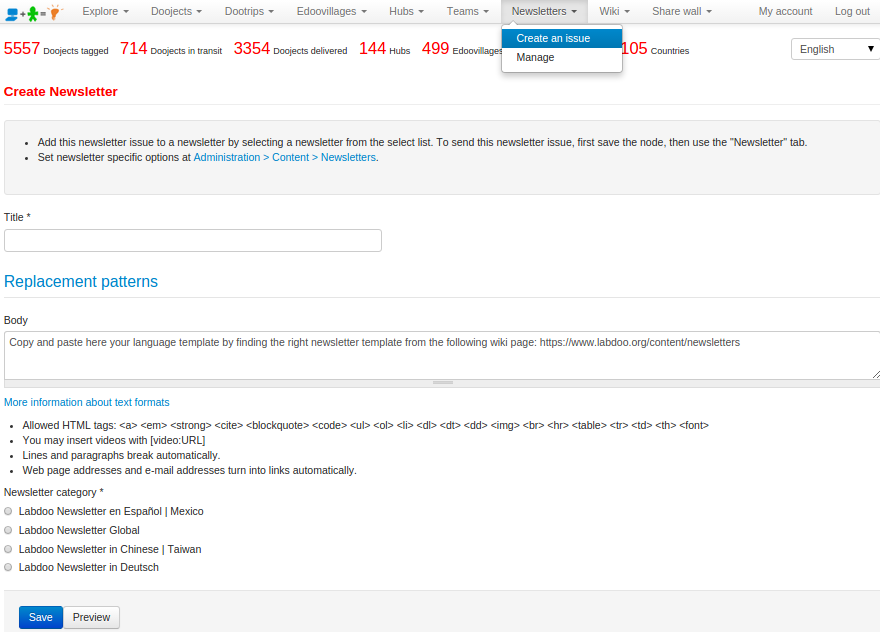
If you want to manage your own newsletter, please send an email to contact@labdoo.org and ask the Labdoo team to assign the role of 'Newsletter manager' to your account. Once this is done, you will see a new 'Newsletter' tab on the top Main Navigation Menu. By clicking on 'Newsletter' and then 'Create an issue' you will be taken to a dashboard where you can create and edit your newsletter as shown in the next figure.
| Figure. Click on 'Newsletter' and 'Create an issue' to go to the newsletter edit dashboard. |
|
You will need to select a title for your newsletter as well as the 'Newsletter category' corresponding to the newsletter your are managing.
The 'body' field includes the actual content of your issue. Start by copying and pasting from one of the templates that you will find in this wiki section. After that, edit the 'Issue' number and the 'Date'. Finally, add each of your news entry by simply copying and pasting the following template codeblock and by modifying the text and image according to the news entry.
<td colspan="2">

<font color="#666666" size="4">Title of This News Entry Here</font>

Write here one or two paragraphs describing this news entry.

<img src="/sites/default/files/styles/labdoo_flexslider_image_style/public/lbd_slides/guinea-conakry.png" width="680"/>

</td>
Once you are done editing your newsletter and have ensured that it is correct, you can submit it to your list of subscribed users by clicking on the tab 'Newsletter' and then selecting 'Send newsletter'. Notice that the system allows you to also send yourself a sample of the newsletter issue by selecting the option 'Send one test newsletter to the test address'. We recommend you to do so prior to sending the final version out to your whole audience.