Labdoo Wiki
The Labdoo platform allows users to create their own wiki pages. To do so, your user will need to have the role of "book writer". If you don't have this role assigned and would like to write wiki pages, please email contact@labdoo.org. (You can check the current roles assigned to your user by going to 'My account' and then clicking the tab 'My roles'.)
When to Use Wiki Pages
The Labdoo platform relies on the concept of wiki pages to allow users share knowledge and best practices. Here are some of the most common situations in which you will want to create a wiki page:
- A manual to describe a certain process. For instance, the manual on how to sanitize a laptop or the manual on how to use the Labdoo social network (such as this section) are written using wiki pages.
- A guide to describe a certain education software application. For instance, you can use wiki pages to describe an application within the Edubuntu software package.
- A page within the Labdoo social network that requires some level of description detail. For instance, the "About Labdoo" page or the "Labdoo Values" pages are written using this wiki system.
- Translations of any existing wiki pages. One of the goals of Labdoo is to be as globally inclusive as possible. That entails providing content in as many languages as possible. Therefore, another situation in which you will want to create a wiki page is the need to translate an existing wiki page or book.
How to Create Wiki Pages
To create a wiki page, follow the next steps:
- Click on the "Wiki" tab and select "Add new content".
- In the wiki form, fill in the following sections:
- Title. If the page you are creating is the first page of a book, this field corresponds to the book title. If the page is a section within a book, this field corresponds to the section title.
- Language. Choose the language you are using to write this wiki page.
- Is this page part of an original book. In this field, if you are translating a page from another original wiki page, select "It's a translation". Otherwise, select "It's the original". If you select "It's a translation", a new field will pop up asking for the original book. In this field, select the book you are translating the wiki page from.
- Body. Write here the actual body of your wiki page. The wiki system supports a simplified set of HTML tags which allows writers to format their text (e.g., bold, italic, bullet points, etc.). For a description of these metatags, see the section Special HTML tags.
- Book outline. Under the "Book" field, if this is a new book, select "create a new book". Otherwise, if your new page corresponds to a section or chapter of a book, select the book it belongs to from the list. In this latter case, in the field "Parent item" select the existing parent section to which you want to attach the new page as a child page.
Special HTML tags
The body section of a wiki page allows writers to use a simplified form of HTML tags to help them format their content. While the page 'Compose tips' (a link to this page is provided at the bottom of the "body" field in each wiki form) provides a detail description of each of the HTML tags supported by the Labdoo wiki system, in this section we provide additional information for some of the tags that are a bit more advanced.
Inserting images
As explained in the 'Compose tips', you can insert an image using the <img> tag. For instance, the following tag:
<img src="/profiles/labdoo/files/pictures/laptop.png" width="50"/>
generates this image:

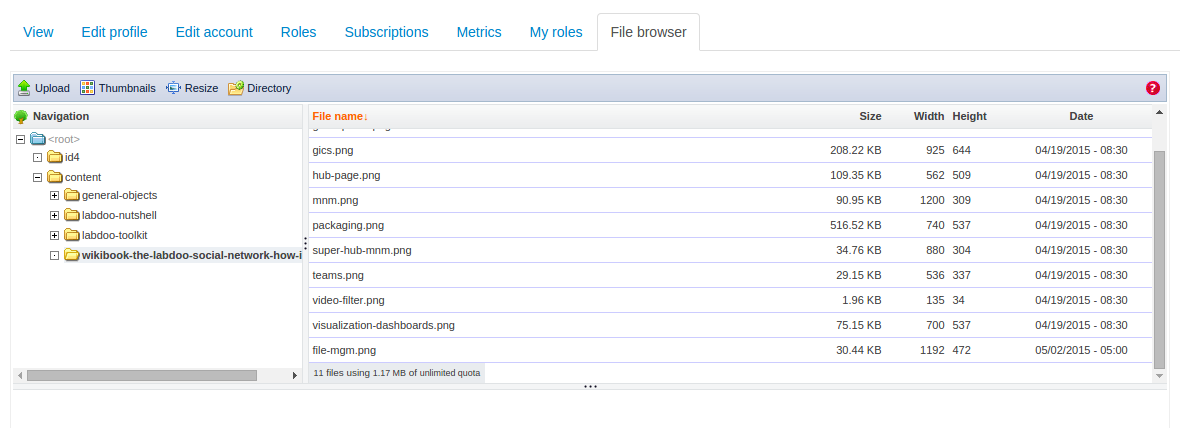
To upload the actual image, follow the next steps:
- Click on "My account" to go to your account.
- Click on the "Manage files" tab. (If you don't see this tab, it's because you don't have enough permissions. Send an email to contact@labdoo.org to get your permissions upgraded.)
- You will see a file system directory tree. Next, make sure to select the folder 'content', as this is the folder used to upload images for wiki content. Please notice that if you select a folder outside 'content', your image may not correctly display in future releases of the Labdoo platform. As an option, you can also create a new directory inside 'content' by clicking on the "Directory" tab and select that new folder as the place where you upload your image. A general rule of thumb is that each new wiki book should have its own directory under the folder 'content'.
- Click on "Upload" to complete the uploading of your image.
- Double click on the image you just uploaded. This will take you to the new image page on a new browser page. You can now copy the URL of this image page from your browser. Use this URL in the "src=" field of your <img> tag.
| Figure. Through the file management interface, you can upload images and files. If you are adding images for the wiki, please make sure to upload your content inside the folder 'content'. Inside the folder 'content', it is also recommended that you create more folders to help you organize further your images and files, while reusing existing folders if the content belongs to the same category. |
|
Formatting figures in your wiki page
If you want to insert an image into your text, please follow the following format:
- Add a <hr> tag before and after your image to display a separating line.
- Add a 'Figure' caption inside <em> tags on top of the image.
- Add both the figure caption and the figure itself inside a table <table> center aligned.
Here is an example:
<hr/>

<table align="center">

<tr><td>

<em> Figure. This is the Labdoo logo.</em>

</td></tr>

<tr><td>

<img src="/profiles/labdoo/files/pictures/laptop.png" width="50"/>

</td></tr>

</table>

<hr/>
Which is displayed as follows:
| Figure. This is the Labdoo logo. |
|
|
Inserting videos
You may insert videos using the following simple tag:
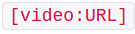
For example:
[video:https://www.youtube-nocookie.com/watch?v=Gpo-7GjFydw]
For a good description on how to insert videos please directly refer to the 'Compose tips' page under the 'Video Filter' section.
Creating Internal Links
If you need to create a link to a page that lives inside www.labdoo.org (for instance, a link to another wiki page), it's important to use relative paths starting with the string ../. For instance, if you want to create a link to this wiki page, follow this example:
<a href="../content/creating-internal-links">An example link to this wiki page</a>
Which generates this link:
An example link to this wiki page
Using the string ../ in front of your internal links serves two goals:
- It generates a relative path, so that the link can be used independent of the URL base path (this is helpful for instance in development mode or when cloning the wiki to other hosts).
- It allows the link to work regardless of the language selected by the user. (You can test this feature by changing the language of this page and then clicking on the link, it should take you to this same page while preserving the selected language.)
Wiki Translations
The goal of Labdoo is to break barriers so that education can reach out to all the regions of the world. A key to overcoming these barriers is the capability to write documents not just in one language but in as many as possible. To that end, the Labdoo wiki system provides a few simple functions facilitating the translation of any wiki doc into any other language. If you find a relevant wiki page or book that is not available in your language, we encourage you to take action and start a translation on your own.
Here are the steps to translate a wiki page or book:
- Go to 'Wiki' tab and select 'Add new content'. (Your account needs to have the role 'book writer' in order for this link to be activated. If you don't have that role enabled, send an email to contact@labdoo.org soliciting that role. You can check the list of roles assigned to your account by going to 'My account' and then clicking the tab 'My roles'.)
- Enter the translated title of the wiki page or book you are translating.
- In the field 'Language', select the language you are translating to. If your language does not show up in the list, send an email to contact@labdoo.org so that it can be added.
- Select the option 'It's a translation'.
- In the field 'Original book', select the original page or book that you are translating.
- In the 'body' field, translate the original body. It may simplify here to copy and paste the 'body' field of the original page into this field because this way you will be able to re-utilize all the HTML tags. To do so, on a separate browser tab, go to the original source page that you are translating, click on 'Edit' (as a wiki editor, you will have access to the 'Edit' tab), copy the 'body' field from there and paste it into your translated 'body' field. You can then exchange the words and sentences from the source language to the target language without altering the HTML tags.
- Just like any other book, in the field 'Book', select 'Create a new book' if this is the first page you are translating, or select the title of the translation book if otherwise.
- Select also the 'Parent item' appropriately.
Publishing and Unpublishing
It is important to not make a wiki page publicly available until its text has been carefully proofread and corrected from any typos and grammatical mistakes. This is to ensure that all content abides to a minimum standard of quality.
To accomplish this, each wiki page has a tag on its top called 'Publish/Unpublish' (this feature is only available to users who have the 'book writer' role enabled) that the wiki writer can use to control whether that page is publicly visible or not. Please use this feature to control when your page should be published. Notice also that only users with the 'book writer' role will be able to see unpublished pages, to all other users such pages are not visible nor searchable.
Allowing Other Users to Edit a Wiki Page
Because the wiki is designed to be a collaborative tool, often we need to allow other users access to edit wiki pages. There are two methods to allow other users to edit wiki pages:
- Coarse grained access to edit wiki pages. If you are a superhub manager, you can use the 'Role Delegation' method to give a user the right to edit any wiki page. This method is explained under the section Role Delegation of this Manual. Please notice that using this method, if you assign the role 'wiki writer' to a user, then this user will be able to edit all the wiki pages. Use this coarser grain method with care and only to assign edit rights to users who feel comfortable editing wiki pages.
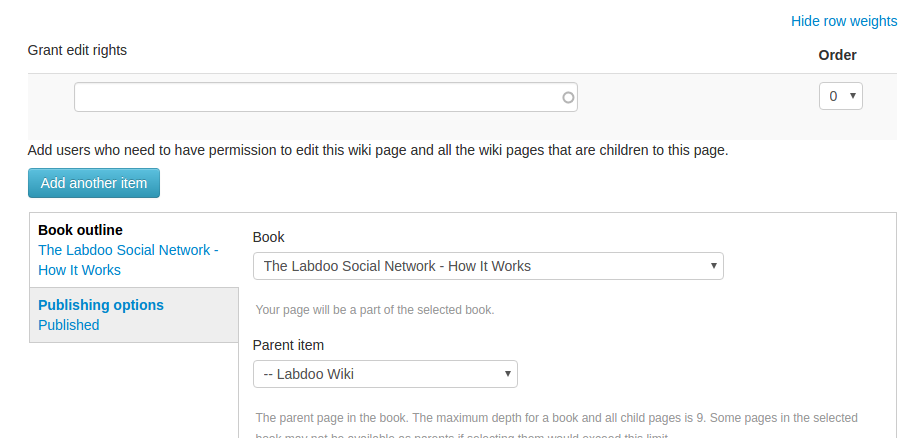
- Fine grained access to edit wiki pages. Some times we only want to grant a user access to edit a few pages (not all the wiki pages). You can achieve this by going to that specific wiki page, clicking on the 'Edit' tab, and then adding the user we want to grant edit rights to the field 'Grant edit rights' (See picture below). Notice that this will give the user access to edit only that wiki page and all of its children wiki pages.
| Figure. To grant a user the right to edit a specific wiki page, click on the 'Edit' tab of that wiki page and add the user to the field 'Grant edit rights'. Doing this will allow the user to edit this wiki page as well as all of its children wiki pages. |
|
Revision Control
The Labdoo wiki system provides revision control on each of the wiki pages. Every time a user modifies a wiki page, the changes are tracked. This allows for instance to roll back changes that were introduced by mistake or to see when certain changes were introduced.
To use this feature, click on the 'Revisions' tab that you will find on the top of each wiki page. (This feature is only available to users who have the 'book writer' role enabled.)
Printing a Wiki Book or Exporting it as a PDF
Every wiki page has at its bottom a link labeled 'Printer-friendly version' which viewers can use to generate a printer friendly version of that page. (To test it, click on the same link you will find at the bottom of this page.) To print the complete book instead of a single page, go to the first page of the book and click on its 'Printer-friendly version' link, it will take you to a page containing the whole book.
This feature can also be used to export the book into a PDF file. For that, when printing the book using your browser printing option, select the option to save it as a PDF. (This option will depend on the browser you are using.)
Offline Access to the Labdoo Wiki
To download a wiki so that it can be accessed offline, you can use openly available tools that allow you to download a World Wide Web site from the Internet to a local directory. One tool that people have successfully used to download the Labdoo Wiki is called HTTrack, which is available for free (under GPL, libre/free software license) from http://www.httrack.com/.
This type of tools come very handy for instance when you want to include a certain wiki book into a laptop that you are going to bring to a school that may have limited Internet access. If you have any questions on how to use these tools, you can ask around in the Quality Assurance team wall.
HTTrack documentation (overview) https://www.httrack.com/html/index.html
HTTrack how to use https://www.httrack.com/html/shelldoc.html (beginners)
HTTrack Manual https://www.httrack.com/html/fcguide.html (experts)
The Labdoo Team has collected and prepared for you these useful offline wikis:
https://www.labdoo.org/wiki-index
https://wiki.lxde.org/en/Main_Page
https://wiki.ubuntu.com/
https://help.ubuntu.com/
These wikis will be updated and can be downloaded from our FTP server http://ftp.labdoo.org/download/Public/.
Best Practices
While there is quite a bit of flexibility when writing your own wiki books, it is important to follow certain best practice rules to ensure that the content provided within the Labdoo platform is of good quality. As a wiki writer, please follow the next recommendations:
- Keep it simple. You have the option to use HTML markup tags, but it is recommended to only use them if you really need them. An important rule is to keep things simple so they are easier to maintain. When it comes to wiki, simple is better.
- Use links with relative paths. Please check this wiki entry on how links should be created.
-
Ensure HTML tags are correctly written. Try to not overuse them, but if you do use some HTML tags to format your wiki pages, ensure that they are correctly written. All tags need to have an open clause and a closing clause. For instance:
<em>text here</em>. If your tag does not include any object inside (such as the new line tag<br>or the horizontal line tag<hr>), then you have two options: you can use either<br></br>(without any object between the clauses) or the more compact version<br/>. This first best practice is specially important because the Labdoo system provides automatic back ups of all the wiki content which needs to parse all the wiki pages, and if the tags are not correctly set up, the parsing process can break. - If in doubt, follow this wiki book as an example. The wiki book you are reading right now, is made using the same system that you use to write your own. Therefore, if in doubt on how to write a certain page, please come to this guide and check how it was written. As a book writer, you have enough user permissions to click on the "Edit" tab found on the top of each of the pages in this book (make sure you are logged in to see the "Edit" tab), which will allow you to see how each field was filled in.
- Capitalize titles. Please capitalize the first letter of the words in the title of each wiki page. For instance, the title of this page is "Best Practices", not "best practices" and not "Best practices". This helps keep consistency.
- Consistency. Please keep consistency across your document. Wiki books can be written in many different ways and styles, but once you decide to do things in a certain way, keep it consistent across your document. This will make your text more pleasant to readers.
- Spell check and proof read your text. Please ensure that there are no spelling and grammar errors in your text, and make sure you proof read it multiple times. It is very recommended that you have some one else read the text and help you correct it, if possible someone who is good at spelling and grammar. For instance, try to have in your team or community a volunteer that can help you with this task.
- Save your text often. Make sure you save your text often, this will ensure that your work is properly stored and that your format is correct.
How to Structure Content
The general structure of the Labdoo wiki system is similar to other standard wiki systems (such as the Wikipedia) and hence it is fairly free style. That means that there is no need to have a lot of synchronization on what types of documents are created. If you believe that a certain article or document belongs to the Labdoo wiki system, then in general you can go ahead and create it. The wiki is an open system and your work will be subject to peer reviewing by other Labdooers so that if the new document is inappropriate to the subjects of interest in the Labdoo platform, then you will be given instructions on how to edit the content. As in any open wiki system, inappropriate content can be unpublished at any time, to ensure the wiki abides to certain standards of quality and relevancy.
Besides the above general 'free style' principle, the wiki does have a few categories of documents that are considered core to the Labdoo platform and standard for all available languages. When writing a new document, one needs to first consider if the new page belongs to any of these categories and structure the document accordingly, ensuring that there is no overlapping and that the new text follows a smooth reading experience with respect to the core documents. Here is the list of core documents/categories:
- The Labdoo Social Network - How It Works. The user manual describing how the Labdoo system works from a user perspective. This page belongs to it. [link]
- Values, Philosophy and Principles of the Labdoo Project. A description of the principles of the Labdoo project, including the goals and the approach taken by the platform. [link]
- dootronic Sanitation Guide. This document provides a comprehensive guide on how to sanitize devices that can be used for education purposes. [link]
- Labdoo Toolkit. The 'Labdoo Toolkit' includes documents that are needed to carry out Labdoo activities, including request forms, logos and drawings that you can use to run your own local campaigns, email templates to simplify the process of replying to solicitors, dootripper letters that can be used when traveling, etc. [link]
- Education Applications. In this category, wiki writers provide descriptions of the education applications that are part of the devices deployed by Labdoo in schools. This can include descriptions of the offline wikipedia, of the applications found in the Edubuntu package, or in general of any of the many education applications that dootronics come preloaded with.
The general principle to add content to the wiki system is as follows: if the subject of the new wiki page belongs to any of the above core categories, then consider adding the new page as part of the above documents; otherwise, you can create a new wiki book.
Reordering Wiki Pages
Wiki books have multiple wiki pages, each page being a section inside the book. When you create or manage a wiki book, you will most likely need to rearrange the order in which each of these sections is presented. For instance, if you have a book consisting of three wiki pages called "Introduction", "Initial Steps", "Advanced Steps", it is logical that you would like to order these sections in the book by presenting first the section "Introduction", then the section "Initial Steps" and lastly the section "Advanced Steps".
To rearrange the order of pages in a wiki book, do the following:
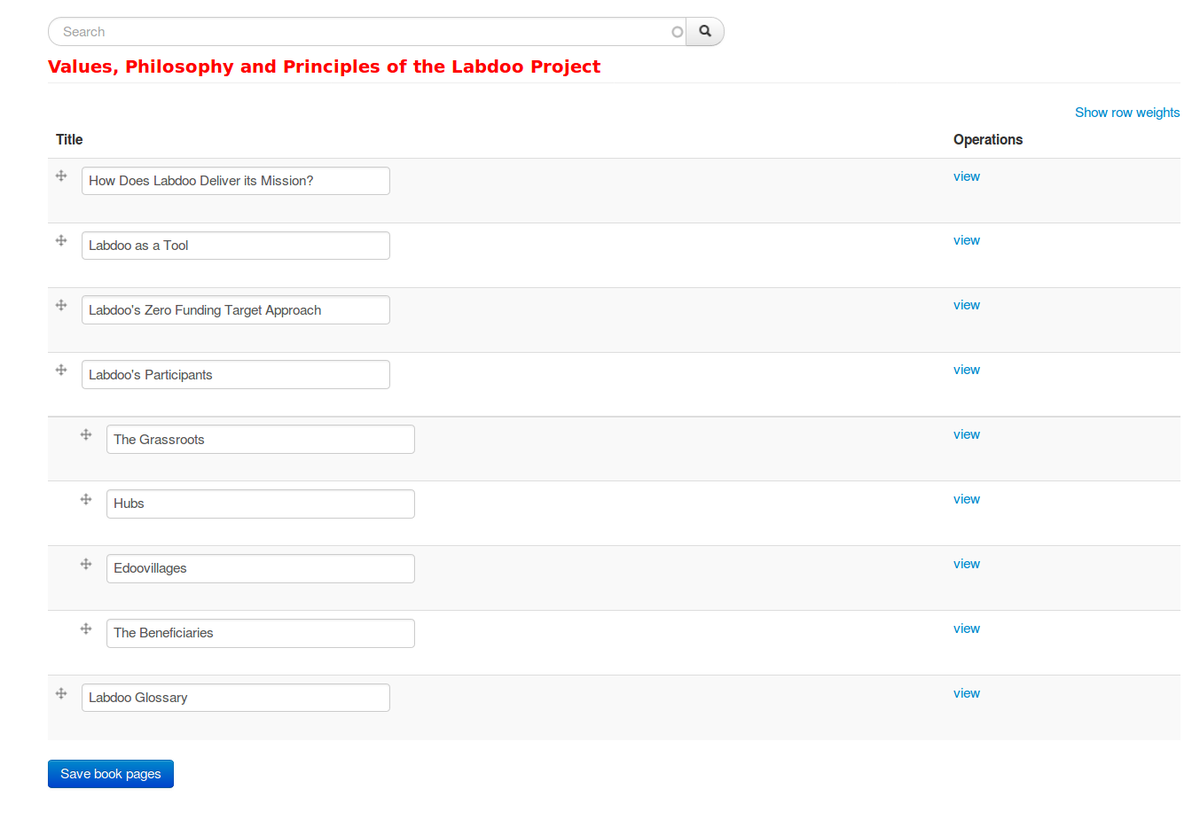
- Go to the book page you want to rearrange. For instance, go to the book "Values, Philosophy and Principles of the Labdoo Project". Then click on where it says "Reorder this book's hierarchy" on the upper right part of the page.
- This will present you the list of page subtitles in the book. On the left side of each page subtitle, you will see a small icon with a cross. Click on this icon and you will be able to drag this element up or down the list. This will allow you to reorder each of the elements. In some browsers, if you don't see the small icon with a cross, then you can also rearrange the order of books by using the weights. A lower value on the weight of a page means that that page will be displayed first.
- When you are pleased with the reordering, click on the button "Save book pages" at the bottom of the page. Your new page ordering is now saved. You can now click on any of the "view" links to go back to the book.
| Figure. On the reordering page of a book, click on the small icons with a cross located at the left of each element and drag that element up or down to position it in the right location. You can also use the numerical weights to reorder the content. |
|
Detecting and Correcting Broken Links
The Labdoo Wiki engine has a module to detect broken links. This module runs in the background automatically from time to time, scanning Labdoo wiki pages and checking for broken links, so you don't have to manually do that by yourself. This means that using this feature is very simple, as described next.
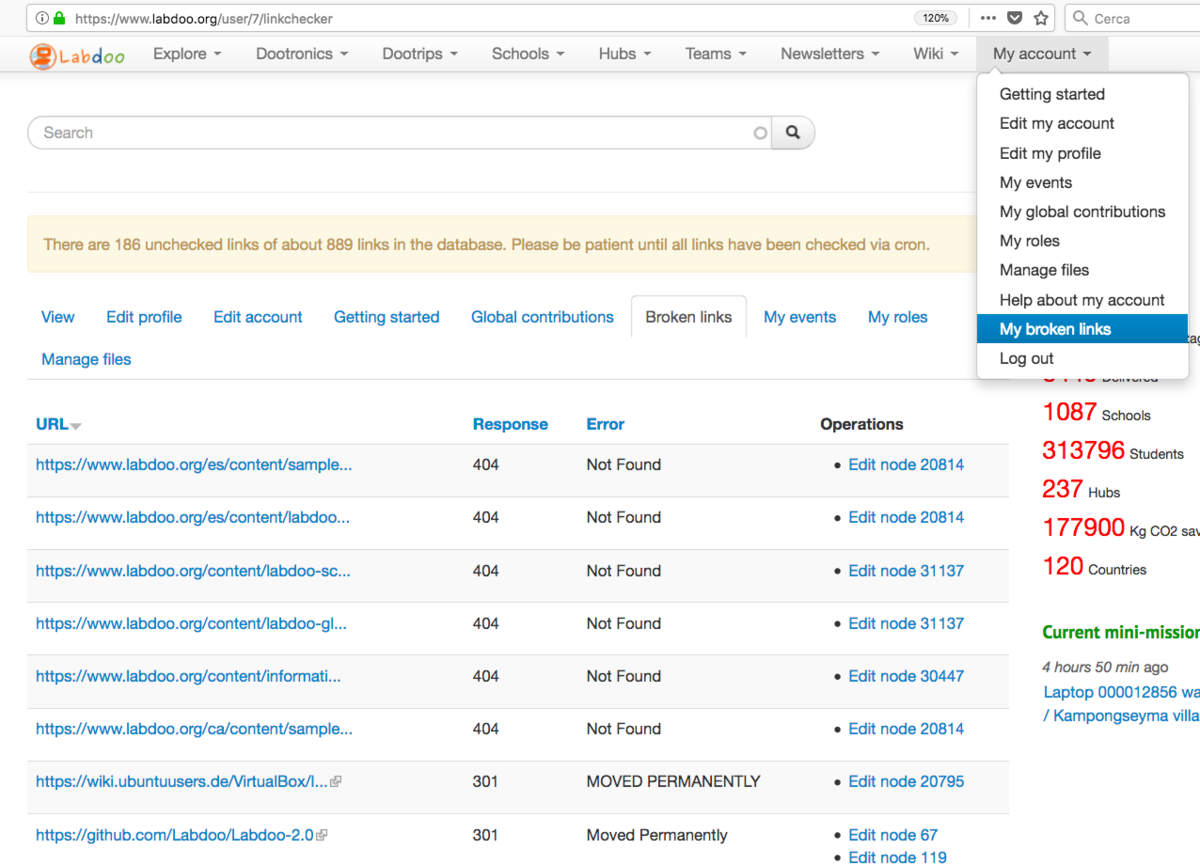
In order to see the list of broken links that are found in wiki pages that you have written, go to "My account" on the upper right corner of any Labdoo page and select the option 'My broken links'. (Please notice that you will only see this option if you are logged into your account and if your account has 'wiki writer' rights.) This will take you to a page under your account with all the broken links that have been detected in wiki pages that you have written. For each broken link that you see in this list, click where it says 'Edit node $NUMBER'. This will take you to that node (in edit mode) where you can directly correct the broken link. If you are a wiki writer, from time to time please do make sure to go to this page and ensure that you have no broken links.
There is also a way to see all the broken links (not just those located in wiki pages that you write, but all the broken links from all the wiki pages) in a centralized list. To see this list, go to the 'Wiki' menu on the top of any Labdoo page and select the option 'All broken links'. (Again, only if you have 'wiki writer' rights you will see this option.) By clicking on this option, you will be taken to a page which gathers the complete list of broken links from all the wiki pages.
A note on broken links error codes. Each broken link comes with its own error code (see figure below for some examples). The most important broken links are those marked with error code 404, which means that the link does not exist ('Page not found'). Please fix all the broken links with error code 404. Other error codes may not need to be fixed. For instance, error code 301 means 'page permanently moved to a new URL', but the link itself is correct, so you don't need to correct any links with error 301.
A note on how pages are scanned. Broken links are found by scanning pages. This happens in two different ways: (1) when a page is saved, the link checker will provide a warning if any of the links are broken, so you can immediately fix it; (2) every hour (at the top of the hour), there is a background process that also checks for broken links. Notice also that when you fix a link, its entry will be immediately removed from the list of broken links.
| Figure. Click on 'My broken links' to access the list of broken links found in wiki pages. |
|