Tips and Tricks, Suggested Solutions
The following section describes relevant learning experiences gained by Labdooers around the world who (like you) are helping to sanitize laptops and make them ready for needy schools. It will teach you tips and tricks that will be very handy when sanitizing your laptops. If you are not able to find a solution to your problem in this section, please ask your questions to the Labdoo QA team and another Labdooer there will provide an answer for you.
Configuring the Bios
How to change the booting order of a laptop from the bios
BIOS (Basic Input Output Subsystem) is a programmable chip that controls how information is passed to various devices in the computer system. A typical method to access the BIOS settings screen is to press ESC, F1, F2, F8 or F10 right after you start your computer.
BIOS settings allow you to run a boot sequence from a hard drive, a CD-ROM drive, the network, or an external device. You may configure the order that your computer searches these physical devices for the boot sequence.
The first device in the order list has the first boot priority. To install the Labdoo software you will need to ensure the CD-ROM, the USB or the network (depending on which method you use to install the software) are given the highest booting priority.
Note: in the case of a USB installation, before you set boot priority for the USB device, plug the device into a USB port to ensure the BIOS will be able to detect it.
To specify the boot sequence:
- Start the computer and press ESC, F1, F2, F8 or F10 (depending on the BIOS manufacturer, try them all if needed) multiple times during the initial startup screen. A menu may appear.
- Choose to enter BIOS setup. The BIOS setup utility page appears.
- Use the arrow keys to select the BOOT tab. System devices appear in order of priority.
- To give the CD/DVD, the USB or the Network the highest boot sequence priority, move such device to the first position in the list.
- Save and exit the BIOS setup utility.
- The computer will restart and will initiate its booting process by looking first at the device you gave the highest priority, allowing you to install the Labdoo software.
| Figure. Illustration of the BIOS boot menu where you can change the booting order. |

|
Troubleshooting potential issues with the bios.
In some rare cases the BIOS could be reset during the process of deleting the hard drive information from the system, or some times older laptops do not support internal and/or external USB keyboards during the booting process. It might happen that you are not able to use the arrow keys (up, down, right, left) to configure the BIOS. In such cases the USB control (and sometimes the internal keyboard) was deactivated. A possible solution is to connect an external PS/2 or USB keyboard, and continue to install or adjust the BIOS.
Installation of Restricted Codecs
Please notice that the usage of restricted codecs might depend on local laws. It might be illegal in some countries to install and use certain codecs (commercial/proprietary third-party packages) and multimedia extensions. Check your local regulations first prior to proceeding with the installation of the following software.
As in all software for Ubuntu, there are two ways to do the installation: via the Ubuntu Sofware Center or via the command line.
The installation via the Ubuntu Software Center is as follows. Open the Ubuntu Software Center (or the Synaptic Package Manager) and search for "restricted codecs". Select the package found and click on install. During the installation you will need to accept an EULA license agreement. To have full support to watch DVDs you must also install libdvdcss2 and non-free-codecs from the Medibuntu Repository. Please notice that in Europe these repositories are not allowed to be used. Further information can be read here: http://www.videolan.org/developers/libdvdcss.html
The same installation can be done via the command line through the following steps. Open a terminal by pressing at the same time the keys ALT+CTRL+T. Then type the following commands:
sudo apt-get install ubuntu-restricted-extras -y (Enter)
sudo apt-get install non-free-codecs -y (Enter)
sudo apt-get install curl -y (Enter)
curl ftp://ftp.videolan.org/pub/debian/videolan-apt.asc | (Enter)
sudo apt-key add -echo "deb ftp://ftp.videolan.org/pub/debian/stable ./" | (Enter)
sudo tee /etc/apt/sources.list.d/libdvdcss.list (Enter)
sudo apt-get update (Enter)
Manually create a guest account in Ubuntu20.04
Ubuntu20.04 has some problem with Guest Session. You can create a guest account with the following procedures
---
1. Select "Administration->Users and Groups ->Add" , to create a new "guest" user:
Name: guest
Username: guest
2. Select the "guest" user and go to the "Advance Setting"
1. Under "Advanced" tab, deselect "Disable account" box
2. Click on "Change" Password, and select "Don't ask for password on login" box
3. Edit "/etc/lightdm/lightdm.conf " file to disable the guest session created by Ubuntu20.04 and add logout procedure for new guest account
allow-guest=false

session-cleanup-script=/home/labdoo/Public/guest_logout.sh
4. Create a /home/labdoo/Public/guest_logout.sh file as followed
#!/bin/bash

if [ $USER = "guest"  ]

then

   rm -r /home/guest/*

   cd /home/guest

   mkdir Desktop Documents  Downloads  Music  Pictures  Public  Templates  Videos

  chown guest *

  chgrp guest *

   rm -rf /home/guest/.mozilla/firefox

fi
You can find more extense and precise information on how to create accounts and manage their permissions from the following Linux Users Tutorial
Samba / Windows Server
Starting from April 2018 and with the 18.04 LTS (L)Ubuntu release, a Samba server comes pre-installed on image cloned laptops. This means that a Labdoo laptop can be used as a server to other computer clients allowing these clients to access all the educational content in the server. This is a powerful configuration as it allows many types of devices (laptops, tablets, mobile phones, etc.) to access the educational content in the server without the need to have access to the Internet or the need to replicate the educational software in many devices.
Due to the speed of the server or the network, there are limitations in the number of computer clients that can be supported by one computer server. If too many clients are connected, the performance of the data transfer will become slow. So if you have many computer clients, it may be necessary to have more than one computer server.
This page describes how you can convert a Labdoo laptop into your own computer server to provide access to other computer clients. With a few simple steps a server can be set-up, check out the next instructions on how to do that!
Install Samba server
-
Install the package "samba" by running in a terminal
sudo apt-get install sambaor via the Linux package manager, e.g. synaptic. -
Type
smbd[Enter] in a terminal to start the Samba server manually. To avoid starting this program each time manually, you can add "smbd" as a command in menu → Preferences / Settings → Personal / Personal → StartUp Applicatons / Start Programs → with "Add" → Name: Samba / command: smbd / Comment: add start up of Samba Server.. This will start the Samba server every time you reboot the system. -
If necessary, install additional extensions to the system's file managers to bring a better use experience. For instance you can install "caja-share" by typing in a terminal
sudo apt-get install caja-shareor by using the synaptic package manager (this extension is also part of the Labdoo Image since April 2018).
Set up the Shared Folders
-
Open Caja as administrator/root by running
sudo caja[Enter] in a terminal and right click on the folder you want to share. Click in the context menu "Share". Please notice that if Caja is not started as root, the menu item "Sharing" will not appear. - Activate "Share this folder" and "Guest access", then enter your own "Share name".
- Close Caja.
- Alternatively for LXDE Desktop, install instead the File Manager PCManFM: Go → network → usually then the server is already recognized and displayed, otherwise Windows network → Workgroup → Server name select, usually labdoo-00000xxxx where xxxx is the Labdoo ID of the computer.
- Finally, don't forget that the computer must be connected to the network via LAN cable or WiFi.
Access to the server via tablet, mobile phone, laptop or PC clients
Depending on your client and operating system installed and in use (Android, iOS, Windows, Linux etc.) access to the server may be different. Below you will find some examples and tips. There are also useful programs such as file managers, browsers, pdf viewers or ebook readers on your device. Check if your file manager is able to connect to a server (not all apps are able to) or if additional extensions need to be installed.
Access to the Server Using a Client
- In a (L)Ubuntu officially cloned Labdoo laptop comes with the file manager Caja. Either use the Menu → Places or use Caja and in the left column go to "Browse the Network" to scan and show all the servers in the network.
- Android - open your file manager and click on "network". The network will be scanned for SMB-shares which will be shown in a file manager. If your installed file manager is not able to handle SMB, you have to install one with this ability. We recommend the file managers Ghost-Commander (to be installed using the apps store Google Play: both Ghost Commander and Ghost Commander - Samba Plugin need to be installed) or the X-plore add on.
- iOS (Work in Progress)
- Windows (Work in Progress)
- To open the "Public" shared folder just double-click it. Then confirm "Connect as anonymous" to get connected.
- For a faster experience, nearly all operating systems and file managers offer a way to bookmark favorite folders. Use it to bookmark the access to the server.
Connecting to the Server Using Ghost Commander in Android
The example Ghost Commander is similar to other file managers.
- Start Ghost Commander.
- Open "home" directory (arrow with dot right upper corner).
- Click on "Windows shares".
- In the window "Connect to Windows PC" click on "Search". No further input should be needed to connect to the server.
- Click on "Workgroup".
- Click on the name of the server you want to connect to.
- The shares of the server should be listed in your file manager.
To create a Bookmark Using Ghost Commander
- Click and hold on for about 2 seconds on the share you want to bookmark until a context menu opens.
- Click on the context menu "NAME_OF_THE_FOLDER as favorite".
- Now you will see the share at /Home (Arrow and dot upper right corner) /Favorites and have direct access, provided the SMB server is online and connected to the local network.
Note: Some file managers first store documents and pages locally before opening and displaying them. This can end up filling up the memory in your device. Cleaning up the memory can help.
Display Educational Content and Documents
- Off-line web content: can be shown in your client's browser. Local off-line content must be stored using relative links (not absolute links).
- pdf: to be displayed and read using a PDF viewer.
- Office documents: It does not matter if you want to open and read Microsoft Office, LibreOffice, OpenOffice documents etc. in all these cases a viewer software app must be installed which can handle the file content.
- Video / audio files: In this case the client must also have matching software / apps installed to watch videos or to listen to audio files.
Make Xowa Accessible from other Devices
Xowa comes with an http-server to help share Xowa wikis within a local network. Navigate to the folder /home/labdoo/Public/xowa and open a terminal (e.g. using the file manager Caja: File →open a terminal here). Run the Xowa-jar file in this folder as follows:
For 64 Bit installations: java -jar xowa_linux_64.jar --app_mode http_server [Enter]
For 32 Bit installations: java -jar xowa_linux.jar --app_mode http_server [Enter]
Don't close this terminal window, as otherwise the Xowa process will be stopped. So leave it open as long as Xowa is used by other client devices.
Some devices, operating systems and browsers can resolve the hostname into its IP address. The IP address is like the address number of a home, which controls the access to each device inside your LAN (Local Area Network).
If the IP address cannot be resolved automatically you can get it manually. From the server computer, first right mouse click on the network/WiFi symbol on the desktop → Connection Information → read IP address (often similar to 192.168.1.xxx). Notice: The IP address will change every time, when you reboot the server (if you run DHCP for dynamic IPs in your network). It might be helpful to assign a static IP address to your server.
Read Xowa Content on any Client
The following is based on the IP address 192.168.1.133 just to illustrate an example. Instead of this IP address, use your server's IP address. Open the browser of your choice on your device (tablet, mobile phone, PC) and type the address of the server:
SERVER_IP_ADDRESS:8080
In our example: 192.168.1.133:8080:8080
Related Links and References
https://en.wikipedia.org/wiki/Samba_%28software%29
https://help.ubuntu.com/community/Samba/SambaServerGuide
https://en.wikipedia.org/wiki/Ubuntu_MATE
https://en.wikipedia.org/wiki/PCMan_File_Manager
Using a Laptop as WiFi Hotspot to provide educational data to mobile devices
Introduction
If a Labdoo laptop is member of a LAN or WiFi network, it can provide data (educational content) to other devices of that network, e.g. to mobile phones or tablets. This can be done either by some network share – e.g. via samba (smb) or e.g. via a web server (e.g. Apache web server). In both cases, educational content on that laptop could be accessed by other mobile devices (mobile phones, tablets) via their web browser. This might be a reasonable use case if these mobile devices do not contain Labdoo educational content (e.g. due to having not enough disc space for this content)or no having internet connection.
In the case of a WiFi connection, we commonly assume that our laptop is connected to a WiFi router, to which all other mobile devices are connected.
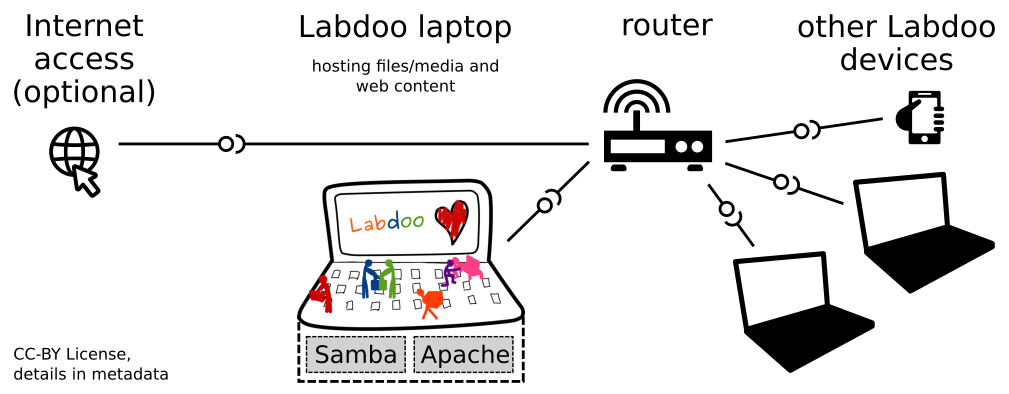
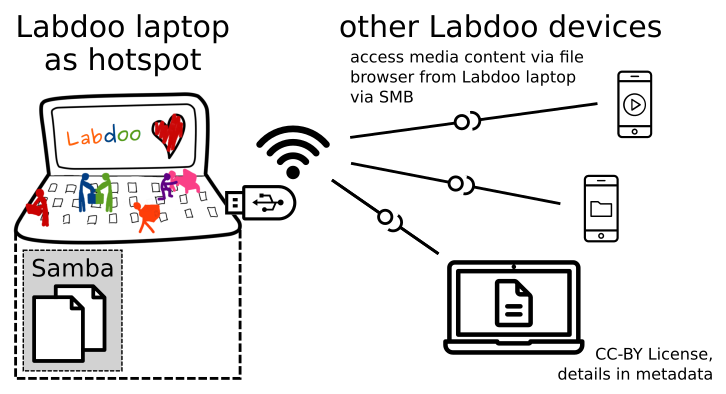
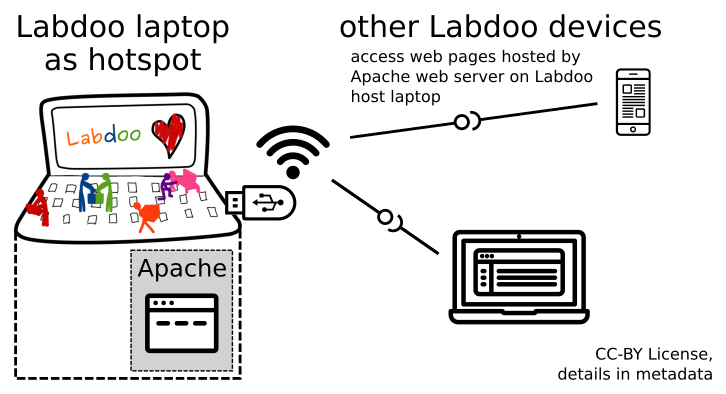
But what do we do if no WiFi router is available? If a WiFi USB-adapter or a built-in Wifi is available on it, is possible to use a laptop as hotspot and host a WiFi network. There a 2 options - use a Samba (smb) file server, which offers a Windows-compatible server (easy to start and handle). Or you can use Apache server, which is bringing a full web server to a laptop (more complex), being able to spread content and web-sites locally and world-wide (if connected to internet).
Such a setup is outline in this document.
using Samba (smb) server
using Apache web server
Target Group
The target groups are Labdoo schools, which do not have a running WiFi network, but need a network to provide file, content and/or Internet access to other mobile devices.
Example: The Labdoo school have tablets or smartphones, but no Labdoo content on them.
Then the school is able to use a Labdoo laptop as server and spread the educational content to mobile devices. The number of mobile devices to be provided by one laptop depends on its capacity, mainly speed of CPU, disc and WiFi connector. In our tests we found 3 - 10 devices a reasonable number of clients to be connected to one laptop.
Each Labdoo laptop comes with a preinstalled Samba server (smb). How to start the smb-server and how to connect mobile devices to it is explained here.
You will find most content on each laptop in the folder /home/labdoo/Public/wikis. Navigate in a browser of your mobile device to the sub-folder (language) needed. Search for the start file, in most cases index.html, start-here.html or similar. Then you can read and use links etc. on your mobile device as reading on a laptop. Please note that Xowa content does not work using a web browser.
Technical Aspects
Most modern smartphones can be used to host a WiFi network. However, not all WiFi chips of laptops or USB-sticks (and their drivers) support this feature. According to the Ubuntu Users Wiki [1], these WiFi chips do the job:
• chips driven by the hostap driver or
• chips working with a current mac80211/nl80211 sub-system
A detailed description on how to set up the laptop as a WiFi hotspot is given in the Ubuntu Users Wiki [1]. The procedure works with (L)Ubuntu 14.04 - 18.04 LTS.
• provide files access (e.g. via Samba, offering Windows-compatible file services) and / or
• run a webserver to provide browser based access on educational content (e.g. via Apache)
• share its Internet connection (e.g. if the Laptop has WWAN)
to mobile devices connected to the WiFi.
References
[1] https://wiki.ubuntuusers.de/WLAN_Router/
Thank you, Daniel Neumann, Labdoo Hubs Hamburg / Rostock, for contributing this text (hamburg-hub@labdoo.org).
User concept, add user student
When installing Lubuntu-Installation the first user created is labdoo (who is also administrator and should be reserved for the teachers, as this user may destroy the system by mistake). If you install via cloning or if you use the installation scripts the additional user student will be created automatically.
The user student kas less rights, e.g. is not able to install or delete software and is not able to destroy the system.
Here is the manuel way, how to create a user student:
Start here → System Tools → User + Groups → unlock → +add user → system password (labdoo) → student as name, e.g. withpassword labdoo → Account Type = Standard (as suggested) → Create → click on password (account disabled) → input of password labdoo and acknowledge → Change → optional: cahnge language of user student.
Open a terminal and type (by executing this zhe user student will become member of the group labdoo):
sudo usermod -aG labdoo student (Enter)
Please note:
Each new user takes disc space. So please do not create more users.
As a standard user you are not able to destroy a system by mistake (or at least it is very hard). The user labdoo (administrator) should only be used by teachers.
Each user has his own folder and files in the directory /home/....(name of the user). But the folder home/labdoo/Public is a public folder. All users should have access here. To go there open the file explorer → filesystem → home → labdoo → folder /Public (you can add a bookmark to navigate here more easily).
If you add content of your own in /Public there is a script http://ftp.labdoo.org/download/install-disk/installskripts/set-rights-fo... to ensure all rights are set correctly.
In addition there is the user guest. guest needs no password to log-in. But guest is not able to change or store anything. When logging out all his input will be deleted automatically.