EN
User Accounts and concept
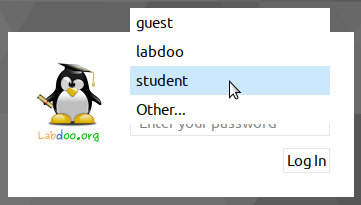
Each Labdoo laptop comes with the Ubuntu operating system preinstalled (release names: xx.04 LTS; xx = 2018, 2020 etc.) and with 3 users already created, ready to use:
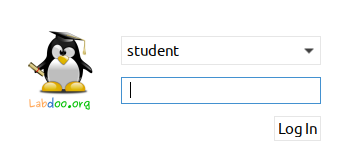
- student: is a standard user account for students. The user student is not administrator, just a standard user. The password for this user is labdoo (you can change the current password or not.)
- guest: is an account which doesn’t require a password to log in. All data will be automatically erased after the user logs off from this account
- labdoo: has super user rights / is administrator! labdoo is an administrator account and has all the access rights on the computer. Working under this account without a proper knowledge may crash the system! Therefore, it is recommended to have only teachers know the password of the user labdoo. The password is labdooadmin.
The letters of the password should match with the character set of the keyboard (latin letters and what you see on keyboard). Using other keyboards with, non-latin characters might lock you out of the computer.
Important: The keyboard layout can be changed manually at the time of log-in (see below). The system setting of the keyboard layout can be changed via the system file / etc / default / keyboard. Labdoo recommends storing the keyboard layout of the delivered computer in this system file (WYSIWYG).
| User log in, select user |
  |
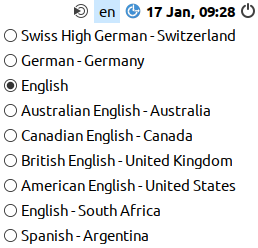
| Select a user language (after log in) |
  |
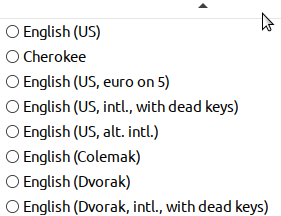
| Select a keyboard layout |
  |
| Settings for visually impaired users (optional) |
  |
Important: the keyboard layout used when logging in will be set during the installation process of (L)Ubuntu. If you installed a computer using images for cloning this will be the German keyboard (DE). Otherwise, the keyboard layout used to install Ubuntu will be the one to remain. To change the layout after logging in, open a terminal (press Strg/CTL + Alt + T at the same time) and type sudo nano /etc/default/keyboard (press Enter). Next, change the keyboard code, (e.g., EN for English, FR for French, ES for Spanish etc.). You can optionally add the code of a specific country in the following line between the 2 quotation marks (z.B. CH for Switzerland). Then store the file (Strg/CTL + Alt + O (Enter), next Strg/CTL + Alt + X). You will NOT modify the keyboard layout you have used after having already logged in. This can be changed using the setting or the keyboard layout icon in the task bar.
Desktop MATE
The recommended desktop is MATE.
To Start a Program
There are many useful, fun and educational software and games installed. To start a program:
Click on the lower left corner on the Ubuntu icon (similar to Windows XP) → “Education” or "game“ → click on the program you want to start it.
In the folder “/Public”, you will find a lot of useful reference manuals, such as OER, Offline wikis, e-books etc.
The icons for a video tutorial and an offline Wikipedia (Kiwix) are available on the desktop.
Optional: Desktops (user interfaces)
Labdoo laptops come with Ubuntu (Linux operating system based on Ubuntu) and the MATE desktop. MATE is fast and easy-to-learn. They can be installed on older laptops with at least 2 GB RAM and they will still run fast (recommended: 4 GB RAM).
Adjust languages, regional formats and keyboard settings
Depending on the country where the edoovillage is located, you may want to install one or more additional language(s) or keyboard(s).
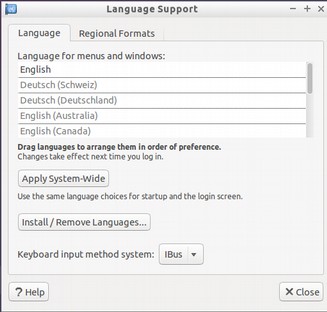
You can adjust the language settings by selecting Preferences → Language Support. You may get messages like “Language support not completely installed, install now”. Click on "Yes" and continue the installation.
In the next window select Install/Remove languages → select the language(s) needed → Apply → Apply System-Wide.
The new languages will show up in the language list (as shown above). Ubuntu will use the first language that appears in the table, then go to the next one, and continue. If no languages matched, English will be used as default language.
To change the priority of the languages → select and hold the right mouse button on the new language → move the language to its position and release the right mouse button → click "Apply System-Wide". The new language will be used after logging out and then logging in again or after rebooting the computer.
Regional formats
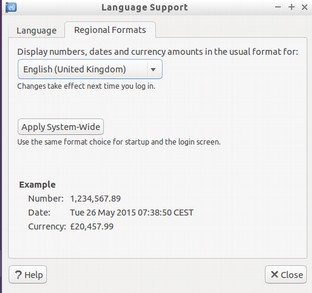
You can also adjust the local currency, notation of numbers, date and time, if available. Click on the tab “Regional formats“ and select the format as shown in the list → Apply System-Wide.
Keyboard settings
You may be able to skip this step if the laptop was cloned with images. Otherwise, you have to add a panel item to the task bar by clicking with right mouse button on the task bar → Add / Remove Panel Items → +Add → select "Keyboard Layout Handler" → +Add → optional: move the item position within the task bar by clicking "Up" or "Down".
Right click on the symbol "DE" (keyboard layout handler) in the task bar (another country abbreviation may be shown) → Keyboard Layout handler Settings → Remove the hook "Keep system layout", if activated, otherwise, you won’t be able to add new layouts) →
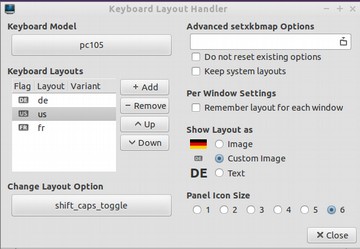
+Add → Add a new keyboard layout
-Remove → Remove a keyboard layout
↑Up → Move a keyboard layout entry in the list up
↓Down → Move a keyboard layout entry in the list up
The maximum number of keyboard layouts is 4.
Manuals, video tutorials and more

You can open the folder /home/labdoo/Public/ for more manuals, video tutorials, offline wikis, etc. The icon of a video tutorial is placed on the desktop. You can watch it by using Firefox or other media player (view -> 1/2 size, zoom +/-).
Install codecs for multimedia, film and DVD
If your computer was installed using an image for cloning you will find on each desktop a script installscript-codecs.sh. Legal Notice Patent and copyright laws operate differently depending on which country you are in. Please obtain legal advice if you are unsure whether a particular patent or restriction applies to a media format you wish to use in your country. Without executing this script, you will not be able to watch videos or DVDs.
This script will install restricted codecs and restricted software for multimedia applications. Proceed only if you are sure that you want to install these codecs and restricted software. Your computer must be connected to the internet while executing this script.
Programs for blind or visually impaired users
On the desktop you will find the icon of a magnifier. Click on it and you will get a magnifier which will follow your mouse. In the panel you will now see another magnifier icon. Right mouse click on that icon to open a settings menu.
Other programs for handicapped users are:
| program | description | program name | screen shot |
|---|---|---|---|
| Orca | Screen reader; Wichtig: to toggle Orca on / off please press at the same time Alt + Super/Windows + o. To configurate Orca, open a terminal (User labdoo) -> type orca -s (Enter). |
Orca |  |
| pico2wave | Tool to read marked (high-lighted) text in any document. To toggle pico2wave on / off press the keys Alt + Super/Windows + p at the same time. Mark the text before, then press these keys and the text will be read out loud. If the piece of marked text is too long, an error will be reported. | pico2wave | |
| Elinks | Text-based web browser, running in a terminal (link on desktop). | Elinks |  |
More information on solutions for handicapped users can be found here https://www.labdoo.org/content/programs-handicapped-users-barrier-free.
Set volume
In the panel you will find an icon to mute or turn the volume up or down. Clicking on that icon will open a dialogue (mute, volume up or volume down). But there are much more settings for volume, microphone etc., which can only be accessed by a program called alsamixer:
| Program | Descriptions | Program name | Screenshot |
|---|---|---|---|
| alsamixer | The program alsamixer is a tool to access all ALSA settings provided for the sound card. Frequent settings, which cannot be directly accessed with the X-user interface, are deactivated or down-regulated. With Alsamixer you can quickly find and activate these settings. Open a terminal (press Ctl/Strg + Alt + t at the same time), type alsamixer (enter). Now you can adjust the volume settings, move the keys ← → to move to the next channel, ↑ ↓ to turn the volume up or down. |
alsamixer | 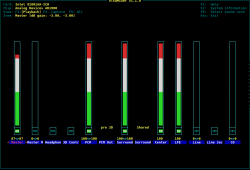 |
Printer settings, CUPS
A printer can be added and administrated by clicking System Tools → Printers → + Add a printer. Most printers, as far as they are connected to the computer or to network (LAN), will be recognized automatically.
For a more complex solution there is Cups (Common Unix Printing System), the most common print tool for Linux. Most printers can be used, jobs and spools administrated using CUPS. CUPS comes with an integrated web server. This server can be used to set up and manage a printer. Open a web browser and open: http://localhost:631. Only the user labdoo is allowed to access this page. In case a printer is locally connected to a computer you can allow access for another computer to this printer via LAN.
Help function F1, manual
By pressing the key F1 or help in the menu bar most programs will open a window and a manual for this program will show up.
Reset and restore user student
A student should log in as guest or as user student, but never as user labdoo (only teachers, administrators should use it). But even if you log in as user student, some menu bars or icons might be deleted by mistake. Everything can be "repaired", but you have to know how - and this knowledge might be missing at schools. But we offer a good solution for that - on the labdoo user's desktop you will find a script restore_user_student.sh (Double click to start the script, run in a terminal). But be careful! This script will delete every(!) data / document stored or reset every setting configurated since you received the laptop! So, make sure all data needed is assured! Sometimes this script is also helpful if you want to remove all of the data before giving the computer to another user.
Log in as administrator labdoo
labdoo: is administrator (admin, "Super User")! This means that the user labdoo has all access rights, e.g., for updating, installing additional software and educational content etc. But as the admin you can accidentally "destroy" the laptop so that it does not start and can no longer be used, especially when users have none or poor experience with IT and Linux. And if the computer is "destroyed", the closest Labdoo hubs who can help with a reinstallation or give support are far away. That could become a real problem.
Therefore, sign up only as user labdoo, if you act carefully and already have experience with the administration of computers. Otherwise, it is better to log in as user student, who has not the administrator rights, but can also use all programs and content - and has less chances to destroy a computer by mistake.
The password to log in is at delivery labdoo (for all systems being delivered with Ubuntu 18.04 LTS or former releases, until about spring 2020). From Ubuntu 20.04 LTS ff. (starting about summer 2020) the password will change to labdooadmin. However, you should change this password immediately once you receive the computer at your school / project, because the user labdoo has administrator rights and only the teachers / maintainers and experienced users should have access as admins!
Have fun learning and playing with your Labdoo laptop!
The Labdoo team
Continue reading to the next page:
Keyboard Layout
Go back to read the previous page:
Why Labdoo Uses Linux

 If you have any questions about this page or if you find any errors,
please write a message to the