Additional Info on how to Sanitize a Laptop
Sanitation Guide: Fast Restoration Method (Labtix)
Labdoo recommends installing by cloning images with the free installation tool Labtix, developed by Labdoo helpers. As you could see in the video tutorial, there are numerous setting and selection options to adapt Labtix to your requirements.
Since Ubuntu version 20.04 LTS (April 2020), there are only 64 bit versions as hybrid images that can boot in both legacy and UEFI mode. To install current Ubuntu images, however, Labtix version 2 had to be adapted.
Labtix is regularly developed further. Please check our FTP server regularly for updates http://ftp.labdoo.org/download/install-disk/Labtix/.
32 bit versions of the images cannot be installed with Labtix 2 anymore. If you still want to work with the old 32 bit images you have to use Labtix 1. However, neither the 32 bit images nor the installation tool Labtix 1 will be maintained further. For the 32 bit Ubuntu versions the support of the developers has also expired. More about Labtix 1 on https://platform.labdoo.org/de/content/labtix-1-archive.
| Version | Ubuntu 20.04 LTS (64 Bit) | Ubuntu 22.04 LTS | Linux Mint 22 (based on Ubuntu 24.04 LTS) |
|---|---|---|---|
| Labtix 2 | |||
| Labtix 3 | |||
| Support Ubuntu bis | 2025 | 2027 | 2029 |
Note for advanced users: Labtix has a persistence mode, i.e. you can make your own changes to Labtix and save them. You act as root user in fact. The password (only needed if you "get stuck" in the terminal when booting ) is "labdoo". But beware - as root you can destroy Labtix or bloat it by too many changes. Labtix fits on a CD when delivered. The tool ISO-snapshot also allows you to create a new ISO-file that takes over possible changes to the system.
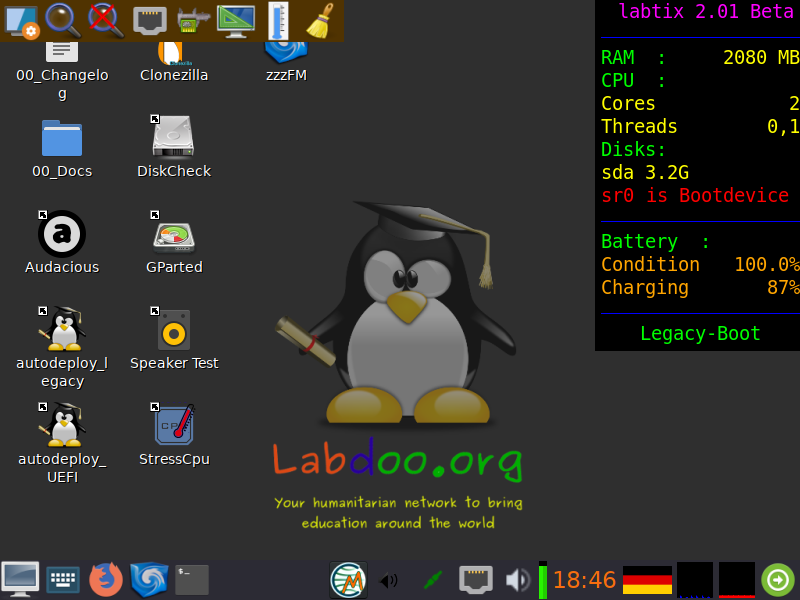
Labtix comes with various tools and installation tools https://platform.labdoo.org/en/content/preinstalled-tools-labtix.
Most of them can be found directly on the desktop. You have to decide for yourself which tool suits you best:
You can find the installation tools directly in the context menu of zzzFM:
- Labdoo installer for cloning the hybrid images that boot in legacy and UEFI mode,
- Labdo legacy installer for a pure legacy installation if a device has problems booting a hybrid installation.
On the Labtix desktop you will find a Docs folder containing manuals in PDF format. However, we recommend that you first watch the individual steps and tools as a YouTube video tutorial.
Sometimes you have to select certain settings in the boot menu because of the hardware, e.g. with netbooks or Apple laptops often failsafe mode etc. Otherwise it can happen that Labtix does not boot, hangs at terminal level (the desktop does not appear) or the monitor remains dark.
Then try out the options in Failsafe Mode or Safe Video Mode. This is also explained in the above YouTube tutorial.
You can find all video tutorials on our YouTube channel https://www.youtube.com/user/LabdooDACH/playlists and on our FTP server http://ftp.labdoo.org/download/Public/videos/for-technicians/.
Labtix release information
All Labtix versions can be downloaded from the FTP server
current version: http://ftp.labdoo.org/download/install-disk/
older version (archive): http://ftp.labdoo.org/download/archive/Labtix_former_releases/
Labtix 2 (from 2022)
Since its launch in 2017, Labtix has become the most popular installer and remover tool within the Labdoo project. Labtix Release 1 is based on a 32-bit Antix 17 (2017) kernel. Labtix 2 is based on a 64-bit Antix 21 (2021) kernel.
Don't put Labtix 1 too far away as this "old" version works well with "old" hardware. And the new Labtix version 2 fits the more modern your donated laptop is, which requires current drivers that are only available in 2. And cloning images of 22.04 LTS and higher Labtix 2 is mandatory.
Ubuntu 22.04 LTS introduced a new boot partition format (grub2 core.img). Labtix 1 and also older Clonezilla versions do not know this format and therefore cannot clone current images on Ubuntu 22.04 and higher! Please try whether Labtix 2 starts with a setting such as failsafe or safe graphics if there is a problem. Then there would be Parted Magic as another installation tool on the web. Or you would have to take Labtix 1 and an image based on 20.04 LTS.
However, we recommend using Labtix 2 by default as it comes with many improvements and features:
- Labtix 2 is based on Antix 21 and is only available in a 64-bit version. There is no longer a 32-bit version (sorry). Users who require a 32-bit version must use the earlier Labtix 1.
- The images provided by Labdoo on our FTP server can be processed with either Labtix 1 or Labtix 2.
- You need for Labtix 2
- At least one 2GB USB key (recommended) or DVD to install and run Labtix 2 on. It is not possible to install Labtix 2 on a CD or a 1GB stick (too small).
- min. 1.5 - 2 GB RAM in the computer to be installed.l
- Labdoo team has changed the user interface as little as possible, so you don't need long training. Some changes were mandatory, e.g. Labtix 2 comes with the file manager zzzFM (Fork of SpaceFM). And 4 years of software development have passed...
- Standard installation from the context menu of zzzFM with the Labdoo installer which performs a legacy and UEFI bootable (hybrid) installation,
- Legacy installation with the Labdoo legacy installer from the zzzFM context menu for devices that cannot boot with Labdoo's hybrid installations.
- The images provided by Labdoo on our FTP server can be processed with Labtix 1 up to 20.04 LTS and with Labtix 2 from 22.04 LTS.
- From summer 23, only Labtix 2 will allow you to install the new smaller BASIC images and the desired content at the same time. If installed otherwise, the content can be added in Labdoo using the script.
- UEFI (only for technicians): The number of IT donations with UEFI will increase. Normally you turn off UEFI and Secure Boot in the BIOS and enable Legacy Boot. However, there may be reasons why this is not possible (e.g. BIOS locked by unknown password; no legacy support implemented, etc.). There was already a manual UEFI procedure in Labtix 1, in Labtix 2 it is now largely automated. Labtix shows which mode (Legacy or UEFI) was booted in and you select the appropriate installation script in the 2-click installer in the file manager. If you select the UEFI Sprit, this happens: On the installation medium, the folder /UEFI with the UEFI image must be in the top folder. This small UEFI image is automatically installed first, followed by the actual image you want. After the installation, the UUID of the 2nd partition is entered in the grub file so that the computer starts up correctly. Labdoo had to decide to either maintain 2 complete sets of images (UEFI and legacy), which would have taken a lot of time and storage space on our servers. Or to have only one set of images (legacy) with the above solution, which is still started correctly in connection with an upstream UEFI image. Sounds more complicated than it is, everything is set automatically during installation.
- Improved user support and more tools available:
- Remaining battery capacity: Labtix shows the percentage (%) of the remaining battery capacity (life cycle), e.g. 20% means that only ⅕ of the original battery capacity is available and a new battery should be considered.
- Better support for SSDs
- New driver for current hardware (graphics card, interfaces, LAN/WiFi etc.).
- Additional tools: Speaker test, Live USB Maker, Avahi network scan, StressCPU (°C/°F check), DiskCheck and much more.
- Images for Cloning:
- A new set of images for cloning based on Ubuntu 22.04 LTS was made available and uploaded to our FTP server in mid-2022,
- the 20.04 LTS based images are moved to the /archives directory on the FTP server,
- The 18.04 LTS images need to be removed from the FTP server due to the capacity of the FTP server (those were the last images that could run on a 32-bit CPU; thus ending the 32-bit range for the Labdoo project) .
- From summer 2023, only small “BASIC” images will be used for the respective languages. The content is then installed in Labtix by the installers. The large images that contain content will continue to be created for a while, but will be phased out in the long term.
Any image release can be processed with any Labtix release, fully compatible.
Labtix 1 (2017 - 2021)
Based on Antix 17 (2017) you get a complete set of refurbishment and installation tools. Labtix 1 runs on 32-bit and 64-bit CPUs. The drivers included in Labtix 1 work best on older hardware (approx. 2008 - 2018, difficult to define exactly, it's best to try it).
for Labtix
- At least one 2GB USB stick or CD to install and run Labtix 1 on.
- 1GB RAM.
Review of a donated laptop
Looking through a donated laptop
In order to start Labtix or Labdoo, settings in the UEFI may need to be changed. UEFI has replaced the old BIOS system, but can usually still be used in the same way as the old BIOS interfaces.
UEFI Settings
On some laptops it is necessary to change UEFI settings:
BIOS settings
On some laptops it is necessary to change BIOS settings:
| BIOS Settings | Explanation |
|---|---|
| Secure Boot | Must always be turned off (disabled). Sometimes an administrator password must be set in the UEFI to deactivate Secure Boot. The admin password can then be removed again. Labtix does not start in secure boot mode but shows secure boot mode in the boot menu. In rare cases, however, an externally installed Labdoo installation boots on a computer with Secure Boot activated. |
| Trusted Platform Module (TPM) | TPM is a security chip that secures a computer. Ubuntu-Mate, which forms the basis for Labdoo images, is TPM certified. TPM should only be switched off if Labdoo does not boot. |
| UEFI | Up to Ubuntu 20.04 LTS It is recommended to disable UEFI and enable Legacy/CSM. However, there is also a concept for a UEFI-based installation developed by Labdoo helpers for 20.04 LTS. From Ubuntu 22.04 LTS a separate concept was developed for Ubuntu so that both UEFI and legacy/CSM installations are possible. Note: On some computers, Labtix starts and the image installation goes smoothly. But when you restart the laptop you get messages like "Invalid Partition table!" or similar and the laptop doesn't boot up. Then please set the UEFI mode or both (UEFI and Legacy) in the BIOS. In very stubborn cases, the tool uses SuperGrub2Disk (https://www.supergrubdisk.org) to start Labdoo. The bootloader Grub can be reinstalled using the terminal command “sudo grub-install /dev/sda”. An internet connection is required to download the required files! |
| Turbo-Boost | If Turbo Boost is activated, the processor may become significantly too hot when operated under load. In Labtix you can tell that under full load (e.g. with the Stress_Cpu tool) the clock frequency is in the 3Ghz range or higher. As a rule, the CPU temperature then rises well above 70 degrees, which can lead to long-term damage to the CPU. That's why it makes sense to switch off the turbo boost as a precaution. If the turbo boost cannot be deactivated or the temperature is still too high, the Cpupower-Gui tool in Labtix can temporarily help. In Labdoo, the maximum CPU frequency must be permanently limited using the script temperature_workaround.sh in the /scripts/temperature_workaround folder on the desktop! |
Check the hardware with Labtix
System requirements (currently on https://www.labdoo.org/deu/en/faq#FAQ04)
- min. 120 GB disk capacity,
- min. 3 GB RAM, better 4 GB,
- if the laptop is max. 12 years old, it should fit (usually with Windows 7 / 8 / etc. seal.
Does the donated device meet our minimum requirements (3-4 GB RAM, max. 12 years old, min Windows 7 or higher upon delivery)? https://www.labdoo.org/deu/en/faq#FAQ04
You should look through a donated computer before installing it. It makes no sense to give a laptop that overheats in cool regions to hot countries. Or if the hard drive is already "crumbling", how will it survive transport and operation in hot regions? That's why Labtix comes with useful tools for not only the hard drive, but also speakers, temperature curves under load, and much more. more to check.
Recommended hardware checks
| Tool | Check |
|---|---|
| GSmart / DiskCheck | The “Disk_Check” icon on the desktop opens the GsmartControl tool. Checks the status of the target hard drive, usually “sda”. The more “red” notices or icons and the darker red they are, the sooner the hard drive should be replaced. |
| StressCpu / psensor | The maximum temperature should be around 55 to 65°C under normal load, depending on the CPU/GPU type and the ambient temperature. To put load on the CPU, the "Stress CPU" script starts on the desktop (triggers "stress --cpu -8" in a terminal). Watch the temperature display of the CPU sensors in psensor. Stress CPU starts after 10 seconds and runs at full CPU load for 60 seconds in order not to damage the CPU and cooling system.
Under full load the temperatures often rise to over 70°C, less would be better. Many manufacturers specify an acceptable maximum temperature (CPU under full load) of 75° degrees. If temperatures rise to 80°C or higher under load, Stress CPU stops immediately to avoid damage to the processor and cooling system. Then the cooling system definitely needs to be revised (e.g. clean the fan or replace the cooler paste/cooling pads). An overheated cooling system can also be recognized by the fact that the copper-colored heat conductor has turned bluish.
On some devices with Intel i3/5/7 processors, it is helpful to switch off the "Intel Turbo Boost" (it can also be called something else on some devices!) in the BIOS/UEFI in order to get the temperature below 75° degrees during full load. If the device is running in Turbo Boost mode and this cannot be switched off in the UEFI (recognizable by the fact that the clock frequency of the processor is in the 3 GHz range or higher), the clock frequency can be temporarily reduced using the Cpupower-Gui tool (in the top panel of Labtix). become. Values around 2.5 GHz have proven to be useful. After installing Labdoo, the maximum CPU frequency must be permanently limited in Labdoo using the temperature-workaround script. |
| Speaker Test | Alternately checks the left and right speakers. |
| CD/DVD Test | Play an audio CD using Audacious. |
Preparation for installation with Labtix
If you already have a bootable CD or USB stick with the Labtix installation environment and Laboo Images for Cloning, you can skip this chapter.
Using the Labtix tool as a live CD/DVD or USB stick (recommended), Labdoo systems prepared by our helpers and equipped with learning content can be easily and quickly transferred ("cloned") to new computers , using so-called Images. As of Labtix 2.09 there are 4 BASIC images in 4 languages (English, Spanish, German, French). Depending on the language in the target country of the IT donation, you can select the language and upload additional learning content in other languages using control files. Local teams maintain additional images, e.g. in Catalan.
You need 2 things:
Labtix on a bootable medium: this can be a DVD (from Labtix 2.xx, from 2022) or a CD (Labtix 1.xx, 2017-2021) or a USB stick (recommended, 2 GB or larger) with which you can boot a computer into the Labtix environment.
External USB hard drive: for storing the Cloning Images and other learning content from our FTP server (Labdoo Hubs in Germany can be obtained from Labdoo.org e.V. Retrieve donated, pre-recorded boot media and USB hard drives.)
---------------------------------------------------------------------------------------------------------------------------
Labtix: The Labdoo installation environment
In order to be able to install older and newer computers yourself with a license-free tool, Labdoo.org has put together a small solution based on the Linux version Antix, which we called Labtix (composed of Labdoo and Antix).
In Labtix you will find everything you need - for deleting old data on a donated computer, for quick and automated installation of finished systems. In addition, you will find many tools on Labtix to diagnose hardware and analyze and solve problems (CPU/processor, thermal problems (°C), detect damaged drives, battery status, etc.)
You could download the iso files for Labtix from the folder of our FTP server. You could check the correct download using checksums (MD5 or sha512).
Once you have downloaded the file, you can create a boot medium from the iso file (CD or USB stick). This is the boot medium with which you can start and prepare donated computers.
Create a boot medium (CD or USB stick) from the Labtix ISO
Next, convert the ISO file into a boot CD or USB boot stick (simple copying is not enough!). This can often be done with the file manager of the operating system you trust or with additional tools. Below you will find some suggestions. For more, consult the web (search for "create CD / USB stick iso" and your operating system).
Requirements for Labtix 2:
- Installation on DVD possible, a simple CD is no longer sufficient
- USB stick with at least 2 GB of storage space. If Labtix is to be expanded using the persistence mode, it may make sense to use a larger stick.
WINDOWS:
- Install and start a program for creating start media, e.g. Rufus: https://github.com/pbatard/rufus/releases/download/v3.4/rufus-3.4p.exe or alternatives https://alternativeto.net/software/rufus/.
Start Rufus, select the USB device, click on the "Select" button, select the labtix.iso file, then click on Start.
LINUX:
- In Labtix there is the tool Live USB Maker as well as the tool ISO-Snapshot with the help of which you can create an ISO file from the existing system (recommended).
- At https://wiki.ubuntuusers.de/Brennprogramme/ you will find a range of Linux tools that you can use to burn CDs/DVDs, e.g. Xfburn or Brasero,
- zto create bootable USB sticks: Unetbootin, boot media creator, Yumi, drive management etc. As a rule, every distro/desktop environment has a corresponding program installed
- With dd, enter the following in the terminal:
dd if=/Path/to/Labtix.iso of=/dev/target partition bs=1M
But beware: Persistence cannot be set up on USB sticks created with dd! Further details at : https://antixlinux.com/forum-archive/writing-antix-iso-image-on-usb-flas...
MAC OS:
The balenaEtcher tool at https://www.balena.io/etcher/ creates the boot medium in a simple way after installation: select the image file, specify the target drive and the medium is flashed.
---------------------------------------------------------------------------------------------------------------------------
Labtix 2
---------------------------------------------------------------------------------------------------------------------------
Labdoo Clone Images and additional learning content
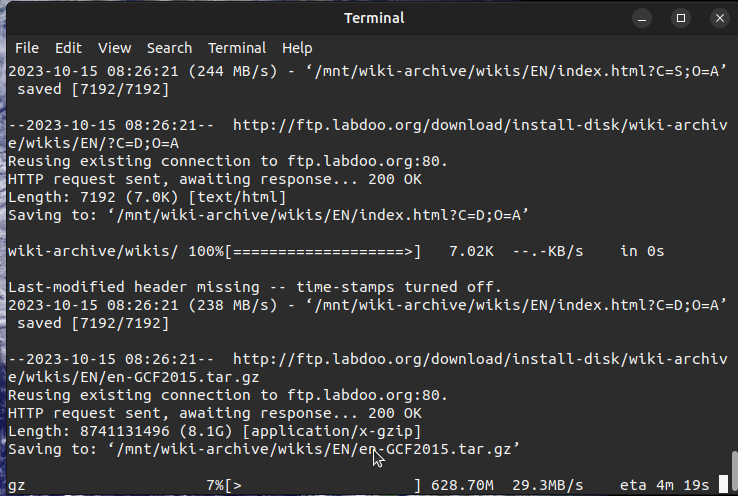
You must download the images beforehand for cloning. Images are copies of a complete, pre-installed system. Linux has a great feature that other operating systems do not have. You can transfer a system from computer A to computer B - and it will run!
You can find these images online on our Labdoo FTP server http://ftp.labdoo.org/download/install-disk/.
You can download individual files via the browser by clicking on them with the right mouse button and then selecting "save link as".

However, this does not work for folders or for many files! These have to be downloaded individually and this is of course not convenient.
Simple methods for downloading multiple files for all common operating systems can be found at https://platform.labdoo.org/content/connecting-labdoo-ftp-server
Images sind groß und der Download dauert lange. Wenn ihr euch mit FTP-Clients auskennt, empfehlen wir daher sie direkt per FTP herunterzuladen (sftp, user labdoo und Passwort labdoo).
Labdoo BASIC Images for Cloning
Images and learning content have been decoupled since summer 2023. Previously, there were turnkey images, e.g. EN_40, EN_80, EN_160, EN_250 etc. Learning content was already pre-installed in these images, but this bloated the images, led to redundancy and long download times.
You can quickly download BASIC images with approx. 16 GB and then complete them with the desired content either during cloning with Labtix 2 or after rebooting. This is much faster, more flexible and saves time and resources.
In order to decide which image and which content is/are best for you, you would have to take the respective framework conditions into account:
- The CPU/processor architecture of the computer you are currently working on (only 64-bit has been supported since 2018). Current images from 2020 are only available as 64-bit versions.
- The language(s) in the target country for which you want to install.
- The size of the hard disk in the computer to be refurbished. The size of the hard disk is displayed e.g. in the BIOS or after booting Labtix.
The name of a BASIC image on the FTP server says:
- xx_04_LTS = Version on which Ubuntu is based, e.g. 22.04 LTS (older versions are in the archive)
There are standard directories for each available BASIC image and user language.
- English (EN): http://ftp.labdoo.org/download/install-disk/EN_English_images/
- German (DE): http://ftp.labdoo.org/download/install-disk/DE_German_images/
- Spanish (ES): http://ftp.labdoo.org/download/install-disk/ES_Spanish_images/
- French (FR): http://ftp.labdoo.org/download/install-disk/FR_French_images/
...and more to come.
Additional learning content
Additional learning content can be combined with the BASIC images. The content must be available locally on a local storage medium or on a local server. Downloading from the FTP server during installation is deliberately not supported (overloading the FTP server and taking a long time).
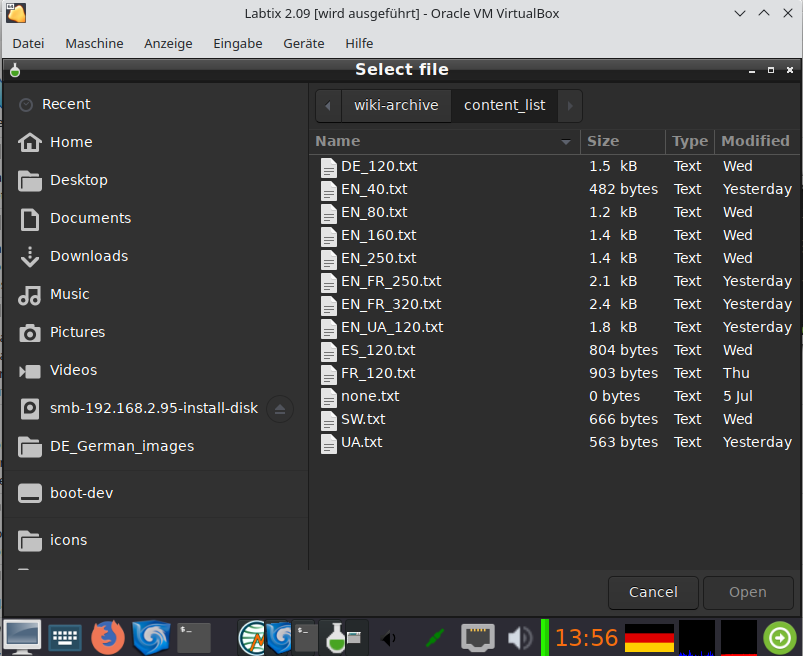
- Either during installation with Labtix. content: none is preset in the mask. If you click on it, you will be redirected to the folder with prepared control files. The names provide information about the content and required disk size, e.g. EN_SW_250 installs English and Swahili content and requires a 250 GB disk.
- Or after the installation process with the script installscript-content.sh, which can be found on the desktop in the /scripts folder. The process is the same as before, only you have to manually navigate to the folder with the control files for the content (usually on install-disk/wiki-archives/content_list
).
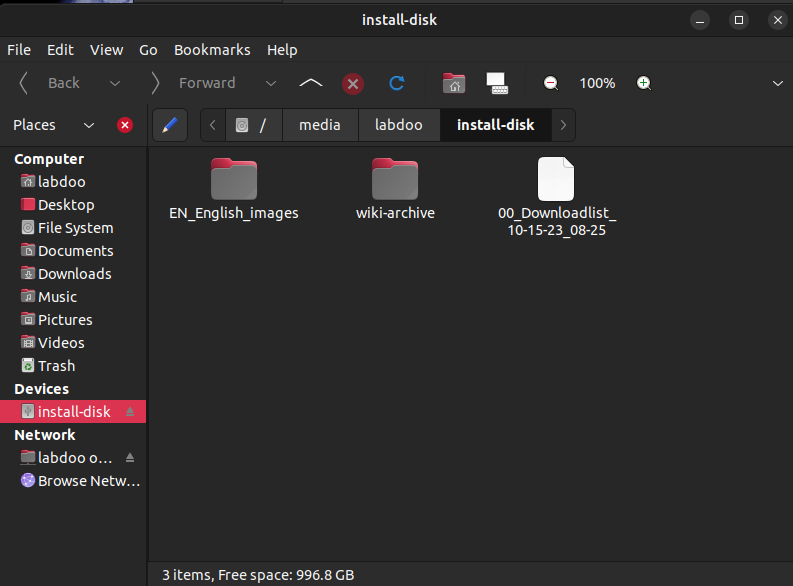
Preparation of the external USB hard drive (1+ TB)
The downloaded images are already unpacked and ready for immediate use. Copies them to an external hard drive or a local server. The USB disk must be formatted to store large files. For example, FAT32 is not possible because FAT32 can only handle files smaller than 4GB. NTFS is the recommended file system for an external hard drive.
Images and educational content
New functions are available from Labtix 2. In recent years, Labtix has become the most used installation tool worldwide within the Labdoo project.
In keeping with this, Labdoo (Germany) has been providing "pre-assembled, ready-made" images for cloning on the FTP server in various languages and contents for years. And here success has created a bottleneck. Thousands of helpers are now downloading the freely available, free images from the FTP server. The infrastructure and bandwidth, kindly provided free of charge by the Polytechnica Barcelona data center, are being shared by more and more users and this leads to slow downloads.
We have therefore expanded our concept. 2.09 can now handle both "finished" images as before, but also the new BASIC images without content.
These "finished" images will soon be removed from the FTP server. You will then find BASIC images prepared in 4 languages.
The big advantage:
There are now only 4 small BASIC images each approx. 16 GB (DE, EN, ES, FR), which drastically reduces the upload and download volume. So far all images were around 500 GB...
How does it work?
There are now control files that tell Labtix what content to install where. This affects the Kiwix and browser-based archives, which were previously part of the "finished" images.
This means that content is not saved multiple times in images, but only once in the folder http://ftp.labdoo.org/download/install-disk/wiki-archive/ (you also need the subfolders here locally from the FTP server or ask for them via USB disk from your national hub representative).
This additional feature has other advantages. For example, you can create your own control files and quickly exchange them with each other, e.g. a file for reinstalling special content. Using a control file, it is also possible to install additional learning content in additional languages, e.g. the FR content for the EN_250 package.
The name of the control file specifies: 1. Language at the front refers to the BASIC image, i.e. for EN_250.txt = selects the image EN_BASIC, 250 refers to the recommended disk size of 250 GB. So everything as before. EN_FR_320.txt does the same thing, but also adds the French content, then needs 320 GB. By the way, FR_EN_250 matches the FR_BASIC image and installs EN content to it. In one case the system language when starting up is French, in the other case it is English.
What's the catch?
You need at least Labtix 2.09 (or higher) http://ftp.labdoo.org/download/install-disk/Labtix/ and the learning content http://ftp.labdoo.org/download/install-disk/wiki-archive/ .
An installation may take slightly longer. But you save a lot of time when downloading the images. If you have to install a lot of devices, you can save a local image you created yourself. Everything you need is included in Labtix.
Where can we find what?
Control files http://ftp.labdoo.org/download/install-disk/wiki-archive/control_files/
Content http://ftp.labdoo.org/download/install-disk/wiki-archive/
Current Labtix version http://ftp.labdoo.org/download/install-disk/Labtix/
Technical information:
Control files must be located locally on a data storage medium or server near the content folders with Kiwx, among others in the /content_files/ folder.
Only local content on USB drives or local servers is supported. Remote servers over the Internet are deliberately not usable.
The control files need a certain syntax. Please refer to the examples (blank lines between comments and content; #### before headings, ####2nd_lang, etc.).
If you want to use your own content, its archive name must match the name in the control file.
For content with a date in the name (e.g. for Kiwix) a wildcard (*) is possible. So you could always install Wikipedia with the control file, regardless of the version.
Content can be installed once during installation. Or later via installscript-content.sh in the scripts folder on the desktop.
We would be happy to hear your suggestions.
Connecting to the Labdoo FTP server
The Labdoo FTP server allows users to download files freely. Here are some simple methods on how you can connect to the FTP server. Choose the one that suits you best.
For security reasons, Labdoo does not allow unsecured FTP protocol, only secured SFTP protocol (no ftp, only sftp). And since fall 2023, rsync has no longer been offered for security reasons..
Note: Labdoo is not responsible for third-party software.
---------------------------------------------------------------------------------------------------------------------------
1. Accessing the server through your browser
Open the URL http://ftp.labdoo.org/download/ in a browser and navigate via the links (Make sure the URL begins with “http://” and not “ftp://). Here you can download all files for free.
To download a file, click on a link with the right button of your mouse, then click "Save target as" (name can be different depending on your browser and opperating system).
This method's advantage is that you can access without a password, but on the other hand files can only be downloaded individually.
---------------------------------------------------------------------------------------------------------------------------
2. Access data to connect to the FTP server
It is more convenient to connect your PC or server directly to the FTP server. Depending on your operating system there are several tools below. We created a user on the FTP server: labdoo with the password labdoo and read permissions (no write permissions), which is available to you for this purpose. If you need write permissions, please contact contact@Labdoo.org (EN) or Labdoo-DACH@Labdoo.org (DE).
Protocol = sftp (sftp is safer than ftp, so only sftp is available)
Server = sftp.labdoo.org
Username = labdoo
Password = labdoo
Path = /
sftp://labdoo:labdoo@sftp.labdoo.org
---------------------------------------------------------------------------------------------------------------------------
3. Integrate into the file manager (Windows, Swish)
Windows does not offer its own way to connect the file manager to an FTP server via the sftp protocol. ftp would be possible, but we do not offer this for security reasons. However, you can use additional programs sftp, e.g. the Swish Add-on for the Windows file manager http://www.swish-sftp.org/(link is external) .
After installing Swish, you have to set up the access to the FTP-Server:
 |
Login to the FTP server: Name - choose a name of your choice; server: sftp.labdoo.org; user: labdoo; path: / |
 |
Security key: Save and connect - key remains permanently on the PC until changed; Simply connect - key is only saved for this session and will be queried again next time |
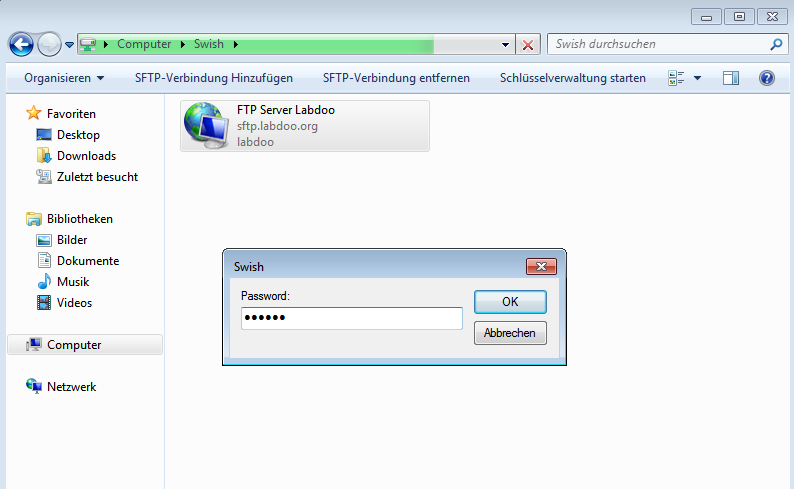 |
Enter the password labdoo, now you can use the FTP server like a drive on your PC. |
---------------------------------------------------------------------------------------------------------------------------
It is easy to connect your computer to the FTP server with special tools if you need to download massive files. The free FTP client Filezilla can be downloaded here https://filezilla-project.org/.. Also available for Apple (macOS) https://filezilla-project.org/download.php?platform=osx.
The start path can be set in the settings under Advanced --> Default directory on the server. Then you don't always have to click through the whole file system.
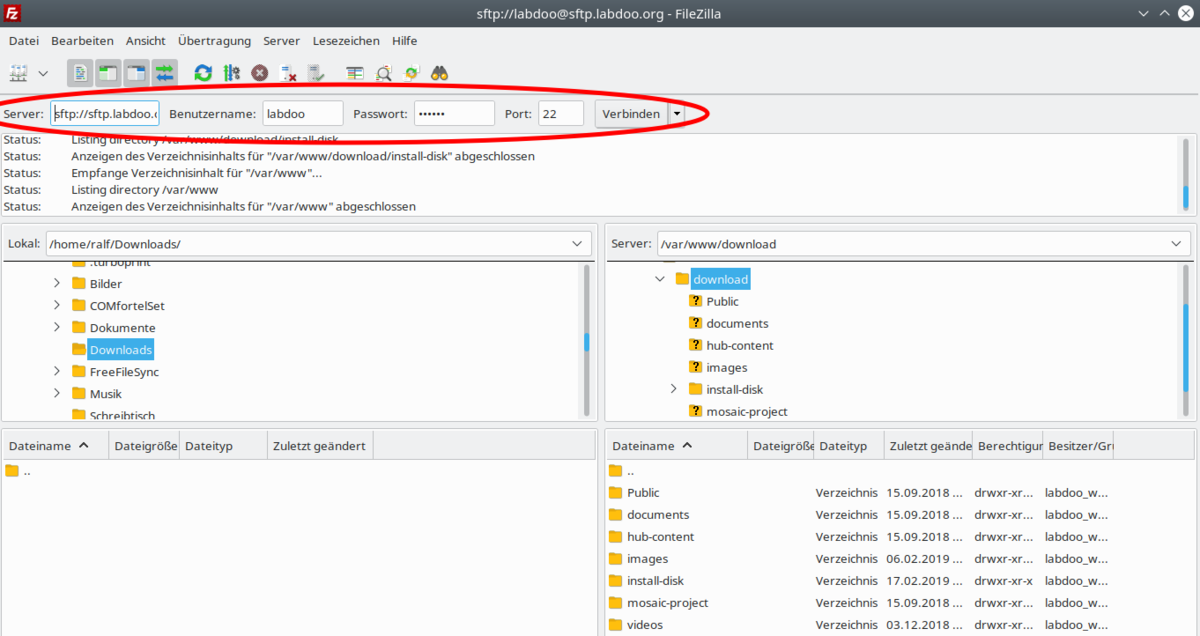 |
Enter the access data: Server - sftp://sftp.labdoo.org ; Username labdoo ; Password - labdoo ; Port - 22 |
---------------------------------------------------------------------------------------------------------------------------
5. Linux
If you are using GNU/Linux, you can easily integrate the FTP server using the sftp protocol (secure FTP). Simply enter the path for the FTP folder → sftp://labdoo:labdoo@ftp.labdoo.org:/ in your favorite file manager.
---------------------------------------------------------------------------------------------------------------------------
lftp is a free FTP client for Linux and other OS.
Install lftp under Linux using sudo apt install lftp.
Then you can mirror the /install-disk folder using the appropriate one-liner with lftp:
lftp -c "open http://ftp.labdoo.org/download/install-disk/ ;mirror --parallel=10 -n -e -O /path/to/install-disk"
The "-e" option ensures that files that no longer exist on the server are deleted from the local install disk. If this is not desired, simply leave out this option.
The entire command can be entered into the crontab using "sudo nano /etc/crontab" if regular mirroring is desired.
Read more https://en.wikipedia.org/wiki/lftp
---------------------------------------------------------------------------------------------------------------------------
7.Connecting Apple (macOS and iOS) using Filezilla or iTransfer to an FTP server
For Apple and (macOS ans iOS) you can install and use the free tools Filezilla or iTransfer.
---------------------------------------------------------------------------------------------------------------------------
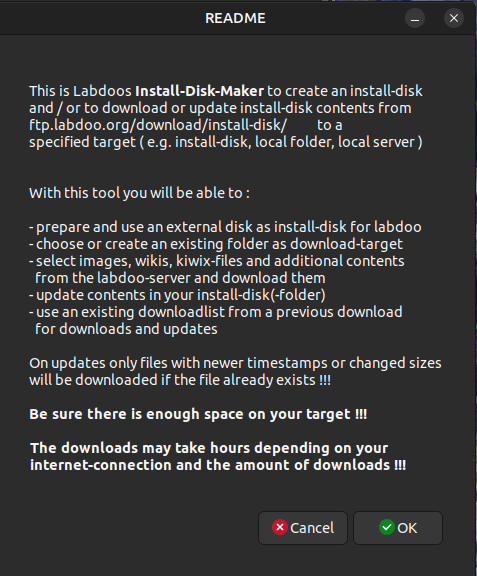
8.install-disk-maker.sh (Tool recommended by Labdoo)
You can download the tool for conveniently creating an installation disk (install disk) or a folder on a computer, server or NAS for Linux here. A download can be "clicked together" and saved as a download list for later repetitions. The download can only be limited to changed files, which saves download time.
http://ftp.labdoo.org/download/install-disk/Labtix/install-disk-maker.sh
(if necessary make it executable)
But it is also part of every BASIC image of Labdoo (on the desktop of the user labdoo in the scripts folder). This is how you can do it after installing it on Labdoo laptops
Note for technical helpers: The tool is based on wget. Downloaded files that no longer exist on the FTP server are not automatically deleted by install-disk-maker. Every now and then it's worth clearing up "file corpses".
---------------------------------------------------------------------------------------------------------------------------
9. recommended folders or links
If you want you can mirror the whole FTP drive :) Maybe you should choose the content you really need? Here are some useful paths that might be of interest to you:
All data necessary for an installation: http://ftp.labdoo.org/download/install-disk/
English documents: http://ftp.labdoo.org/download/documents/english/
Graphics + logos: http://ftp.labdoo.org/download/documents/material/
If you have any questions send an e-mail to Labdoo Global Support team wall and a Labdooer will get back to you.
Windows is a registered trademark of Microsoft Corporation.
install-disk-maker
Install Disk Maker [in preparation]
Labdoo's install disk is used to distribute Labdoo images and educational content in order to install Labdoo systems. Despite the name Install Disk, images and educational content do not necessarily have to be on a hard drive. Local folders or shares on the local network can also be used. The installation is usually carried out using the installation scripts in the zzFM file manager in Labtix. After installation, additional educational content can be installed from Labdoo using the installscript_content.sh script in the “Scripts” folder on the Labdoo desktop.
In order for the Labdoo installers to work correctly, the following folder structure must be ensured:
For Images:
/install-disk/DE_German_images/22.04_LTS_EN_Basic
/install-disk/EN_Englisch_images/22.04_LTS_DE_Basic etc.
For Kiwix-Dateien:
/install-disk/wiki-archive/kiwix/wikis/DE/Lerninhalt.zim
/install-disk/wiki-archive/kiwix/wikis/EN/Learning_content etc.
For Offline-Wikis:
/install-disk/wiki-archive/wikis/DE/beispiel.tar.gz
/install-disk/wiki-archive/wikis/EN/example.tar.gz etc.
For control files ( content_lists ) :
/install-disk/wiki-archive/content_list/DE_120.txt
/install-disk/wiki-archive/content_list/EN_FR_80.txt etc.
The Content_Lists play a special role (see below). They serve as control files and contain the information about which additional content (wikis and Kiwix files) will be installed during the installation with the installer scripts in Labtix or after the installation with installscript_content.sh in Labdoo. Many Content_Lists already exist on the server. The name contains the minimum size of the hard drives on the devices to be installed. With every download, the contents of the content_lists folder are updated!
It is still possible to use Clonezilla in Labtix to create your own Labdoo images with a lot of content and save them anywhere and clone them using the Labdoo installer in zzFM or with Clonezilla in Labtix.
The Install Disk Maker tool is used to easily create an install disk or a corresponding folder using selection menus. Images and content can be saved specifically in a correct folder structure.
The advantage is that the entire install disk no longer has to be downloaded from the Labdoo servers, thereby significantly reducing download times and server utilization. In addition, individual compilations can be created more easily, e.g. if Labdoo installations with bilingual content are required. Simply download the relevant content to the install disk, create a corresponding Content_List (see below) and you have created the possibility for an individual Labdoo installation.
The install disk maker downloads the desired files from the Labdoo server (http://ftp.labdoo.org/download/install-disk/). A password is not necessary for this.
Of course the computer must be connected to the Internet!!!
The possibilities of the install disk maker:
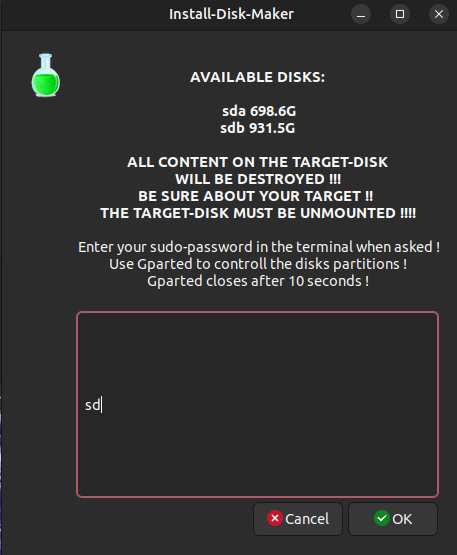
- Reformat an empty hard drive and set it up as an install disk with content,
- set up a folder, hard drive or local share as an install disk with content,
- update an existing install disk or an existing install disk folder. The tool searches for existing files on the disk or in the folder and updates them if newer versions are available.
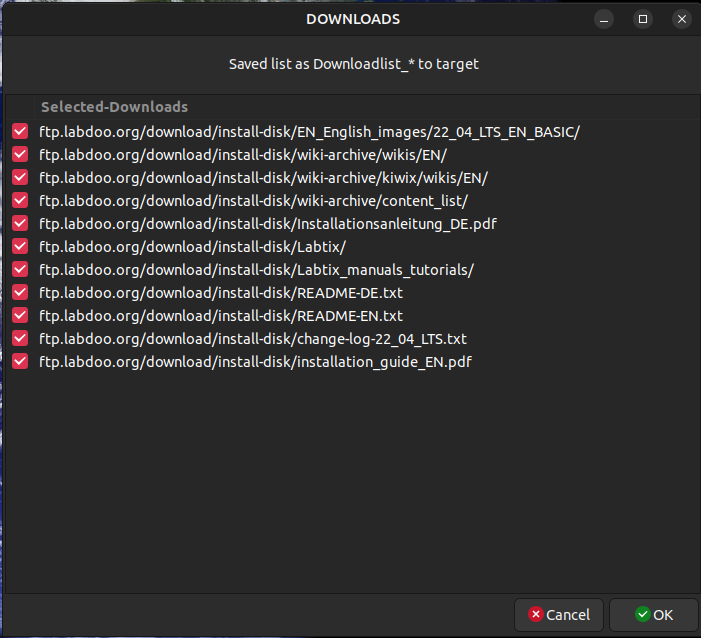
- update an existing install disk (or install disk folder) using an existing download list or repeat a download using a download list if there is an interruption. A download list is created with each complete run of the tool and stored in the target directory with a time stamp. The download list is a pure text file with a list of the ftp addresses used. It can therefore also be edited manually.
In general, if folders/files already exist in the target folder, only newer versions or versions with a different size will be downloaded. This also helps enormously to reduce download times and relieve the load on the FTP server.
The install-disk-maker
The Install Disk Maker is a shell script with Yad as the frontend for the dialogs. It should run on all Debian-based systems. The dependencies are yad, wget and sed. If not available, these should be installed later if necessary. Simply copy the script to your computer, make it executable, double-click it and run it in the terminal when asked. The script is already integrated into Labtix and Labdoo. It is only available with English user guidance.
Starting the script:
In Labtix: Double-click on the corresponding icon on the desktop (from Labtix 2.10)
In Labdoo: /Desktop/Scripts/install-disk-maker.sh , logged in as user labdoo
After a short README, a selection list appears in which the further procedure is determined.
There are four options to choose from:
| 1 format and use an unmounted hard disk as target |
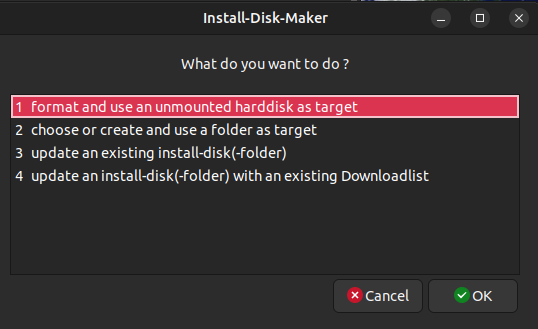
|
| 2 choose or create and use a folder as target |

|
| 3 update an existing install-disk(-folder) |
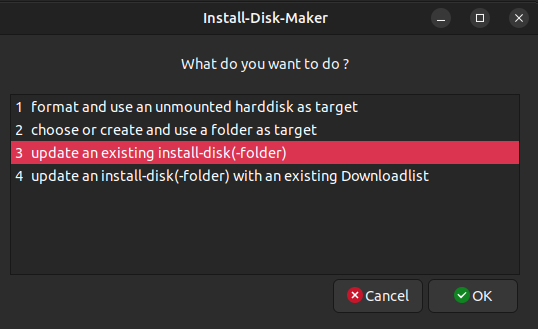
|
| 4 update an install-disk(-folder) with an existing Downloadlist |
|
Depending on your selection, you will be guided to your destination via self-explanatory dialogues. Only option 1 requires you to enter the sudo password in the terminal once under Labdoo.
| Selection of the drive for the install disk. Often sda is your own system disk and sdb is the external drive; like in the screenshot. However, this can change depending on the configuration. |
|
| Entering the administrator password (sudo) |

|
| Should a download list from a previous download be used. Or should a new list be “clicked together” individually for download. |

|
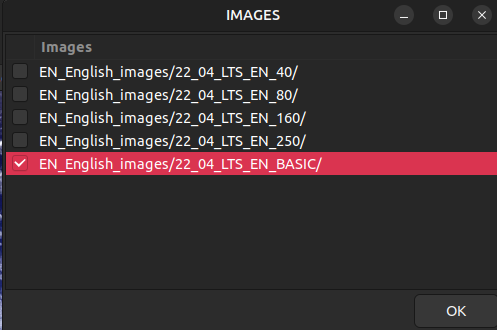
| Mark the images to download by language |
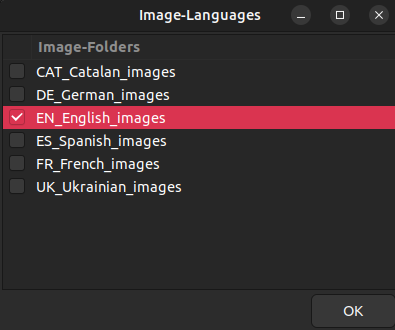
|
| Selection of images to load in the language folder |
|
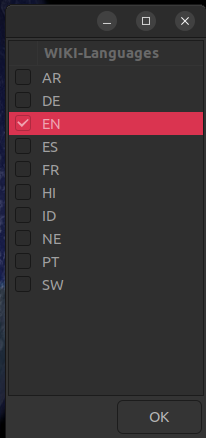
| Selection of wiki languages for browser-based content |
|
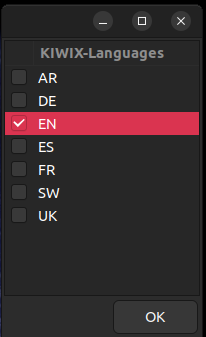
| Selection of wiki languages for Kiwix |
|
| Display of the selected content for confirmation |
|
| Display of the download and progress in the terminal |
|
| Display of the download and the download list |
|
After closing the final “READY” dialog, the existing files and folders in the target folder or disk are displayed in the terminal. This is used to check the contents of the target folder or disk.
Pressing “Enter” in the terminal ends the script and the working folder is cleaned up.
While the script is running, it is possible to mount or unmount disks or shares using a file manager. It is not necessary to end the script.
If an external disk has been formatted, it must be removed from the device once after the script has ended and then reconnected in order to make it available to the system.
While the script is running, some auxiliary files are created in the working folder (or on the desktop in Labtix) which are deleted during the run. Some dialog windows allow you to abort the script and then delete these files. If the script hangs, for example because the connection to the server is interrupted, you can end it by closing the terminal in which the script is running. Some auxiliary files may be retained. To delete these, call the script again and end the "README" dialog with "Cancel". The work folder is cleaned up.
In rare cases, auxiliary files of the stream editor used sed with the name sed* appear in the working folder. These files cannot be edited, but disappear as soon as you close and reopen the file manager or restart the desktop in Labtix.
If you want to repeat the project, we recommend copying the resulting download list to a suitable location so that it is available at any time and/or can be passed on.
Building a control file (content_list)
The control files are pure text files that can be edited with any editor. Text processing is unsuitable for this!!!
Example EN_BS_80.txt (shortened):
=======================================================================
# Control file for automated post-installation of content, requires Labtix 2.09 or higher
# Control file for automated post-installation of content, requires Labtix 2.09 or higher
####lang_1
EN
# _80 = min. needed disk-size, 80 GB
####wikis_1
en-afristory.tar.gz
en-algebra2go.tar.gz
####kiwix_1
askubuntu.com_en_all_*.zim
ifixit_en_all_*.zim
wikibooks_en_all_maxi_*.zim
# Create new Firefox Tab for users labdoo and student to path labdoo/home/Public/wikis/EN (html file already exists in all Labdoo images)
####homepages_1
file:///home/labdoo/Public/wikis/EN/index-tutorials-en.html|file:///home/labdoo/Public/manuals/index-manuals.html|https://start.ubuntu-mate.org/|file:///home/labdoo/Public/wikis/EN/index-en.html
####lang_2
BS
# adds Bosnian content to an installation
# path /Public/kiwix/wikis
####wikis_2
####kiwix_2
phet_bs_*.zim
wikibooks_bs_all_maxi_*.zim
####homepages_2
file:///home/labdoo/Public/wikis/EN/index-tutorials-en.html|file:///home/labdoo/Public/manuals/index-manuals.html|https://start.ubuntu-mate.org/|file:///home/labdoo/Public/wikis/EN/index-en.html
======================================================================
It is important to adhere to the syntax of the tags (e.g. ####kiwix_2) so that the install scripts can evaluate the control file correctly. If you want to create your own control files, you will find many existing examples in the /install-disk/wiki-archive/content_list folder. These can be adapted to your own projects.
2 - Click Installation Method
Labtix 2
Sometimes the screen is very dark after booting and the screen cannot be brightened or darkened using the function keys. Then move the mouse to the upper left corner, if necessary "flying blind", click there and then tap on the arrow key to the right. Each time you press the arrow key, the monitor should get a little brighter.
- Double-click to start the file manager zzzFM (Labtix 2).
- Mount the drive on which the images for cloning are located.
- For external USB drives: plug it in, the drive appears with a - in front of it, then click on the entry and the "-" becomes a "+".
- Connect to the network, via LAN it is sufficient to plug in the LAN cable, for WLAN with Connman system tray, then open file manager zzzFM → in the input area (preset /home/labdoo/) den Enter the path to the server, e.g. smb://192.168.1.1/install-disk, if necessary enter the password in the terminal window. smb is the protocol required for Windows servers.
First it tries to establish a connection for the user guest, then for the user ladboo. Or you can enter a local user like this: smb://user@192.168.1.1/install-disk and then the password in the terminal window. - The drive / server is now mounted, i.e. the computer has access to it.
- Open the folder with the images.
- Right click on the folder containing the image to be installed.
- Click the displayed functions list on
- Labtix 2: labdoo-legacy-installer or labdoo-UEFI-installer (depending on system settings and boot)
- in the next window
- Labtix 2: Enter the path to the target disk, e.g. sda, nvmep1n or similar → set the number of delete runs,
- optional: enter the host ID if you already know it (otherwise it can be changed after the restart)
- The image will now being copied to the internal hard disk sda.
- At the end GParted opens for control to display the finished partition on sda. The whole hard disk should be available. Close GParted. In rare cases the automatic adjustment of the partition does not work. Then it can be adjusted manually.
- The window with the installation's confirmation will appear, confirm with "ok" and close.
- The installation will be confirmed in the terminal, then close with ''Enter''.
- The installation is complete. Labtix can be shut down with "Poweroff" or "Save Poweroff" and the computer can be restarted.
| Select your BASIC-image and content package |
 |
| Select the content package |
 |
| (Example) Content package chosen and power off after installation activated |
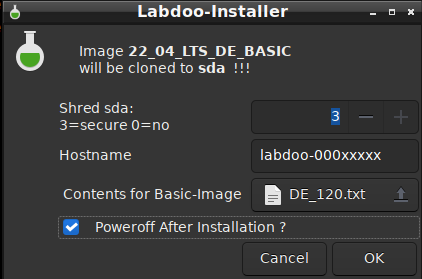 |
Installed tools for Labtix
Labtix comes with a number of useful tools preinstalled:
(partly smaller deviations between the Labtix versions possible)
| Application | Description |
|---|---|
| Arandr | A tool for configuring the screen layout. Very useful when your device has the internal monitor removed and an external display is connected. |
| Audacious | CD/DVD drive functionality test |
| Avahi network scanner | scans the network (please connect first) and shows e.g. the path to a server or similar. |
| Backlight Brightness | Sometimes the screen is too dark and cannot be made brighter with the keyboard (function keys). Then you can change the brightness with Backlight Brightness. Works most of the time, but not always. |
| battery-plugin | in the panel gives you information about the status of the battery when you mouse over it. The plug-in can be activated with a right mouse click and "Battery Monitor Settings", if not already done. |
| Conky | A tool for displaying system information on the desktop. The output window is in the upper right corner. The configuration file is in Labtix 1: /etc/conky/conky.conf, in Labtix 2: ~/conky.rc. In Labtix 2 with even more information, such as battery status, etc. |
| Firefox esr | is the "enterprise version" of Firefox, which is not updated as often. For example, Firefox can be used during installation to research the web. It can also display pdf files. By default it doesn't collect cookies and doesn't store data to avoid bloating Labtix with unnecessary data in persistence mode. |
| Gparted | a great tool for disk partitioning, file system repair and partition copying. |
| Gsmartcontrol / DiskCheck |
a tool to read the S.M.A.R.T data from a hard drive to see if the hard drive is healthy. If yours is "red" in the registers, you should use a different hard drive. Tip: If a Seagate disk shows thousands of reallocation reallocation events in the Attributes tab, the drive is not damaged. These hard drives have different firmware specifically for Lenovo computers that uses the memory bit for reallocation events for other purposes. |
| hard info | gives you extensive information about the hardware and software of the computer. |
| ISO Snapshot | a tool to create an ISO snapshot of the system. All changes to the system are saved in the snapshot. While running ISO snapshot, mark the directories NOT to be added to the snapshot, except for the "Desktop" directory which contains the .desktop files. You should move existing snapshots to a directory that you do not want to include in the snapshot. The snapshot is saved in /home/snapshot. If the snapshot is created on a non-persistent system (e.g. boots from CD-ROM), it should be saved on another device. If there is not enough disk space to save the snapshot, the save path can be e.g. to another USB stick. The snapshot can be installed to a USB stick using UNetbootin or burned to a CD-ROM or DVD-ROM using the IG Burn Tool plugin in SpaceFM. |
| Keyboard layout handler | With the Keyboard Layout Handler on the right side of the panel you can change the keyboard layout with a left mouse click. To make a permanent change, right click and use the "Keyboard Layout Handler Settings". The top keyboard layout in the list is preassigned at startup. With a left mouse click you can go through the pre-installed keyboard layouts (German, US English, French, Spanish). |
| Live USB Maker (Labtix 2) | to copy Labtix to other USB sticks. |
| Magnify | Magnifier on/off |
| Onboard | show/hide monitor keyboard. |
| SimpleScreenRecorder (Labtix 2 only) |
Tool to record videos of the session, e.g. for training purposes. |
| Psensor | A tool to control the temperatures of CPU, GPU and others. |
| SpaceFM (Labtix 1) / zzzFM (Labtix 2) |
is a file manager for the usual file actions and for integrating external devices. It has plugins to e.g. mount shares and burn CDs or DVDs. SpaceFM/zzzFM is highly configurable and can be modified with additional plugins. The trash can is disabled to prevent accumulation of too much data in persistence mode. If required, the trash can can be added as a plugin. It should not be removed as it is part of the desktop environment! |
| Speaker Test | Speaker test right / left. |
| UNetbootin (Labtix 1) | a tool to create bootable USB sticks. Start Unetbootin, enable "Diskimage", select the ISO snapshot (should be in /home/snapshot) and select the target USB drive. The USB stick should be formatted with fat32 and it should be mounted (use SpaceFM for this). After installation on a thumbdrive, Gparted should be used to check if the boot flag is set correctly! |
| wipefs | Fast deletion of the file system (but does not replace overwriting with random numbers). |
| Xfburn | to burn Labtix from CDs/DVDs. |
For more information, please use the man pages of the help function in the terminal (e.g. "man gparted" or
type "psensor --help" there and press (enter)) or use the Internet.
Desktop Settings:
The Labtix desktop environment is based on openbox with the additional lxpanel. If you right-click on the desktop, you can select "Desktop Settings" to make changes to the desktop. To install new program launchers on the desktop, copy them from /usr/share/applications to the desktop. To move icons on the desktop, use "Shift + Drag". Please note that in some cases SpaceFM moves the items out of the folder. If so, please copy it back.
Troubleshooting
We may need some tools for troubleshooting that make it easier for us to fix errors when installing or starting computers:
- Labtix on a USB stick :-) ,
- Labtix on USB stick, installed with "dd" with the Live USB Maker,
- Labtix on DVD,
- a finished standard Labdoo installation on a hard drive to test whether a device can / wants to boot with Labdoo,
- a finished legacy Labdoo installation on a hard drive to test whether a device can / wants to boot with Labdoo legacy,
- Super Grub 2 Disk (link) as a starting aid for Labtix or Labdoo,
- Clonezilla-Live or Parted Magic to install if nothing else works,
- Boot Repair Disk ( link ) to fix boot problems with Labdoo.
- optional: USB adapter for SATA to be able to "plug in" a hard drive externally,
- optional: USB hub for USB / USB-C slots if a laptop doesn't have enough slots
You don't have to create all of these tools directly. It is enough to create them when needed. But the more problem cases you have worked on, the more complete this tool collection becomes.
The easiest way can often be to install a hard drive with a finished Labdoo installation in a "problem" computer. This saves time and nerves!!!
Computer remains "dead":
When plugging in the power supply, the DC indicator light does not light up or the computer beeps:
- Power supply defective or not suitable? Make sure you have the correct DC plug.
- No RAM memory installed?
- Battery deeply discharged? If possible, try starting without a battery or powering the computer for a while. Depending on the device, it can take a few minutes to an hour until the device is bootable!
UEFI not accessible:
- Win 10 or 11 is started in installation mode and the UEFI is not accessible: remove the hard drive and delete it externally.
- If Windows is already installed and boots to the login screen: Click the power icon, click the "Restart" option with Shift/Shift key >>"Advanced options">> "Troubleshoot" >> "UEFI settings" . In the UEFI then put the Labtix stick first in the boot settings, deactivate secureboot if necessary.
- Common keys to get into UEFI: ESC, F1 (Lenovo), F2, F10, F12 (Dell), Del . Depending on the setting in the UEFI, the "Fn" key must be pressed at the same time.
- Some devices (some Lenovo or Sony) have their own button to boot into UEFI, sometimes quite hidden. A search on the Internet can be informative.
- If Labtix boots into the UEFI boot menu: Boot Rescue Menus >> Reboot into BIOS/UEFI Setup. Labtix may have to be booted via the computer's boot menu.
- If you have one, try a Labtix DVD and boot into the UEFI using the Boot Rescue Menu (see above).
- Boot into the UEFI boot menu with a Xubuntu USB Live stick. This contains the “UEFI Firmware Settings” option. Is also possible with some other *buntus. You may have to boot via the computer's boot menu.
- Sometimes it helps to consistently remove all drives and don't overlook the SD card slot.
- On some devices, removing the CMOS battery can force an error message from which access to the UEFI is often possible. Similarly, some devices have a reset button on the bottom that can be reached through a small hole.
Labtix does not boot into the Grub boot menu:
- Secureboot switched off in UEFI?
- USB boot not possible, e.g. by excluding USB boot in UEFI
- Some devices only boot Labtix in UEFI mode, others only in legacy mode, so it makes sense to try it out. The same applies to the installed images.
- "USB-always power on" activated in UEFI?
- A common problem is the poor connectivity of some USB sticks in USB sockets. If you pull the stick approx. 1mm outwards, the stick may have better contact. If the LED on the stick (if present) lights up or flashes, the contact should be OK.
- Use Labtix DVD?
- Use Labtix on a stick installed in Labtix with the Live USB Maker with the "dd" option?
- The device simply does not want to start with the bootloader used by Labtix or ignores it due to the computer firmware used (e.g. on some Acer laptops). If the device accepts the SuperGrub2Disk bootloader (from USB or CD), Labtix can be started using SuperGrub2Disk. https://www.supergrubdisk.org
- If all else fails, you can install a hard drive in the device on which you have installed Labdoo.
- If only Win 10 or 11 stubbornly boots, the only solution is to remove the hard drive to start Labtix and/or get into the UEFI. The hard drive should then be erased using an external USB adapter and checked for errors using DiskCheck in Labtix.
- (for Labdoo Germany) ...and if all else fails, then send the IT donation to the central post office https://platform.labdoo.org/de/hub?h=119075
Labtix hangs when booting:
- If Labtix hangs when booting, it is worth trying out the boot options “failsafe” (driver problems), “nomodeset” (graphics driver problems) or acpi=off (power management problems),
- A network search with the computer type, "Linux" and "Boot options" can lead to success in special cases,
- If the boot process hangs with the message "waiting for devs to be fully populated ..." you can cancel this process with Ctrl + C,
- sometimes a device just won't boot with Labtix. Alternatively, an image can be installed with Parted Magix or Clonezilla Live. The content can then be installed from Labdoo.
- There is always the option of installing a hard drive pre-installed with Labdoo.
Installation aborts:
- Destination disk damaged? Check with check disk.
- Contact to the install disk or the server used is not stable? Or files do not exist on the specified paths?
- The Labdoo images use a block size of 4096 bytes. This can cause problems with a few SSDs/NVMEs. Unfortunately, the only solution is to replace the hard drive.
- The target hard drive could be too small for the selected image and content.
- In general you should carry out an installation with a freshly booted Labtix. If the installation scripts were aborted or hard drives or shares were added or deleted in Labtix, artifacts in the operating system may prevent the installation scripts from running correctly.
- Some hard drives have write and/or read protection. The values in Disk-Check then look normal, but no partitions can be deleted or created. The only quick solution here is to replace the hard drive.
MacBooks:
Note: Labdoo Germany accepts MacBooks as IT donations. Labdoo Switzerland does not.
- If Labtix does not boot (which is the rule), hold down the Alt key immediately after pressing the power button until a selection of bootable media appears.
- The computer's NVRAM may need to be deleted first:
- Power button, then hold down "Alt", "P", "Cmd", "R" at the same time for approx. 30 seconds,
- In Labtix, pay attention to the clock frequency, if necessary limit it to approx. 2 Ghz with Cpupower-Gui to avoid overheating during the installation of Labdoo. Use the temperature_workaround in Labdoo!
- MacBooks with the T2 chip are unfortunately not compatible with Labdoo. The same applies to the new MacBooks with ARM processors.
Labdoo does not boot:
- Try booting via the computer's boot menu. Common keys: Esc, F9, F12 on tablets/convertibles Power + Vol"+" or Vol"-". If necessary, together with the Fn key.
- Use Gparted in Labtix to check whether the installation on the hard drive looks correct:
- Standard installation: grub2core.img, efi partition and Linux partition present and extended to the entire drive?
- Legacy installation: Linux partition present and extended to the entire drive?
- "Boot flag" and efi flag (standard installation only) set?
- Check the hard drive again with Disk Check in Labtix. By deleting hard drives with "shred" when installing Labdoo, they can be damaged if they were already on the brink anyway.
- The boot mode may need to be changed in UEFI. Sometimes Labtix only boots in UEFI mode on the same device, but Labdoo boots in Legacy or CMS mode or vice versa
- Move Labdoo up in the boot order in the UEFI,
- look in the boot menu of the computer to see whether the Labdoo installation appears there and whether it can be started from there,
- Start Labdoo using Super Grub 2 Disk (https://www.supergrubdisk.org). Connect to the Internet. Open a terminal with "Ctrl" + "Alt" + "T" and reinstall the bootloader with the command "sudo grub-install". This may cause Labdoo's bootloader to be entered into the computer's firmware.
- Start the computer with "Boot Repair Disk" ( link ), establish an internet connection and follow the instructions. Can solve one or two UEFI problems.
Get more messages:
In its default setting, Labdoo does not display the kernel boot messages during booting, but rather the Mate boot logo ("plymouth"). However, if booting or shutting down hangs or takes a long time, you can use the boot messages to diagnose possible sources of error.
To display the boot messages while Plymouth is displayed: press "ESC" + "F1"
If you want to show all messages:
- After switching on, use the shift key to make Grub's boot menu visible. If necessary, try several times, the default time window is 3 seconds!
- If you are in the boot menu and the first entry is activated, press the "E" key to enter editor mode.
Find the line withlinux /boot/vmlinuz....and replacequiet splashwithnoplymouth. The American keyboard layout applies! - Boot with F10.
The most recent boot messages can be used to search for errors on the Internet. When searching, always specify the device used.
The changed settings only apply once, so they have to be changed every time you boot.
When the computer boots into Labdoo, the "dmesg" command in the terminal displays the boot messages. Problems are usually displayed in red.
Secure boot activated and cannot be deactivated
Important note: Labtix does not boot with Secureboot!!! However, the Grub boot menu appears and the message “secureboot” appears at the bottom left. However, it is often possible to access the UEFI in order to deactivate Secureboot via the Boot Rescue Menus >> Reboot into BIOS/UEFI Setup entries.
On some computers, Secureboot can only be deactivated if an administrator password has previously been set in the UEFI.
There is a small trap with some Acer computers: if you deactivate Secureboot and set the boot mode to "UEFI", Secureboot is automatically activated again!
If the computer's UEFI is protected with an unknown password and Secureboot is activated, it is still worth trying to install. As a rule, all *buntus like Ubuntu Mate, the basis of the Labdoo images, can be installed easily with Secureboot.
Since Labdoo images are installed through cloning, the installation step in which the Ubuntu secureboot certificate is entered into the computer's firmware is no longer necessary. This means that, depending on the computer firmware or the secure boot settings, the computer is prevented from booting Labdoo. Nevertheless, it is worth a try to have the certificates subsequently entered into the firmware. Unfortunately, this doesn't always work.
Installation of Labdoo:
- The quickest way to work is to install a hard drive pre-installed with Labdoo.
- Does the computer still have to be installed, e.g. because of a soldered hard drive
- Installation with Clonezilla in Parted Magic, then install contents in Labdoo.
- If the Labdoo installation does not boot: see "Labdoo does not boot".
Once Labdoo has been made to boot (unfortunately this is not always possible), an update must be carried out:
- Connect to the Internet and open a terminal with "Ctrl" + "Alt" + "T" and enter the following commands one after the other:
sudo apt update>>> check for updates,sudo apt upgrade>>> run the updates.- If asked, answer yes and provide the Labdoo admin password.
During the update you should be asked whether you want to create a secureboot password. This must be answered in the affirmative and entered accordingly. Write on a piece of paper and keep it safe :-)) . It may be that if there are changes to the hardware (e.g. new WiFi card) the password will be requested! - Restart Labtix once, then enter
sudo apt autoremove>>> in the terminal to remove unnecessary files.
For very inflexible devices:
Unfortunately, this type of installation is not trivial, which is why the procedure can only be outlined superficially. If you really want to give it a go, you'll have to search online from time to time to get further:
- Install a hard drive pre-installed with Labdoo in the device,
- Install Xubuntu on the device in parallel. During the installation, the kernel or its secure boot certificate is entered into the UEFI partition and the firmware of the computer.
- In the corresponding window, select the option "Install Xubuntu alongside Ubuntu",
- during Xubuntu installation, set the partition size for Xubuntu to approximately 12 Gb,
- After installation, set the default boot entry of the Grub bootloader to the partition with Labdoo. Unfortunately it's not entirely trivial; it's best to use the Internet to find out,
- After booting into Labdoo for the first time, update the system once as described above.
...and if nothing works, send the IT donation to the central post office... ;) (Labdoo Germany only)
Labtix boot setting and persistence
Labtix has two boot menus. Once the menu for legacy boot and the menu for UEFI boot. Whether you boot into the legacy or UEFI boot menu depends on the settings in the UEFI. On many devices, both options can be selected via the computer's boot menu.
Legacy boot menu from Labtix:
Set the desired options using the corresponding function keys (e.g. F2 for language or F4 for kernel boot options) and, if desired, set them up permanently with F8. A reset is possible at any time with F8 > Reset. Alternatively, you can also enter it directly in the “Boot Options” line. After the next reboot, the boot menu contains the menu entry "Custom..."
Labtix UEFI boot menu:
The UEFI boot menu contains the “Advanced Options” entry through which options can be set up and saved using submenus.
Persistence mode
In persistence mode, all your changes are saved, such as . Network connections, Firefox bookmarks, changes within the Labtix environment, etc. . Installing programs and saving files is also possible.
- To do this, press F5 in the Labtix grub menu in legacy mode and select "persist_all",
- then press F8 and select "save",
- then you boot e.g. "antix-21 x64-base ...",
- When asked for the rootfs persistence file, press "Enter" for the default size,
- When asked for the homefs persistence file, press "Enter" for the default size,
- If you are asked for the live USB swap file, select "n" for "no",
- The question "Do you want to copy the files to the home persistence device?" answered with "y" for "yes",
- The question "Please choose auto-save mode" answered with "2" for semi-automatic,
If you wanted to use changes via persistence, you should not boot toram and remove the stick, because then Labtix cannot save your changes when you shut down.
Using the ISO Snapshot and Live USB Maker tools in Labtix, a new bootable stick can be created that includes all changes. The Unetbootin we previously recommended for creating live USB sticks uses the fat32 file system, which limits the maximum persistence size to 4 GB. The Live USB Maker uses ext4 as the file system and therefore allows for greater persistence. If the Live USB stick was created with the dd program or the "dd" option of the Live USB Maker, it is not possible to permanently set up boot options and set up persistence. The corresponding options do not appear in the boot menus.l
Terminal commands
Helpful terminal commands
Even if, contrary to popular opinion, the use of a terminal in Linux is not absolutely necessary, it does offer some advantages. Terminal commands give you output faster than pushing the mouse. Terminal commands can be controlled and linked in a variety of ways using arguments and are therefore the method of choice for more complex problem solving.
To open a terminal, click on the icon at the bottom left of the bottom menu bar or press Ctrl + Alt + t on the keyboard.
If a command is refused with the note "permission denied" or root rights are required, type "sudo" before the command used, e.g. "sudo zzzfm"
For further information use the --help option e.g. "apt --help" or the man pages "man apt"
| Application | Description |
|---|---|
| acpi (-V) | Information about the power system such as battery status, battery status, etc. |
| (sudo) apt | Package manager
Application: |
| dd | Bit-accurate copying
Example:
|
| eject -T | ejects CDs or DVDs if the button on the drive is defective. |
| grep | filters the output of commands
|
| (sudo) inxi | System information
|
| iwconfig | Displays information about WLAN connections. |
| lsblk | list block devices such as hard drives and their partitions. |
| lspci | lists all discovered PCI devices
|
| lsusb | lists all detected USB devices. |
| rfkill | Tool for radio modules such as Wifi, Bluetooth etc.
Unlock a hard-blocked device:
|
| (sudo) shred | Tool to securely wipe devices or partitions
Use: |
| sudo | Command to get root permissions
There is no sudo password set up in Labtix, so entering a password is not required. |
| wipefs | Quick deletion of file systems
Use: |
| xkill | Tool to close windows that don't respond
Use: |
| xrandr | Tool for setting the graphical (X) server
|
Labtix 1 [archive]
The Labtix 1 version of the Labtix installation tool is no longer being developed. For current images Labdoo recommends the current version Labtix 2 https://platform.labdoo.org/de/content/installation-mit-labtix.
Labtix 1 is still able to process older 32 bit images. However, these are no longer maintained.
Based on Antix 17 (2017), you get a complete set of refurbishment and installation tools. Labtix 1 runs on 32 bit and 64 bit CPUs. The drivers included in Labtix 1 work best on older hardware (ca. 2008 - 2018, difficult to delimit exactly, best you try it out).
You need for Labtix 1
- at least a 2 GB USB stick or a CD (750 MB) to install and run Labtix 1 on it,
- 1 GB RAM (besser mehr, speziell wenn ihr den Persistenzmodus nutzen möchtet).
| Version | until Ubuntu 20.04 LTS | from Ubuntu 22.04 LTS |
|---|---|---|
| Labtix 1 | |
|
| Labtix 2 |
Labtix comes with various tools and installation tools https://platform.labdoo.org/de/content/vorinstallierte-tools-labtix.
Most of them can be found directly on the desktop. You have to decide for yourself which tool suits you best:
- "2-click" installer - from the file manager SpaceFM (up to Labtix 1.02) / zzzFM (from Labtix 2.0) clone images with 2 clicks. From Labtix 2.0 the standard installation procedure.
- Labdoo Installer - with graphical user guidance (only Labtix 1)
- autodeploy and content installer - comprehensive, terminal-based installation tool that also automates the deployment of additional content in multiple languages
On the Labtix desktop, you will find a Docs folder containing manuals in PDF format. However, we recommend that you first watch the individual steps and tools as a YouTube video tutorial.
Labtix 1
https://www.youtube.com/watch?v=DkmrV3tvt-U
Nur für Labtix 1
Labdoo Installer - the compact installation tool with graphical user interface (English)
- Start by double click Labdoo Installer,
- 2 windows open; the terminal shows whether it is 32 and/or 64 bit CPU; the 2nd window shows the hard disk on which is installed (in most cases. sda. Confirm by ok.
- in the next window:
- shred = Number of deletion runs (from 0 to 3 possible, 3 preset)
- Target Disc sda (may not be mounted)
- Display the size of the hard disk (just for info, to better choose the appropriate image)
- Choose Image → click on the triangle next to home → Select Other... → then navigate to(!) the folder where the unpacked image is located (just marking the folder is not enough); confirm with "Open".
- optional: Enter Host_ID, if already known (but can also be entered after restarting the computer)
- click "OK" to start the installation.
In Labtix 2 this function has been integrated into the file manager zzzFM. A separate script could be dispensed with.
[Archiv, outdated / veraltet]
autodeploy and content installer - the comprehensive, terminal-based, script-driven installation tool (German)
the new version (since September 2018 part of Labtix,) also automates the deployment of learning content to multiple language (not seen in video)
Manual (pdf) http://ftp.labdoo.org/download/install-disk/labdoo%20autodeploy%20and%20...
Review of a donated laptop
Check the hardware with Labtix
To start, you should check a donated computer. After all, it makes no sense to send a laptop to hot countries that already overheats in cool regions. Or if the hard drive is already "crumbling", how is it supposed to survive transport and operation in hot regions? That's why Labtix comes with useful tools to check not only the hard drive, but also speakers, temperature sensors under load and much more. more to check, if necessary to clean fan, to renew thermal paste or foil.
BIOS settings
Some laptops require changing BIOS settings:
| BIOS settings | Comment |
|---|---|
| Secure Boot | Must always be off (disabled). Sometimes an administrator password must first be set in order to disable Secure Boot. The admin password can then be removed again. |
| Trusted Platform Module (TPM) | TPM is a security chip that secures a computer. In connection with Linux, however, TMP should always be switched off (deactivated). With some laptops, an administrator password must first be set in order to be able to deactivate the TPM. The admin password can then be removed again. |
| UEFI | Up to Ubuntu 20.04 LTS It is recommended to turn off UEFI and enable Legacy/CSM. However, there is also a concept for an UEFI-based installation for 20.04 LTS developed by Labdoo helpers. From Ubuntu 22.04 LTS a separate concept was developed for Ubuntu so that both UEFI and Legacy/CSM installations are possible. Note: Labtix starts on some computers and the installation of the image runs smoothly. But when you restart the laptop, you get notices like "Invalid Partition table!" or similar and the laptop won't boot. Then please set the UEFI mode or both (UEFI and Legacy) in the BIOS. In very stubborn cases, the tool uses SuperGrub2Disk https://www.supergrubdisk.org. |
Recommended hardware checks
| Tool | Check |
|---|---|
| GSmart | Please check the status of the target disk (sda) with the tool GSmartControl. The more "red" notes or icons and the darker they are, the sooner the hard drive should be replaced. |
| StressCpu / psensor | The maximum temperature should be around 55 to 65°C under normal load, depending on the CPU / GPU type and the ambient temperature. To load the CPU, the "Stress CPU" script starts on the desktop (triggers "stress --cpu -8" in a terminal). Observe the temperature display of the CPU sensors in psensor. Stress CPU starts after 10 seconds and runs at full CPU load for 60 seconds so as not to damage the CPU and cooling system.
The temperatures often rise to over 70°C under full load, less would be better. Many manufacturers indicate an acceptable maximum temperature (CPU under full load) of 75 degrees. If the temperatures rise to 80°C or higher under load, Stress CPU immediately stops to avoid damage to the processor and cooling system. Then the cooling system needs to be revised (e.g. cleaning the fan or replacing the cooler paste/cooling pads). An overheated cooling system can also be recognized by the fact that the copper-colored heat conductor has turned bluish.
For some devices with Intel i3/5/7 processors, it is helpful to switch off the "Intel Turbo Boost" (may have a different name for some devices!) in the BIOS/UEFI in order to get the temperature below 75°C under full load. |
| Speaker Test | Alternately checks the left and right speakers. |
UEFI Boot only or BIOS locked and UEFI set
[This page explains a solution in case a donated computer can only boot with UEFI or the BIOS is locked (password unknown) and UEFI is set as the boot option. If your computer can boot in legacy mode, you can skip this page].
Back in 2013/2014, there was a technical and legal discussion about SecureBoot and UEFI. The manufacturers argued that only UEFI boot on their computer provides security and therefore must only be used. However, the EU and NGOs went to court and the judges decided that the computer manufacturers had to re-open the BIOS settings so that users could choose whether to use the UEFI boot, the legacy boot (the "old" boot) or both as boot options. Computers that were produced before the "UEFI only" decision and after the old flexibility decision have no problem installing with Labtix and prepared Labdoo images.
However, if the computer was manufactured in the "UEFI only" period in 2013/2014, this may cause problems when installing a Lubuntu-based installation. Our Labdoo images are set up for legacy boot, not for UEFI boot (although Lubuntu could). We have described a solution for these specific UEFI-only machines here.
Another use case is a locked BIOS. A computer has been donated, but a BIOS password has not been removed and is unknown. If the boot option in the BIOS is set to "UEFI / Secure Boot Only" and cannot be switched to "Legacy Boot" because of the password lock, you can run the installation process described below and then use the computer for Labdoo.
If our solution is too difficult for you, please contact Labdoo helpers or hubs in your country / region and ask them for support.
You can use the installation tool Labtix (recommended, supports UEFI-Boot) or Parted Magic. PXE is not possible because you have to select certain options during the installation process and PXE does not allow access to these settings.
The installation sequence is rough:
- First install a small Xubuntu based image via cloning in a partition (Xubuntu is able to UEFI boot); a prepared image is available on FTP server http://ftp.labdoo.org/download/install-disk/special_images/,
- Next ,install in a second partition of one of our Labdoo images with slightly different settings than usual.
- Change the grub boot file.
- After that, the system will boot and a user will not even notice that this is a special "UEFI only" laptop.
- This solution only works for 80 GB disc-drives or bigger.
So here are the steps in details:
- Download the special UEFI-Boot image, available on our FTP-Server http://ftp.labdoo.org/download/install-disk/special_images/ and copy it to a local USB-drive or any local server.
- Start Labtix, run the Clonezilla tool (icon on the Labtix desktop) and make the drive with the special UEFI image available - Important: Use "expert mode" and "restoredisk", mark the option -icds . For experts: Or install Xubuntu (I think all other UEFI based * buntu do it too) in UEFI mode on the device.
- If you use the prepared UEFI image, the size of the partition sda2 is set to 80 GB by default. A Labdoo image for 80 GB fits. If you want to install an image for a 160 GB or 250 GB hard drive, you have to enlarge the partition sda2 with GParted.
- Shut down the computer and restart it with Labtix.
- Start Clonezilla to replace sda2(!) of the installed UEFI-Boot image / Xubuntu by replacing "restoreparts" with sda1 of the Labdoo-image you want to install. Make sure you choose the target-partition sda2 when asked and the "-icds"-option in "Clonezilla advanced extra parameters". Make sure the option "-k Do NOT create a partition table..." is checked.
- After installing sda2, use GParted to maximize sda2. Check if the "boot"- and "esp"-flags are set to sda1. To retrieve the UUID of sda2 right-click on it and select "Information". Mark the UUID and copy it with "Ctrl" + "C" to the clipboard.
- Edit /EFI/ubuntu/grub.cfg in the EFI-bootpartition ( usually sda1, the small partition with 512MB ) with the editor Geany and replace the given UUID with the UUID of sda2 you copied by GParted. E.g. open SpaceFM -> sda1 -> navigate to /EFI/ubuntu/grub.cfg -> right mouse click -> open > Geany editor -> in line 1 you will see a UUID -> mark and paste the new UUID from the clipboard. Don't forget to save the file before closing Geany editor.
- Shut down and restart the computer. Now it should start in UEFI mode and users will see the Labdoo login after a short time.
This description is very technical, but it works. If you know a simpler solution, please feel free to contact us.
A special thank you goes to helpers from hub Rhein-Ruhr (Germany) for noticing and solving this specific problem.
Helpful commands (shell, terminal)
Helpful comnands (shell, terminal)
To open a terminal click on the terminal icon in the menu bar or press the keys Ctrl and Alt and t.
If access to a command is denied ("permission denied") or root rigts are needed, add "sudo" in front of the command to be used, e.g. "sudo zzzfm"
For more information use the --help option e.g. "apt --help"
======================================================================
acpi (-V) >> information about the powersystem like battery-state, battery-condition etc.
======================================================================
(sudo) apt >> package manager
Usage:
sudo apt update >> create the needed package database
sudo apt install mousepad >> installs the program "mousepad"
Only usefull in the persistence mode. The device must be connected to the internet.
======================================================================
eject -T >> ejects CDs or DVDs
======================================================================
grep >> filters the output of commands
acpi -V | grep -i battery >> shows only the lines of acpi -V wich contain the term "battery"
======================================================================
(sudo) inxi >> system information
sudo inxi -v 5 >> informations with verbosity level 5 (1-8 possible)
inxi -B >> battery information
sudo inxi -M >> informations about the system
inxi -m >> informations about the memory
Sudo is only needed if informations inxi gathers need root permissions
======================================================================
iwconfig >> shows informations about wireless connections
======================================================================
lsblk >> lists blockdevices like harddisks
======================================================================
======================================================================
lspci >> lists all recognized pci-devices
lspci | grep -i Network ( or Wireless or WLAN ) >> shows Wifi-devices
======================================================================
lsusb >> lists all recognized USB-devices
======================================================================
rfkill >> tool for radio devices
rfkill list all >> lists the states of all radio devices
rfkill unblock all >> unblocks all softblocked devices
To unblock a hardblocked device:
- look for a hardware switch
- look for a keyboard function/binding
- look if the device is blocked in the UEFI/BIOS
======================================================================
(sudo) shred >> tool to securely delete devices or partitions
Usage:
sudo shred /dev/sdX -v -f -n 2 >> overwrites sdX 2 times
Shred will overwrite each single byte of the target device, so it might take a long time.
BE CAREFUL !!! BE SURE TO USE THE PATH TO THE DEVICE/PARTITION YOU REALLY WANT TO CLEAN !!!
======================================================================
sudo >> command to get root permissions
In labtix no sudo-password is installed, so typing in a password is not needed
======================================================================
wipefs >> tool to delete filesystems
Usage:
sudo wipefs -a -f /dev/sdX >> wipes the filesystem of sdX
BE CAREFUL !!! BE SURE TO USE THE PATH TO THE DEVICE / PARTITION YOU REALLY WANT TO CLEAN !!!
This is not a secure method of deleting any devices, it's the quick and dirty solution if you want to get rid of an installed system. For safe deletions use the command "shred"
======================================================================
xkill >> tool to kill windows that are not responsible
Usage:
Open a terminal, type "xkill" and press "Enter". The mousepointer will be shown as a skull. Leftclick with the skull inside the window you want to close. Xkill will only close windows. In some cases processes started by the killed window might still run in the background.
Do not click on the Desktop, it is a window too !!!
======================================================================
xrandr >> tool to manipulate the graphical-(x-)server
xrandr --output eDP-1 --scale 0.5x0.5 >> reduces the height and width resolution of output eDP-1 by the factor 0.5 . Very useful if the screen has a very high resolution.
To get the name of the actual output:
xrandr | grep primary
======================================================================
Dual boot MacOS and Ubuntu
Step-by-step instructions on how to install macOS and Ubuntu on a Mac computer.
There are four parts:
01: Prepare Your Stuff
Requirements
- A 4GB or larger USB flash drive to create a bootable image
- (Optional but recommended) Another 4+GB USB drive or external HD to store the files that you will download later
- At least 40GB free on the Mac HD
Downloading Files
Download the following files from labdoo@ftp.labdoo.org:/macOS-ubuntu:
- refind-bin-0.12.0
- ubuntu-mate-20.04-desktop-amd64.iso
- unetbootin-mac-681.dmg
It is strongly recommended that you install and use a download manager software (e.g. FileZilla) to download the files since the iso file is huge, and the download manager can resume the download just in case you lost the connection. Save the files to a USB drive or external HD. Below is a screenshot using FileZilla:
Create Bootable USB
Do the following on a working Mac. Otherwise, complete “The Mac Side” section and come back here.
- Insert a blank USB
- Double click on the file unetbootin-mac-681.dmg that you downloaded earlier
- Right-click and select Open
- Click the Open button
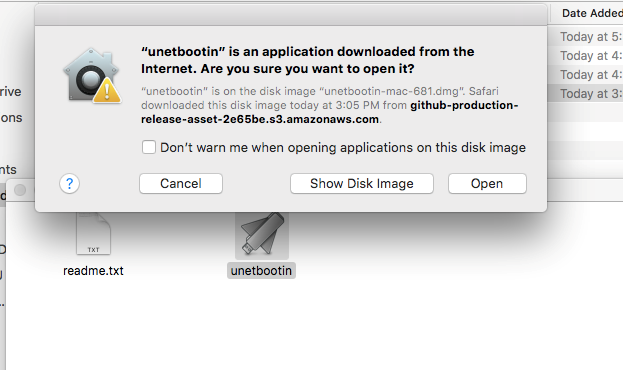
- Enter the password if prompted. The UnetBootin application will open. Select “Disk Image” option and the Ubuntu ISO file you downloaded earlier
- Click OK. UnetBootin will extract and copy a bunch of files to the USB drive.
- When it’s done, eject the USB drive by clicking on the Eject icon:
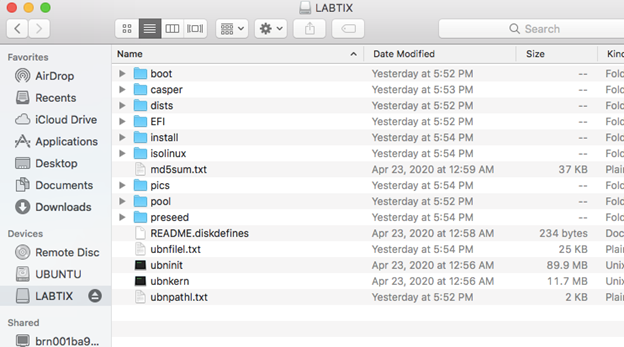
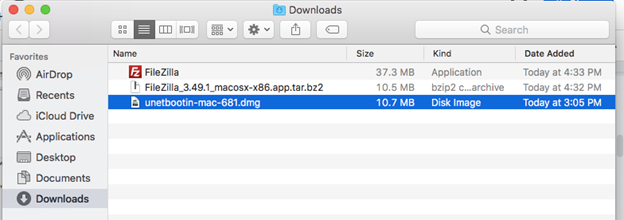
The USB drive now can be used to boot any Mac.
02: The Mac Side
If MacOS is missing
You will need to have Wifi and internet access to reinstall macOS.
- Booting the laptop.
- If it prompts you to install a new OS, simply connect to your WiFi and follow the screen
- Otherwise, reboot the laptop, holding both the Command and R keys until you see the Apple logo. Then select “Reinstall macOS” from the menu
If MacOS is present
If you know the password of the admin user, congratulations!. Otherwise, follow these steps to reset the password:
- Reboot the laptop, hold the Command + R keys until the Apple logo appears.
- Select Utilities -> Terminal to launch a terminal.
- Type resetpassword (yes, one word) at the terminal. Follow the screen to reset the password for each existing account.
- Restart and log in using the new password
“Labdooing” the Mac
Create Labdoo Accounts
You will use the existing admin account to create two new accounts: “student” and “labdoo” and then remove all non-labdoo accounts.
- Log in as the current admin account
- Select “System Preferences” -> “Users & Groups”
- Click the lock icon to unlock. Type password when prompted
- Click ‘+’ to add a new account. A new account form will pop up
- Create “labdoo” account - fill in the form with the following values:
- New Account: Administrator
- Full Name: labdoo
- Account Name: labdoo
- Password: labdooadmin
- Verify: repeat the password
- Password hint: can leave blank
- Create “student” account - fill in the form with the following values:
- New Account: Standard
- Full Name: student
- Account Name: student
- Password: labdoo
- Verify: repeat the password
- Password hint: can leave blank
Delete Non-labdoo Accounts
- Log in as “labdoo”
- Select “System Preferences” -> “Users & Groups”
- Click the lock icon to unlock. Type password when prompted
- Select a non-labdoo account, click the ‘-’ to remove the account
- Select “delete user directory” option. Confirm deletion when prompted
- Repeat step 4 and 5 for all remaining non-labdoo accounts
Change the Computer Name:
We will change the computer name to the labdoo Tag ID:
- Generate a tag ID for this computer if it doesn’t have one yet
- Click “System Preference” -> “Sharing”
- Change the computer name to labdoo-000xxxxxx, where xxxxxx is the tag ID.
Create a Partition for Ubuntu
- Run Disk Utility: Select Go -> Utilities -> Disk Utility

- Disk Utility screen
- Click “Partition”. A dialog box will pop up. Click Partition again

-
Click the ‘+’ sign. A new partition will be added. We now have 2 partitions, each occupies 50% of the disk space. Name the new partition “UBUNTU” and set its format to MS-DOS(FAT).
-
Click Apply
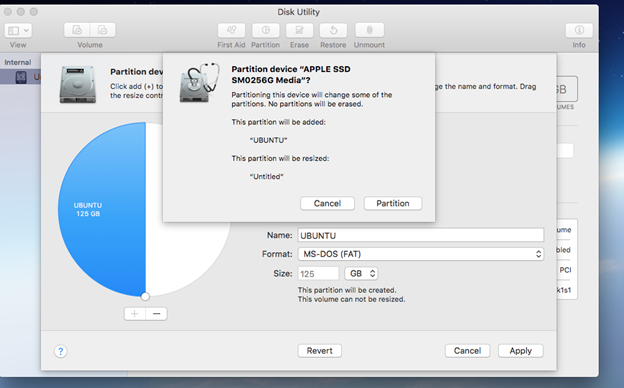
-
Click Partition
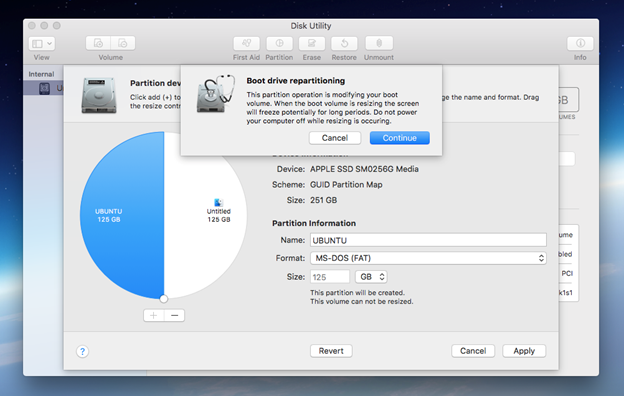
- Click Continue. The process may take a while.
We are now ready to install Ubuntu on the new partition. But there is one task left: to install a boot manager.
Install rEFInd Boot Manager
Disable SIP (System Integrity Protection)
SIP protects critical areas on the disk from being altered, and rEFInd needs to write to one of those areas. Thus, we need to disable SIP before installing rEFInd
- Check to see if SIP is enabled or disabled. Open a Terminal and type “csrutil status”
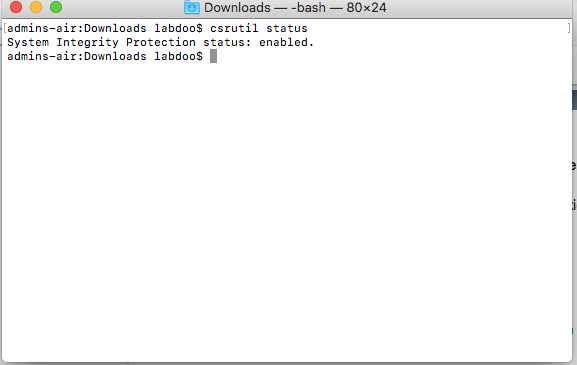
- Reboot and hold the Command + R key until you see the Apple logo. It will boot into Recovery mode.
- Select “Utilities” -> “Terminal”
- At the terminal, type csrutil disable
- Reboot and log back in as labdoo
If it says “enabled” like in the capture above, follow the steps below to disable it
Installing rEFInd
- Open a Terminal
- Open the folder where you downloaded the files earlier
- Arrange the Terminal window and the folder window so you can see both at the same time:
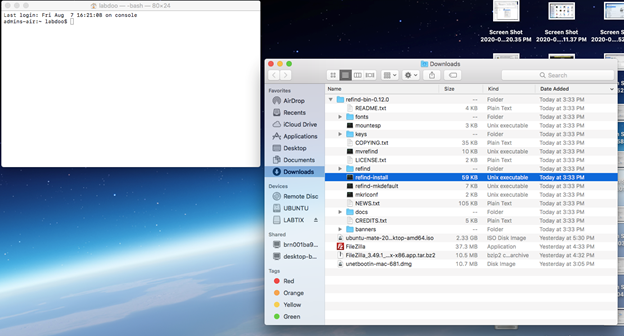
- Drag and drop the “refind-install” file into the Terminal folder
- In the Terminal window, hit Enter or Return key to execute the command. Enter the password when prompted
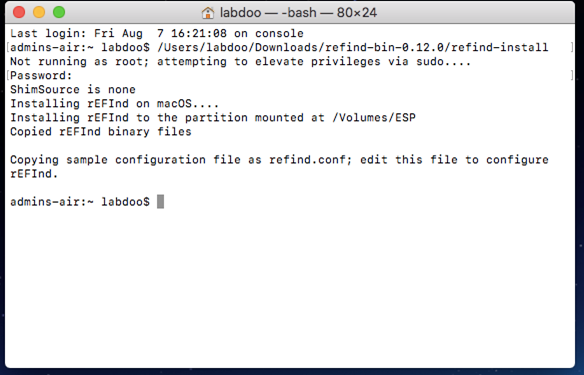
We are now ready to install Ubuntu.
03: Install Ubuntu Mate
- Insert the bootable USB drive that you created earlier
- Reboot. The rEFInd boot menu will show
- Select EFI\BOOT\grubx64.rfi from {your USB drive name} and hit Enter
- Select “Try Ubuntu MATE without installing”
- After a few minutes or so, you should see the Ubuntu desktop
- Click on Install Ubuntu MATE 20.04LTS
- Follow the screens to complete the installation. IMPORTANT:
- Under the “Updates and other software” screen, make sure you select “Install third-party software for graphics and WiFi hardware and additional media formats”. Click Continue. Then connect to your WiFi network when prompted.
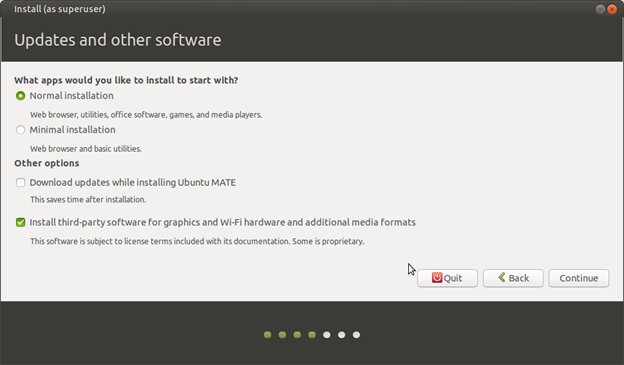
- Under the “Installation Type” select “Something else” option
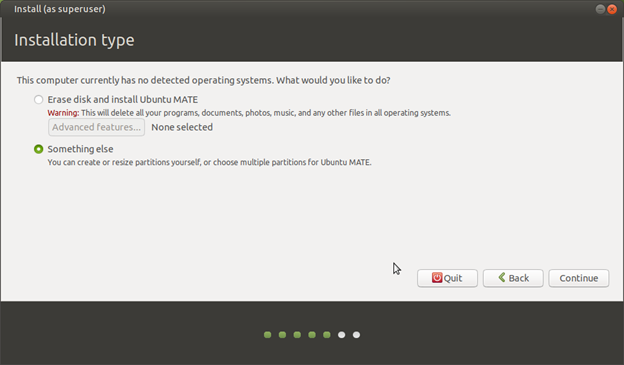
- Select the partition with format fat32 which we created earlier using Disk Utility
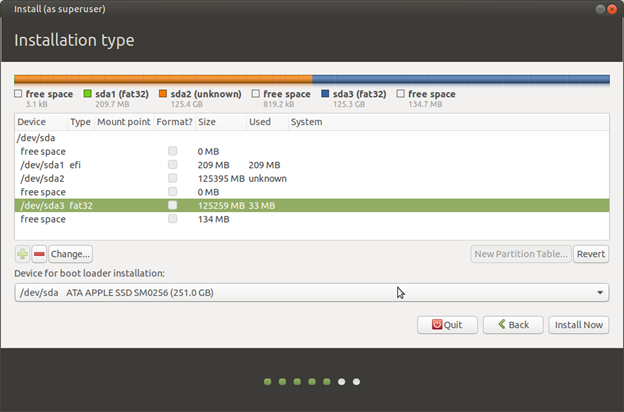
- Double-click the highlighted entry. A dialog box will pop up. Select:
Ext4 journaling file system
Check “Format the partition”
Mount point: /
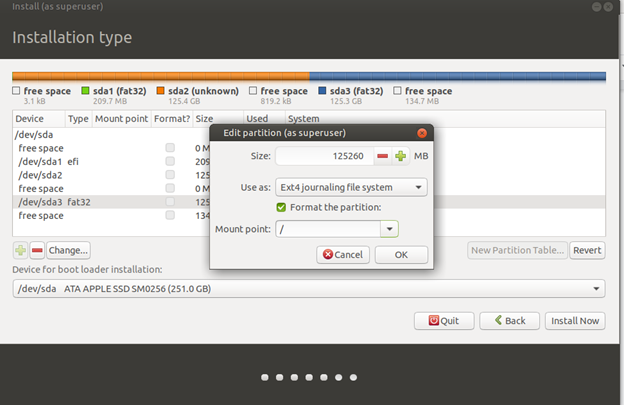
- Click OK
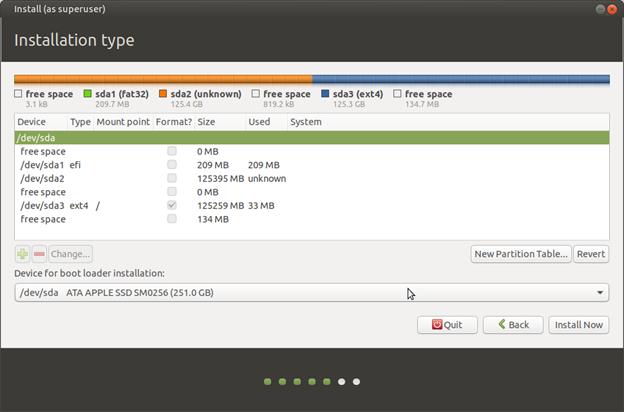
- Click “Install Now” and follow the screens to complete the installation. At the “Who are you” screen, create the labdoo account and use the tagID for the hostname:
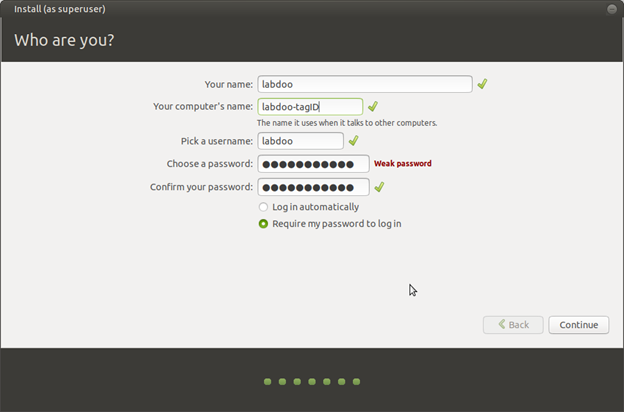
- When the installation completes, click restart to reboot the system. Hold the Option key while the system reboots until you see the original boot menu
IMPORTANT NOTE:
The installation of Ubuntu overwrites the EFI boot area that we created earlier in the “Installing rEFInd” section. But without the EFI boot area, the Ubuntu installation would fail for some reason that I haven’t figured out. Thus, we’ll have to install rEFInd again. - Select booting from macOS partition and hit Enter key
- Repeat the steps in the Installing rEFInd section again
04: Post Installation
Enable SIP
- Reboot into recovery mode: hold Command + R key while rebooting until the Apple logo appears
- Select Utilities->Terminal to open a terminal
- Type “csrutil enable” and hit Enter key
- Reboot