Information for Labdooers (Volunteers)
In this guide you will find useful information for Labdooers (Labdoo users/volunteers), including information about how to sanitize laptops, how to package them ready for traveling, or general tricks and tips among others. While this document attempts to be comprehensive, if you have any questions that do not get answered in this guide, please post them directly in any of the Labdoo Teams and one member of the Labdoo community will provide an answer.
Collecting, Sanitizing and Delivering Laptops: Complete Step by Step Guide
Step 1: Collecting Unused Laptops
This section describes the first step, where you will learn how to collect unused laptops. Keep reading to discover how.
How to Find and Collect Unused Laptops
The first step in the Labdoo process is to identify an unused laptop that can be repurposed for educational means. There are many different ways to identify and rescue laptops that are no longer used. Here are some ways to do so, among others:
- Reach out to your relatives, some of your family members may have an unused laptop.
- Ask your neighbors, it is also likely someone around you has one or more unused laptops.
- Contact the IT department at the company you work for, in many cases laptops are unfortunately thrown away when they are replaced.
- Make a post on your favorite social network asking your friends and contacts for unused laptops.
- Get creative and come up with your own strategy to find unused laptops, odds are that you will succeed. After all, more than 500 million computers are retired every year all over the world!
Remember that Labdoo will only accept laptops that have at least 1GB of memory RAM and that actually work (the easiest way to check if it does is to turn on the laptop and see if it is running). Otherwise, the laptop would not be suitable for educational purposes and can't be accepted. Note also that even if the battery does not work, the laptop can still be used and accepted as a valid contribution, since it can be plugged in the power source as any other computer. Finally, it's important to make sure you also collect its AC adapter and power cord.
Once you have rescued one or more laptops, you can move on to the next section.
Tagging a Laptop
Once you have collected an unused laptop, you need to register it into the Labdoo platform so it can receive a Labdoo ID number. The laptop status gets to be updated when it transits into the next step of the Labdoo process via this unique Labdoo ID number. Users can use it to trace the progress of the laptop. It also helps the hub managers to plan for their resources.This provides transparency and accountability in the Labdoo process.
Please follow these simple steps below to tag a laptop:
- If you haven't done so yet, start by creating your account in the Labdoo platform by following this link: https://www.labdoo.org/user/register
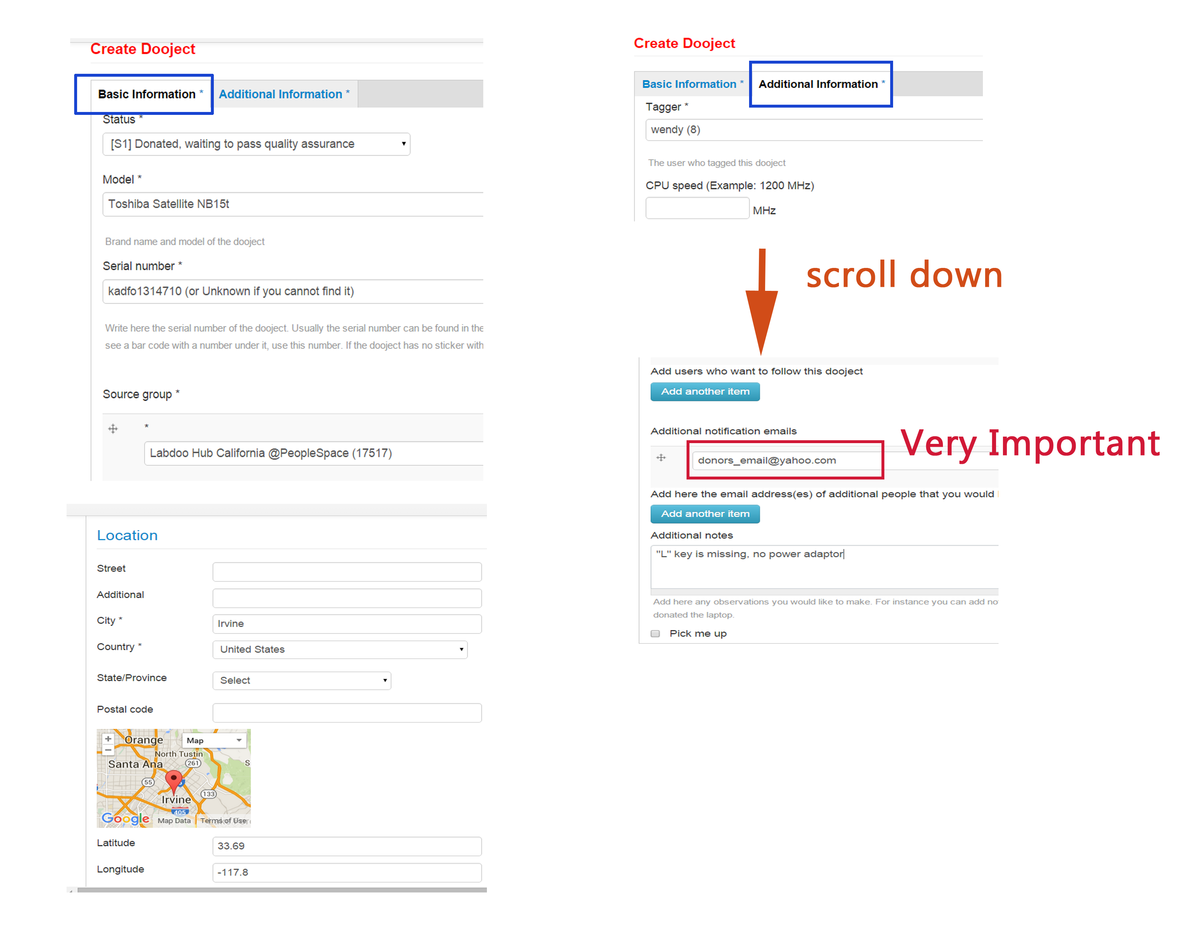
- Click on the "Dootronics" menu that you will find at the top of the page and then click on the option "Tag it!". (Make sure you are logged into your Labdoo account to be able to access this page). Fill in the form with as much information about the laptop as you can, and then click on "Save".
- All the questions ended with a "*" are required fields that you cannot leave blank. If you cannot find the serial number on the laptop, type "unknown" in the field.
- If you are tagging the laptop on behalf of someone else, please fill in the field "Additional notification emails" with that person's email address so that they get email updates every time the laptop's state changes as it makes its way to a destination school.
- After saving the form, it is very important to click on the link "Print tags". A new screen with the tags will show up. Print them and don't forget to attach them to the laptop to make sure it can be properly traced as it makes its path towards a project. See this diagram illustrating how the tags should be attached.
| Figure 1. To tag a laptop, go to 'Dootronics' and click on the menu option 'Tag it!'. |

|
| Figure 2. Example of tagging procedure. |
|
Step 2: Sanitizing a Laptop
This section describes the second step, where you will learn how to sanitize a laptop and install the Labdoo's educational package. Keep reading by clicking on the menu below to discover how.
Creation of a Labtix Bootable USB
1. Download Labtix.iso
Start by downloading and installing the FileZilla FTP client application from this link: https://filezilla-project.org/
Then, open FileZilla and connect to the Labdoo FTP server using these parameters (see also Figure 1):
Host: sftp://ftp.labdoo.org (this link can only be open once in FileZilla)
User: labdoo
Password: labdoo
Port: 22
| Figure 1. Use the parameters shown in this screenshot to connect to the Labdoo FTP server with FileZilla. |

|
In the 'remote site' window of FileZilla, go to the folder /install-disk. In this folder, you will find the file Labtix.iso. Right-click on this file with your mouse and select the option 'Download'. That way the file Labtix.iso will be downloaded to your local computer.
2. Create a bootable USB with Labtix.iso
Download the Universal USB Installer from this link: https://www.pendrivelinux.com/universal-usb-installer-easy-as-1-2-3/
Run this application by double clicking on the downloaded file. You will see the following screen, where you will need to accept the license agreement:
| Figure 2. Download and run the Universal USB Installer and accept the license agreement. |

|
Next, insert a blank USB pendrive into one of the USB ports in your computer. We recommend to choose one with at least 2GB of storage. Note that all the data you had previously saved in the pendrive will be erased, so make sure to have a backup copy.
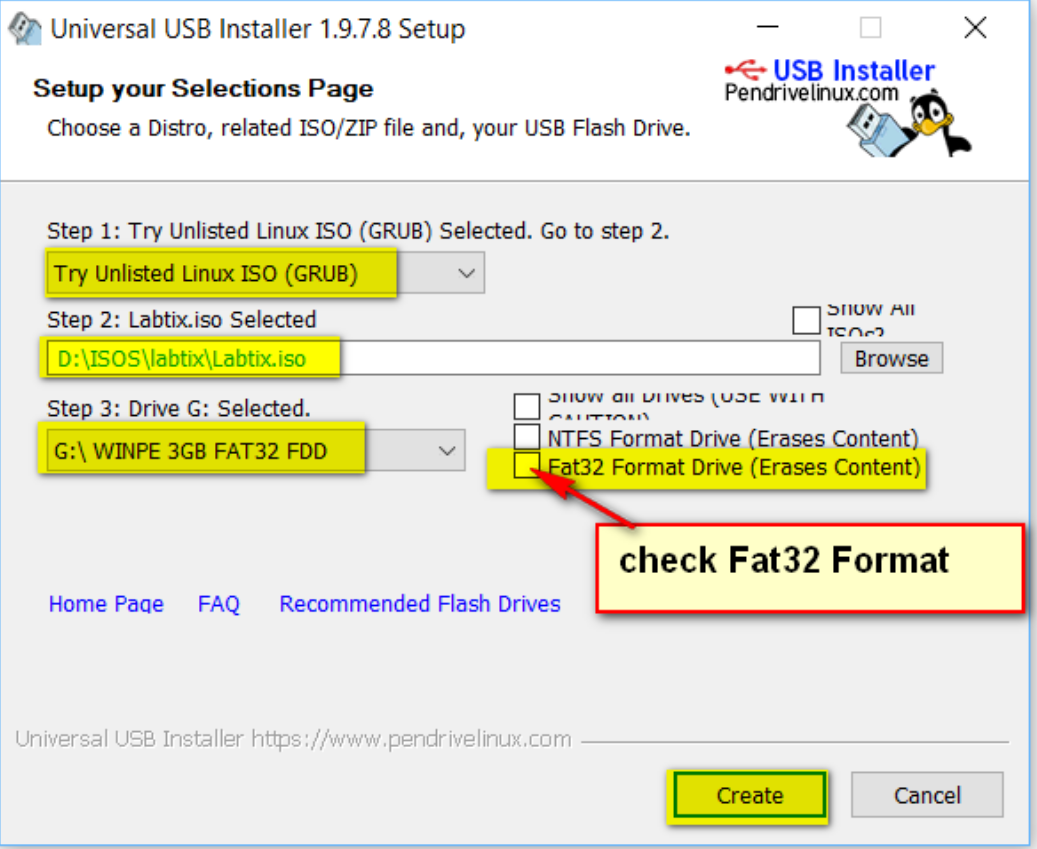
Then, fill in the fields in the next screen by using the parameters that appear in the next figure. As the screenshot shows, in the field Step 2 please select the Labtix.iso file previously downloaded and then select the corresponding USB pendrive in Step 3:
| Figure 3. Use the parameters shown in this screenshot to create the bootable USB pendrive. |
|
Continue by accepting every following screen as shown in the next figures:
| Figure 4. Accept this screen. |

|
| Figure 5. Accept this screen as well. |
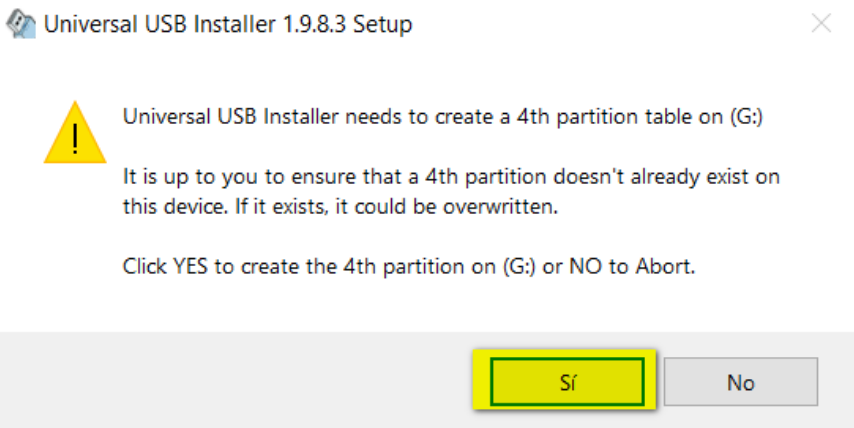
|
That's it. Now you have a bootable USB pendrive with the Labtix ISO. Go to the next wiki page to continue with the sanitation process.
Downloading the Labdoo Images
In this step, you will need an external hard drive where you will be downloading one or more Labdoo images from the Labdoo FTP server. We recommend choosing a hard drive with at least 100GB, although one with a larger capacity (e.g., 200GB, 500GB or 1TB) would be even better in case you wanted to download some of the larger images.
Start by connecting again to the Labdoo's FTP server using FileZilla (see the previous section for a description on how to do this).
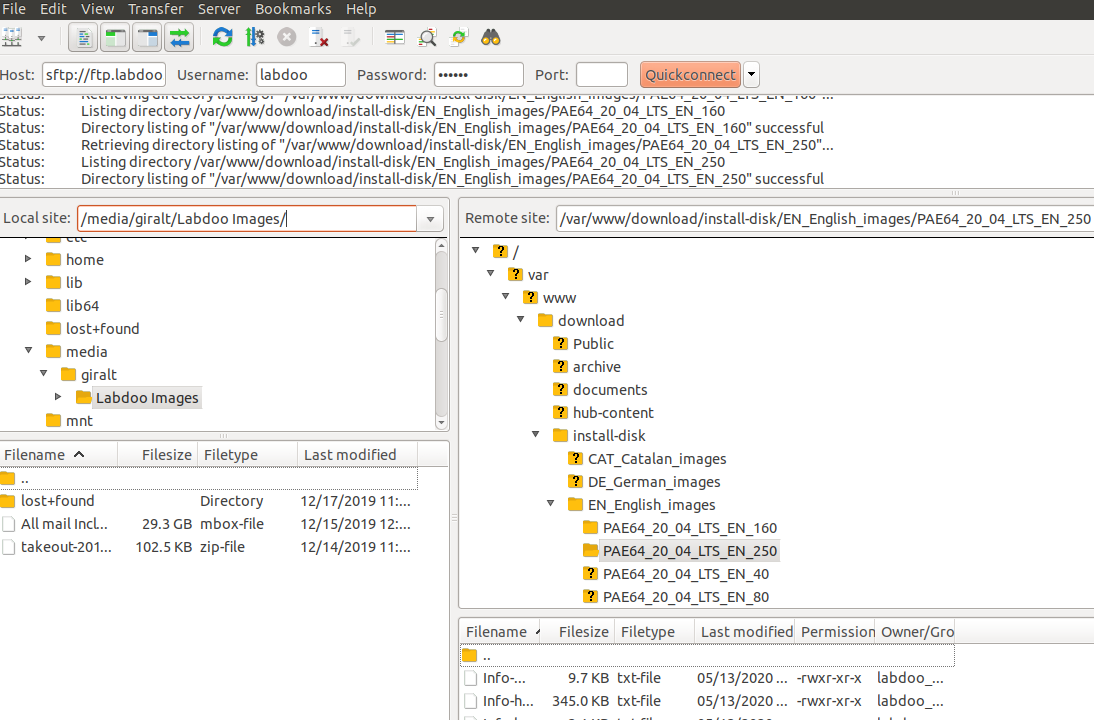
Then, go to '/'. In this location, you will find multiple directories of the form XX_images, where XX indicates the language of the image. Each of these directories contains multiple images organized by size. For instance, inside the English images directory 'EN_English_images', you will find the directory 'PAE64_20_04_LTS_EN_160'. The name of this directory lets us know that we are facing a (PAE) 64-bit image based on Ubuntu 20.04 LTS, with English as the default language and with a total of 160GB of educational content. The size of the file, 160GB in this case, corresponds to the minimum size that the hard drive must have in order to be able to store this image.
Make sure that, in the field 'Local site' , you select the external hard drive where you want to download the images.
Now go ahead and download the image that you are interested in. For instance, if you are interested in downloading the image 'PAE64_20_04_LTS_EN_160', the one we mentioned above, travel to the directory '/install-disk/EN_English_images/', right-click on the directory 'PAE64_20_04_LTS_EN_160' and select the option 'Download'. The image will be automatically downloaded to your external hard drive. Download as many images as you need, provided that you have enough space in your external hard drive. Note that the process of downloading one or more images could take a significant amount of time, depending on the speed of your connection.
| Figure 1. Directory structure where you can find all the Labdoo images. |
|
Installation of the Labdoo Image Using Labtix
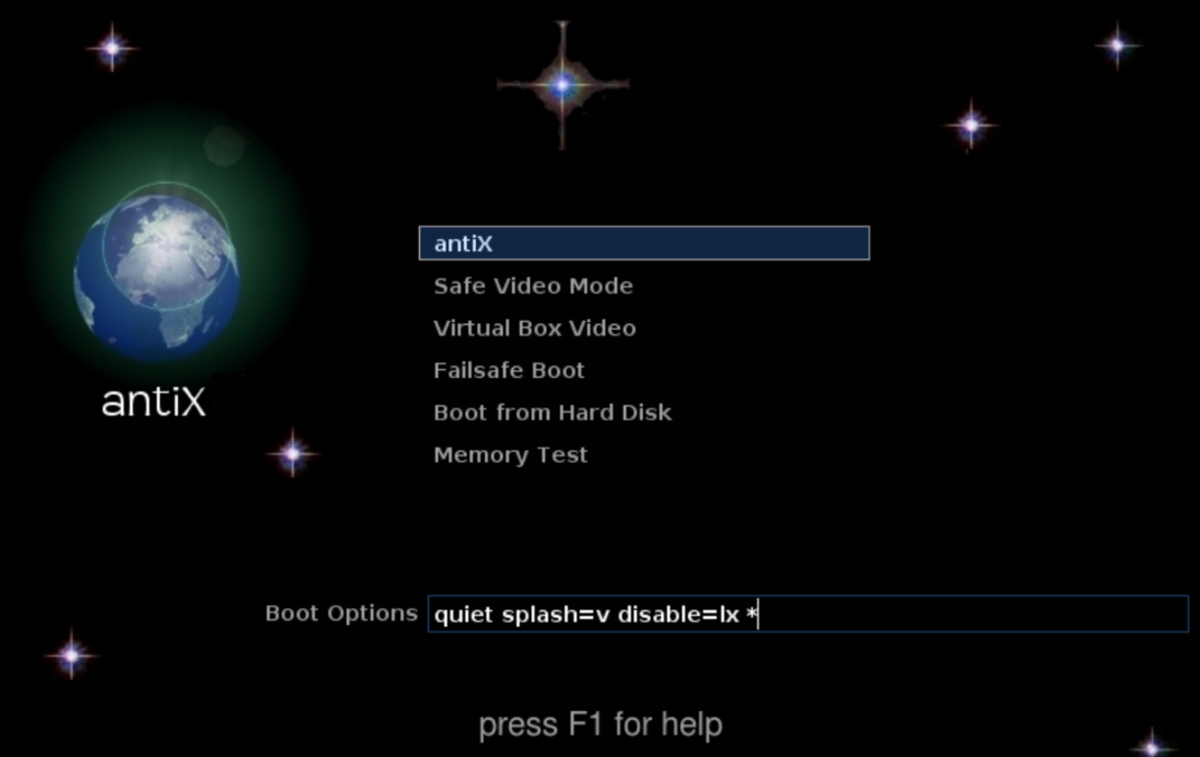
Plug the Labtix Bootable pendrive into one of the USB ports of the computer that you want to sanitize. Start the computer and verify that the Labtix software boots correctly. If it does, the following screen will show up:
| Figure 1. Initial Labtix screen when a computer is booted. |
|
If you don't see the screen shown above, it most likely means that you need to modify the boot order to make sure the computer properly loads the Labtix software stored on the USB pendrive. In this case, please follow the instructions on this wiki page to change the boot order of the computer and ensure that the USB pendrive is selected as the first boot device. After doing this, reboot the computer and, if the screen shown in figure 1 finally appears, you will know that Labtix is correctly booted.
Upon reaching the screen in Figure 1, select the first option "antiX" and press enter. This will take you to the next screen:
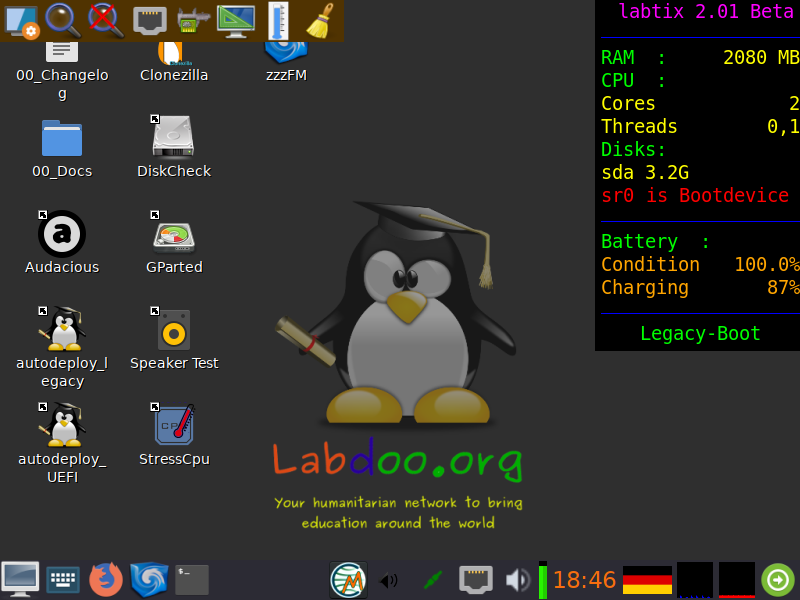
| Figure 2. Once in this view, double-click on the icon 'Labdoo installer'. |

|
Note that in the upper-right corner of the screen you will see a summary of the key parameters extracted from the laptop. It includes the following information:
- Vers: the version of the Labtix software that you are using. In Figure 2, this value is '1.01'.
- CPU: the type of CPU (32-bit or 64-bit). In Figure 2, this value is '64 Bit'.
- Boot: The name of the booting USB device where Labtix is running. In Figure 2, this value is 'sr0'.
- RAM: The amount of memory in the laptop. In Figure 2, this value is '2703' MB.
- Sdx: The name of the hard drive where the Labdoo image is to be installed and its size. In Figure 2, the name of the disk is 'sda' and it has '100GB' of storage.
In the screen shown in figure 2, make sure to enter the name of your computer's hard drive. This name is typically of the form Sdx (for instance, sda, sdb, sdc, etc.), but not necessarily; it depends on your computer. The actual name can be found in the 'Sdx' field located in the upper-right corner of the screen. For instance, in Figure 2, the name of the hard drive is 'sda'. To be sure that it is in fact the actual hard drive of your computer, you can double-click on the application GParted, which will show you all the drives attached to your computer.
Click on OK to go to the next screen:
| Figure 3. Parameters needed to initiate the installation. |

|
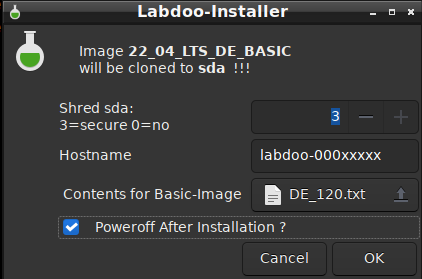
In this screen, you will need to specify the following parameters:
- Shred: This option specifies the number of times the hard disk must be shredded prior to initiating the installation of the image. The operation of shredding consists in writing random zeros and ones everywhere in the hard drive to ensure any prior personal information is completely erased. Labdoo recommends setting this value to 3, so that three full shreds are carried out, ensuring that all existing information is erased.
- Target disk: This corresponds to the name of the hard drive that you introduced in the previous screen (see Figure 2), which is the disk where the image will be installed.
- Disk size: This field specifies the size of the chosen disk. This size will determine what image you can install, since you can't select an image larger than this value. For instance, in Figure 3, the size of the chosen disk (sda) is 100GB, so you need to make sure you don't install an image that is larger than 100GB.
- Choose an image: In this step you will select the image to install. Click on this field, then select the option "Other...", and browse through the directory tree to select the image you want to install. In the directory tree, make sure you go to the external drive where you installed the images, and travel to the directory where you stored the image you want to use. Then, click "Open". This will populate the field "Choose an image": with the right path to your selected image. As mentioned in the previous parameter, make sure that the image you select is smaller than the size of the disk shown in the parameter "Disk size". By convention, the last value of the image name corresponds to its size. For instance, the image PAE64_20_04_LTS_EN_80 weighs 80GB, so you will need a disk with at least 80GB of storage.
- Hostname:This field corresponds to the hostname that will be assigned to the computer after the image has been installed. By convention, please always choose a name of the form 'labdoo-XXXXXXXXX', where XXXXXXXXX is the 9-digit Labdoo ID of the computer you are sanitizing, which you had previously generated in the section 'Tagging a Laptop'.
After you have populated all the parameters above, click "OK" on all the following screens. Then the actual process of shredding and installation of the selected Labdoo image will initiate. Note that this process could take a while, even more than an hour, depending on the size of the disk and the size of the selected image.
Step 3: Delivering Laptops to a Project
The third and last step is delivering the laptop you sanitized in the previous step to an educational project. To complete this process, do as follows:
- First, check if there is an existing project near your location. You can see the full list of projects in this dashboard. If you find a project near your area, reach out to them directly by using the contact information you can find in that project's dashboard. Ask them if they need an additional laptop and if they would be willing to accept your contribution.
- If you don't find any existing project near your location, try to find a school or a mentoring association nearby that works in the area of education. Some examples of valid organizations are: schools, associations working with refugees or, more in general, any organization that provides schooling or mentoring services to those who don't have access to education. If you find one, ask them if they need laptops and if they would be willing to accept your contribution. If the answer is yes, then reach out to the Labdoo team by filling in this form. A Labdoo volunteer will reach back to you and help you create this project.
Once you have completed any of the two steps above, you can now deliver the laptop to the chosen project. Finally, make sure to update the status of your laptop to S4 and assign it to the corresponding project. (If you don't know how to update the status of your laptop to S4, see this wiki page.)
Congratulations, if you have reached this point, by now you have already improved someone's life by providing them an education!
Additional Info on how to Sanitize a Laptop
Sanitation Guide: Fast Restoration Method (Labtix)
Labdoo recommends installing by cloning images with the free installation tool Labtix, developed by Labdoo helpers. As you could see in the video tutorial, there are numerous setting and selection options to adapt Labtix to your requirements.
Since Ubuntu version 20.04 LTS (April 2020), there are only 64 bit versions as hybrid images that can boot in both legacy and UEFI mode. To install current Ubuntu images, however, Labtix version 2 had to be adapted.
Labtix is regularly developed further. Please check our FTP server regularly for updates http://ftp.labdoo.org/download/install-disk/Labtix/.
32 bit versions of the images cannot be installed with Labtix 2 anymore. If you still want to work with the old 32 bit images you have to use Labtix 1. However, neither the 32 bit images nor the installation tool Labtix 1 will be maintained further. For the 32 bit Ubuntu versions the support of the developers has also expired. More about Labtix 1 on https://platform.labdoo.org/de/content/labtix-1-archive.
| Version | Ubuntu 20.04 LTS (64 Bit) | Ubuntu 22.04 LTS | Linux Mint 22 (based on Ubuntu 24.04 LTS) |
|---|---|---|---|
| Labtix 2 | |||
| Labtix 3 | |||
| Support Ubuntu bis | 2025 | 2027 | 2029 |
Note for advanced users: Labtix has a persistence mode, i.e. you can make your own changes to Labtix and save them. You act as root user in fact. The password (only needed if you "get stuck" in the terminal when booting ) is "labdoo". But beware - as root you can destroy Labtix or bloat it by too many changes. Labtix fits on a CD when delivered. The tool ISO-snapshot also allows you to create a new ISO-file that takes over possible changes to the system.
Labtix comes with various tools and installation tools https://platform.labdoo.org/en/content/preinstalled-tools-labtix.
Most of them can be found directly on the desktop. You have to decide for yourself which tool suits you best:
You can find the installation tools directly in the context menu of zzzFM:
- Labdoo installer for cloning the hybrid images that boot in legacy and UEFI mode,
- Labdo legacy installer for a pure legacy installation if a device has problems booting a hybrid installation.
On the Labtix desktop you will find a Docs folder containing manuals in PDF format. However, we recommend that you first watch the individual steps and tools as a YouTube video tutorial.
Sometimes you have to select certain settings in the boot menu because of the hardware, e.g. with netbooks or Apple laptops often failsafe mode etc. Otherwise it can happen that Labtix does not boot, hangs at terminal level (the desktop does not appear) or the monitor remains dark.
Then try out the options in Failsafe Mode or Safe Video Mode. This is also explained in the above YouTube tutorial.
You can find all video tutorials on our YouTube channel https://www.youtube.com/user/LabdooDACH/playlists and on our FTP server http://ftp.labdoo.org/download/Public/videos/for-technicians/.
Labtix release information
All Labtix versions can be downloaded from the FTP server
current version: http://ftp.labdoo.org/download/install-disk/
older version (archive): http://ftp.labdoo.org/download/archive/Labtix_former_releases/
Labtix 2 (from 2022)
Since its launch in 2017, Labtix has become the most popular installer and remover tool within the Labdoo project. Labtix Release 1 is based on a 32-bit Antix 17 (2017) kernel. Labtix 2 is based on a 64-bit Antix 21 (2021) kernel.
Don't put Labtix 1 too far away as this "old" version works well with "old" hardware. And the new Labtix version 2 fits the more modern your donated laptop is, which requires current drivers that are only available in 2. And cloning images of 22.04 LTS and higher Labtix 2 is mandatory.
Ubuntu 22.04 LTS introduced a new boot partition format (grub2 core.img). Labtix 1 and also older Clonezilla versions do not know this format and therefore cannot clone current images on Ubuntu 22.04 and higher! Please try whether Labtix 2 starts with a setting such as failsafe or safe graphics if there is a problem. Then there would be Parted Magic as another installation tool on the web. Or you would have to take Labtix 1 and an image based on 20.04 LTS.
However, we recommend using Labtix 2 by default as it comes with many improvements and features:
- Labtix 2 is based on Antix 21 and is only available in a 64-bit version. There is no longer a 32-bit version (sorry). Users who require a 32-bit version must use the earlier Labtix 1.
- The images provided by Labdoo on our FTP server can be processed with either Labtix 1 or Labtix 2.
- You need for Labtix 2
- At least one 2GB USB key (recommended) or DVD to install and run Labtix 2 on. It is not possible to install Labtix 2 on a CD or a 1GB stick (too small).
- min. 1.5 - 2 GB RAM in the computer to be installed.l
- Labdoo team has changed the user interface as little as possible, so you don't need long training. Some changes were mandatory, e.g. Labtix 2 comes with the file manager zzzFM (Fork of SpaceFM). And 4 years of software development have passed...
- Standard installation from the context menu of zzzFM with the Labdoo installer which performs a legacy and UEFI bootable (hybrid) installation,
- Legacy installation with the Labdoo legacy installer from the zzzFM context menu for devices that cannot boot with Labdoo's hybrid installations.
- The images provided by Labdoo on our FTP server can be processed with Labtix 1 up to 20.04 LTS and with Labtix 2 from 22.04 LTS.
- From summer 23, only Labtix 2 will allow you to install the new smaller BASIC images and the desired content at the same time. If installed otherwise, the content can be added in Labdoo using the script.
- UEFI (only for technicians): The number of IT donations with UEFI will increase. Normally you turn off UEFI and Secure Boot in the BIOS and enable Legacy Boot. However, there may be reasons why this is not possible (e.g. BIOS locked by unknown password; no legacy support implemented, etc.). There was already a manual UEFI procedure in Labtix 1, in Labtix 2 it is now largely automated. Labtix shows which mode (Legacy or UEFI) was booted in and you select the appropriate installation script in the 2-click installer in the file manager. If you select the UEFI Sprit, this happens: On the installation medium, the folder /UEFI with the UEFI image must be in the top folder. This small UEFI image is automatically installed first, followed by the actual image you want. After the installation, the UUID of the 2nd partition is entered in the grub file so that the computer starts up correctly. Labdoo had to decide to either maintain 2 complete sets of images (UEFI and legacy), which would have taken a lot of time and storage space on our servers. Or to have only one set of images (legacy) with the above solution, which is still started correctly in connection with an upstream UEFI image. Sounds more complicated than it is, everything is set automatically during installation.
- Improved user support and more tools available:
- Remaining battery capacity: Labtix shows the percentage (%) of the remaining battery capacity (life cycle), e.g. 20% means that only ⅕ of the original battery capacity is available and a new battery should be considered.
- Better support for SSDs
- New driver for current hardware (graphics card, interfaces, LAN/WiFi etc.).
- Additional tools: Speaker test, Live USB Maker, Avahi network scan, StressCPU (°C/°F check), DiskCheck and much more.
- Images for Cloning:
- A new set of images for cloning based on Ubuntu 22.04 LTS was made available and uploaded to our FTP server in mid-2022,
- the 20.04 LTS based images are moved to the /archives directory on the FTP server,
- The 18.04 LTS images need to be removed from the FTP server due to the capacity of the FTP server (those were the last images that could run on a 32-bit CPU; thus ending the 32-bit range for the Labdoo project) .
- From summer 2023, only small “BASIC” images will be used for the respective languages. The content is then installed in Labtix by the installers. The large images that contain content will continue to be created for a while, but will be phased out in the long term.
Any image release can be processed with any Labtix release, fully compatible.
Labtix 1 (2017 - 2021)
Based on Antix 17 (2017) you get a complete set of refurbishment and installation tools. Labtix 1 runs on 32-bit and 64-bit CPUs. The drivers included in Labtix 1 work best on older hardware (approx. 2008 - 2018, difficult to define exactly, it's best to try it).
for Labtix
- At least one 2GB USB stick or CD to install and run Labtix 1 on.
- 1GB RAM.
Review of a donated laptop
Looking through a donated laptop
In order to start Labtix or Labdoo, settings in the UEFI may need to be changed. UEFI has replaced the old BIOS system, but can usually still be used in the same way as the old BIOS interfaces.
UEFI Settings
On some laptops it is necessary to change UEFI settings:
BIOS settings
On some laptops it is necessary to change BIOS settings:
| BIOS Settings | Explanation |
|---|---|
| Secure Boot | Must always be turned off (disabled). Sometimes an administrator password must be set in the UEFI to deactivate Secure Boot. The admin password can then be removed again. Labtix does not start in secure boot mode but shows secure boot mode in the boot menu. In rare cases, however, an externally installed Labdoo installation boots on a computer with Secure Boot activated. |
| Trusted Platform Module (TPM) | TPM is a security chip that secures a computer. Ubuntu-Mate, which forms the basis for Labdoo images, is TPM certified. TPM should only be switched off if Labdoo does not boot. |
| UEFI | Up to Ubuntu 20.04 LTS It is recommended to disable UEFI and enable Legacy/CSM. However, there is also a concept for a UEFI-based installation developed by Labdoo helpers for 20.04 LTS. From Ubuntu 22.04 LTS a separate concept was developed for Ubuntu so that both UEFI and legacy/CSM installations are possible. Note: On some computers, Labtix starts and the image installation goes smoothly. But when you restart the laptop you get messages like "Invalid Partition table!" or similar and the laptop doesn't boot up. Then please set the UEFI mode or both (UEFI and Legacy) in the BIOS. In very stubborn cases, the tool uses SuperGrub2Disk (https://www.supergrubdisk.org) to start Labdoo. The bootloader Grub can be reinstalled using the terminal command “sudo grub-install /dev/sda”. An internet connection is required to download the required files! |
| Turbo-Boost | If Turbo Boost is activated, the processor may become significantly too hot when operated under load. In Labtix you can tell that under full load (e.g. with the Stress_Cpu tool) the clock frequency is in the 3Ghz range or higher. As a rule, the CPU temperature then rises well above 70 degrees, which can lead to long-term damage to the CPU. That's why it makes sense to switch off the turbo boost as a precaution. If the turbo boost cannot be deactivated or the temperature is still too high, the Cpupower-Gui tool in Labtix can temporarily help. In Labdoo, the maximum CPU frequency must be permanently limited using the script temperature_workaround.sh in the /scripts/temperature_workaround folder on the desktop! |
Check the hardware with Labtix
System requirements (currently on https://www.labdoo.org/deu/en/faq#FAQ04)
- min. 120 GB disk capacity,
- min. 3 GB RAM, better 4 GB,
- if the laptop is max. 12 years old, it should fit (usually with Windows 7 / 8 / etc. seal.
Does the donated device meet our minimum requirements (3-4 GB RAM, max. 12 years old, min Windows 7 or higher upon delivery)? https://www.labdoo.org/deu/en/faq#FAQ04
You should look through a donated computer before installing it. It makes no sense to give a laptop that overheats in cool regions to hot countries. Or if the hard drive is already "crumbling", how will it survive transport and operation in hot regions? That's why Labtix comes with useful tools for not only the hard drive, but also speakers, temperature curves under load, and much more. more to check.
Recommended hardware checks
| Tool | Check |
|---|---|
| GSmart / DiskCheck | The “Disk_Check” icon on the desktop opens the GsmartControl tool. Checks the status of the target hard drive, usually “sda”. The more “red” notices or icons and the darker red they are, the sooner the hard drive should be replaced. |
| StressCpu / psensor | The maximum temperature should be around 55 to 65°C under normal load, depending on the CPU/GPU type and the ambient temperature. To put load on the CPU, the "Stress CPU" script starts on the desktop (triggers "stress --cpu -8" in a terminal). Watch the temperature display of the CPU sensors in psensor. Stress CPU starts after 10 seconds and runs at full CPU load for 60 seconds in order not to damage the CPU and cooling system.
Under full load the temperatures often rise to over 70°C, less would be better. Many manufacturers specify an acceptable maximum temperature (CPU under full load) of 75° degrees. If temperatures rise to 80°C or higher under load, Stress CPU stops immediately to avoid damage to the processor and cooling system. Then the cooling system definitely needs to be revised (e.g. clean the fan or replace the cooler paste/cooling pads). An overheated cooling system can also be recognized by the fact that the copper-colored heat conductor has turned bluish.
On some devices with Intel i3/5/7 processors, it is helpful to switch off the "Intel Turbo Boost" (it can also be called something else on some devices!) in the BIOS/UEFI in order to get the temperature below 75° degrees during full load. If the device is running in Turbo Boost mode and this cannot be switched off in the UEFI (recognizable by the fact that the clock frequency of the processor is in the 3 GHz range or higher), the clock frequency can be temporarily reduced using the Cpupower-Gui tool (in the top panel of Labtix). become. Values around 2.5 GHz have proven to be useful. After installing Labdoo, the maximum CPU frequency must be permanently limited in Labdoo using the temperature-workaround script. |
| Speaker Test | Alternately checks the left and right speakers. |
| CD/DVD Test | Play an audio CD using Audacious. |
Preparation for installation with Labtix
If you already have a bootable CD or USB stick with the Labtix installation environment and Laboo Images for Cloning, you can skip this chapter.
Using the Labtix tool as a live CD/DVD or USB stick (recommended), Labdoo systems prepared by our helpers and equipped with learning content can be easily and quickly transferred ("cloned") to new computers , using so-called Images. As of Labtix 2.09 there are 4 BASIC images in 4 languages (English, Spanish, German, French). Depending on the language in the target country of the IT donation, you can select the language and upload additional learning content in other languages using control files. Local teams maintain additional images, e.g. in Catalan.
You need 2 things:
Labtix on a bootable medium: this can be a DVD (from Labtix 2.xx, from 2022) or a CD (Labtix 1.xx, 2017-2021) or a USB stick (recommended, 2 GB or larger) with which you can boot a computer into the Labtix environment.
External USB hard drive: for storing the Cloning Images and other learning content from our FTP server (Labdoo Hubs in Germany can be obtained from Labdoo.org e.V. Retrieve donated, pre-recorded boot media and USB hard drives.)
---------------------------------------------------------------------------------------------------------------------------
Labtix: The Labdoo installation environment
In order to be able to install older and newer computers yourself with a license-free tool, Labdoo.org has put together a small solution based on the Linux version Antix, which we called Labtix (composed of Labdoo and Antix).
In Labtix you will find everything you need - for deleting old data on a donated computer, for quick and automated installation of finished systems. In addition, you will find many tools on Labtix to diagnose hardware and analyze and solve problems (CPU/processor, thermal problems (°C), detect damaged drives, battery status, etc.)
You could download the iso files for Labtix from the folder of our FTP server. You could check the correct download using checksums (MD5 or sha512).
Once you have downloaded the file, you can create a boot medium from the iso file (CD or USB stick). This is the boot medium with which you can start and prepare donated computers.
Create a boot medium (CD or USB stick) from the Labtix ISO
Next, convert the ISO file into a boot CD or USB boot stick (simple copying is not enough!). This can often be done with the file manager of the operating system you trust or with additional tools. Below you will find some suggestions. For more, consult the web (search for "create CD / USB stick iso" and your operating system).
Requirements for Labtix 2:
- Installation on DVD possible, a simple CD is no longer sufficient
- USB stick with at least 2 GB of storage space. If Labtix is to be expanded using the persistence mode, it may make sense to use a larger stick.
WINDOWS:
- Install and start a program for creating start media, e.g. Rufus: https://github.com/pbatard/rufus/releases/download/v3.4/rufus-3.4p.exe or alternatives https://alternativeto.net/software/rufus/.
Start Rufus, select the USB device, click on the "Select" button, select the labtix.iso file, then click on Start.
LINUX:
- In Labtix there is the tool Live USB Maker as well as the tool ISO-Snapshot with the help of which you can create an ISO file from the existing system (recommended).
- At https://wiki.ubuntuusers.de/Brennprogramme/ you will find a range of Linux tools that you can use to burn CDs/DVDs, e.g. Xfburn or Brasero,
- zto create bootable USB sticks: Unetbootin, boot media creator, Yumi, drive management etc. As a rule, every distro/desktop environment has a corresponding program installed
- With dd, enter the following in the terminal:
dd if=/Path/to/Labtix.iso of=/dev/target partition bs=1M
But beware: Persistence cannot be set up on USB sticks created with dd! Further details at : https://antixlinux.com/forum-archive/writing-antix-iso-image-on-usb-flas...
MAC OS:
The balenaEtcher tool at https://www.balena.io/etcher/ creates the boot medium in a simple way after installation: select the image file, specify the target drive and the medium is flashed.
---------------------------------------------------------------------------------------------------------------------------
Labtix 2
---------------------------------------------------------------------------------------------------------------------------
Labdoo Clone Images and additional learning content
You must download the images beforehand for cloning. Images are copies of a complete, pre-installed system. Linux has a great feature that other operating systems do not have. You can transfer a system from computer A to computer B - and it will run!
You can find these images online on our Labdoo FTP server http://ftp.labdoo.org/download/install-disk/.
You can download individual files via the browser by clicking on them with the right mouse button and then selecting "save link as".

However, this does not work for folders or for many files! These have to be downloaded individually and this is of course not convenient.
Simple methods for downloading multiple files for all common operating systems can be found at https://platform.labdoo.org/content/connecting-labdoo-ftp-server
Images sind groß und der Download dauert lange. Wenn ihr euch mit FTP-Clients auskennt, empfehlen wir daher sie direkt per FTP herunterzuladen (sftp, user labdoo und Passwort labdoo).
Labdoo BASIC Images for Cloning
Images and learning content have been decoupled since summer 2023. Previously, there were turnkey images, e.g. EN_40, EN_80, EN_160, EN_250 etc. Learning content was already pre-installed in these images, but this bloated the images, led to redundancy and long download times.
You can quickly download BASIC images with approx. 16 GB and then complete them with the desired content either during cloning with Labtix 2 or after rebooting. This is much faster, more flexible and saves time and resources.
In order to decide which image and which content is/are best for you, you would have to take the respective framework conditions into account:
- The CPU/processor architecture of the computer you are currently working on (only 64-bit has been supported since 2018). Current images from 2020 are only available as 64-bit versions.
- The language(s) in the target country for which you want to install.
- The size of the hard disk in the computer to be refurbished. The size of the hard disk is displayed e.g. in the BIOS or after booting Labtix.
The name of a BASIC image on the FTP server says:
- xx_04_LTS = Version on which Ubuntu is based, e.g. 22.04 LTS (older versions are in the archive)
There are standard directories for each available BASIC image and user language.
- English (EN): http://ftp.labdoo.org/download/install-disk/EN_English_images/
- German (DE): http://ftp.labdoo.org/download/install-disk/DE_German_images/
- Spanish (ES): http://ftp.labdoo.org/download/install-disk/ES_Spanish_images/
- French (FR): http://ftp.labdoo.org/download/install-disk/FR_French_images/
...and more to come.
Additional learning content
Additional learning content can be combined with the BASIC images. The content must be available locally on a local storage medium or on a local server. Downloading from the FTP server during installation is deliberately not supported (overloading the FTP server and taking a long time).
- Either during installation with Labtix. content: none is preset in the mask. If you click on it, you will be redirected to the folder with prepared control files. The names provide information about the content and required disk size, e.g. EN_SW_250 installs English and Swahili content and requires a 250 GB disk.
- Or after the installation process with the script installscript-content.sh, which can be found on the desktop in the /scripts folder. The process is the same as before, only you have to manually navigate to the folder with the control files for the content (usually on install-disk/wiki-archives/content_list
).
Preparation of the external USB hard drive (1+ TB)
The downloaded images are already unpacked and ready for immediate use. Copies them to an external hard drive or a local server. The USB disk must be formatted to store large files. For example, FAT32 is not possible because FAT32 can only handle files smaller than 4GB. NTFS is the recommended file system for an external hard drive.
Images and educational content
New functions are available from Labtix 2. In recent years, Labtix has become the most used installation tool worldwide within the Labdoo project.
In keeping with this, Labdoo (Germany) has been providing "pre-assembled, ready-made" images for cloning on the FTP server in various languages and contents for years. And here success has created a bottleneck. Thousands of helpers are now downloading the freely available, free images from the FTP server. The infrastructure and bandwidth, kindly provided free of charge by the Polytechnica Barcelona data center, are being shared by more and more users and this leads to slow downloads.
We have therefore expanded our concept. 2.09 can now handle both "finished" images as before, but also the new BASIC images without content.
These "finished" images will soon be removed from the FTP server. You will then find BASIC images prepared in 4 languages.
The big advantage:
There are now only 4 small BASIC images each approx. 16 GB (DE, EN, ES, FR), which drastically reduces the upload and download volume. So far all images were around 500 GB...
How does it work?
There are now control files that tell Labtix what content to install where. This affects the Kiwix and browser-based archives, which were previously part of the "finished" images.
This means that content is not saved multiple times in images, but only once in the folder http://ftp.labdoo.org/download/install-disk/wiki-archive/ (you also need the subfolders here locally from the FTP server or ask for them via USB disk from your national hub representative).
This additional feature has other advantages. For example, you can create your own control files and quickly exchange them with each other, e.g. a file for reinstalling special content. Using a control file, it is also possible to install additional learning content in additional languages, e.g. the FR content for the EN_250 package.
The name of the control file specifies: 1. Language at the front refers to the BASIC image, i.e. for EN_250.txt = selects the image EN_BASIC, 250 refers to the recommended disk size of 250 GB. So everything as before. EN_FR_320.txt does the same thing, but also adds the French content, then needs 320 GB. By the way, FR_EN_250 matches the FR_BASIC image and installs EN content to it. In one case the system language when starting up is French, in the other case it is English.
What's the catch?
You need at least Labtix 2.09 (or higher) http://ftp.labdoo.org/download/install-disk/Labtix/ and the learning content http://ftp.labdoo.org/download/install-disk/wiki-archive/ .
An installation may take slightly longer. But you save a lot of time when downloading the images. If you have to install a lot of devices, you can save a local image you created yourself. Everything you need is included in Labtix.
Where can we find what?
Control files http://ftp.labdoo.org/download/install-disk/wiki-archive/control_files/
Content http://ftp.labdoo.org/download/install-disk/wiki-archive/
Current Labtix version http://ftp.labdoo.org/download/install-disk/Labtix/
Technical information:
Control files must be located locally on a data storage medium or server near the content folders with Kiwx, among others in the /content_files/ folder.
Only local content on USB drives or local servers is supported. Remote servers over the Internet are deliberately not usable.
The control files need a certain syntax. Please refer to the examples (blank lines between comments and content; #### before headings, ####2nd_lang, etc.).
If you want to use your own content, its archive name must match the name in the control file.
For content with a date in the name (e.g. for Kiwix) a wildcard (*) is possible. So you could always install Wikipedia with the control file, regardless of the version.
Content can be installed once during installation. Or later via installscript-content.sh in the scripts folder on the desktop.
We would be happy to hear your suggestions.
Connecting to the Labdoo FTP server
The Labdoo FTP server allows users to download files freely. Here are some simple methods on how you can connect to the FTP server. Choose the one that suits you best.
For security reasons, Labdoo does not allow unsecured FTP protocol, only secured SFTP protocol (no ftp, only sftp). And since fall 2023, rsync has no longer been offered for security reasons..
Note: Labdoo is not responsible for third-party software.
---------------------------------------------------------------------------------------------------------------------------
1. Accessing the server through your browser
Open the URL http://ftp.labdoo.org/download/ in a browser and navigate via the links (Make sure the URL begins with “http://” and not “ftp://). Here you can download all files for free.
To download a file, click on a link with the right button of your mouse, then click "Save target as" (name can be different depending on your browser and opperating system).
This method's advantage is that you can access without a password, but on the other hand files can only be downloaded individually.
---------------------------------------------------------------------------------------------------------------------------
2. Access data to connect to the FTP server
It is more convenient to connect your PC or server directly to the FTP server. Depending on your operating system there are several tools below. We created a user on the FTP server: labdoo with the password labdoo and read permissions (no write permissions), which is available to you for this purpose. If you need write permissions, please contact contact@Labdoo.org (EN) or Labdoo-DACH@Labdoo.org (DE).
Protocol = sftp (sftp is safer than ftp, so only sftp is available)
Server = sftp.labdoo.org
Username = labdoo
Password = labdoo
Path = /
sftp://labdoo:labdoo@sftp.labdoo.org
---------------------------------------------------------------------------------------------------------------------------
3. Integrate into the file manager (Windows, Swish)
Windows does not offer its own way to connect the file manager to an FTP server via the sftp protocol. ftp would be possible, but we do not offer this for security reasons. However, you can use additional programs sftp, e.g. the Swish Add-on for the Windows file manager http://www.swish-sftp.org/(link is external) .
After installing Swish, you have to set up the access to the FTP-Server:
 |
Login to the FTP server: Name - choose a name of your choice; server: sftp.labdoo.org; user: labdoo; path: / |
 |
Security key: Save and connect - key remains permanently on the PC until changed; Simply connect - key is only saved for this session and will be queried again next time |
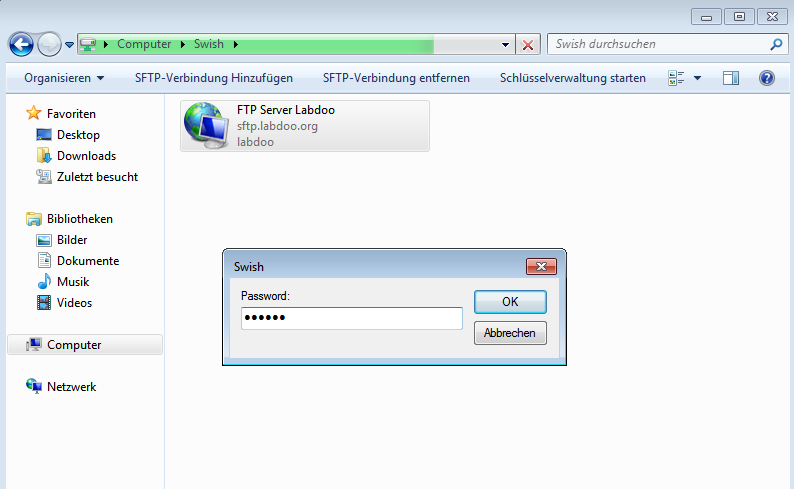 |
Enter the password labdoo, now you can use the FTP server like a drive on your PC. |
---------------------------------------------------------------------------------------------------------------------------
It is easy to connect your computer to the FTP server with special tools if you need to download massive files. The free FTP client Filezilla can be downloaded here https://filezilla-project.org/.. Also available for Apple (macOS) https://filezilla-project.org/download.php?platform=osx.
The start path can be set in the settings under Advanced --> Default directory on the server. Then you don't always have to click through the whole file system.
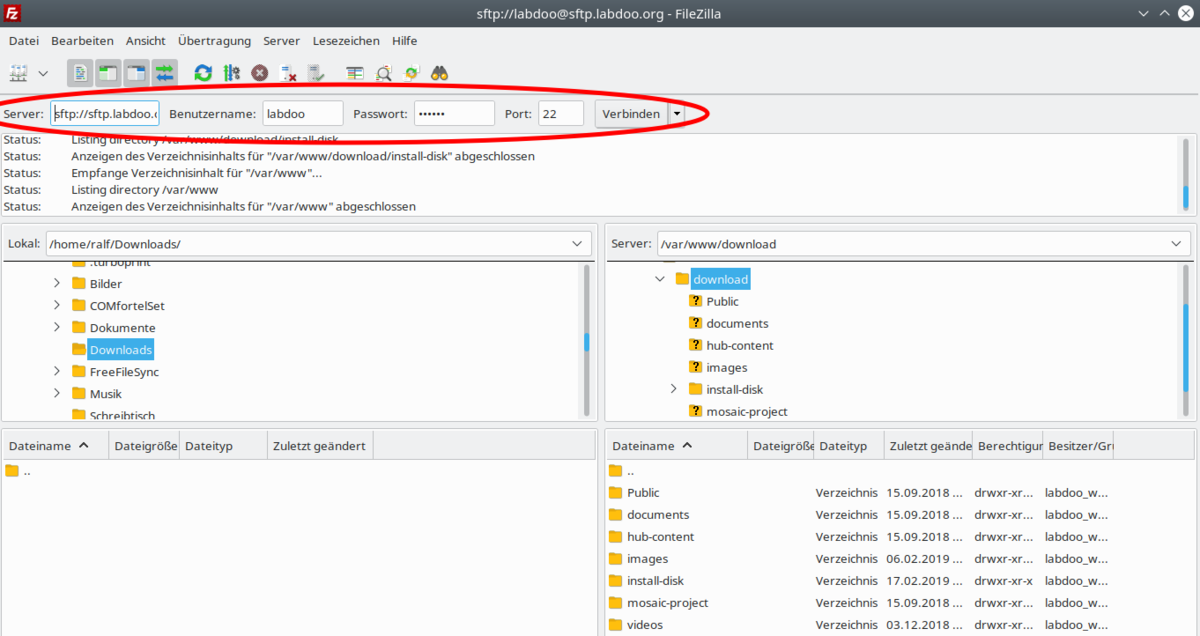 |
Enter the access data: Server - sftp://sftp.labdoo.org ; Username labdoo ; Password - labdoo ; Port - 22 |
---------------------------------------------------------------------------------------------------------------------------
5. Linux
If you are using GNU/Linux, you can easily integrate the FTP server using the sftp protocol (secure FTP). Simply enter the path for the FTP folder → sftp://labdoo:labdoo@ftp.labdoo.org:/ in your favorite file manager.
---------------------------------------------------------------------------------------------------------------------------
lftp is a free FTP client for Linux and other OS.
Install lftp under Linux using sudo apt install lftp.
Then you can mirror the /install-disk folder using the appropriate one-liner with lftp:
lftp -c "open http://ftp.labdoo.org/download/install-disk/ ;mirror --parallel=10 -n -e -O /path/to/install-disk"
The "-e" option ensures that files that no longer exist on the server are deleted from the local install disk. If this is not desired, simply leave out this option.
The entire command can be entered into the crontab using "sudo nano /etc/crontab" if regular mirroring is desired.
Read more https://en.wikipedia.org/wiki/lftp
---------------------------------------------------------------------------------------------------------------------------
7.Connecting Apple (macOS and iOS) using Filezilla or iTransfer to an FTP server
For Apple and (macOS ans iOS) you can install and use the free tools Filezilla or iTransfer.
---------------------------------------------------------------------------------------------------------------------------
8.install-disk-maker.sh (Tool recommended by Labdoo)
You can download the tool for conveniently creating an installation disk (install disk) or a folder on a computer, server or NAS for Linux here. A download can be "clicked together" and saved as a download list for later repetitions. The download can only be limited to changed files, which saves download time.
http://ftp.labdoo.org/download/install-disk/Labtix/install-disk-maker.sh
(if necessary make it executable)
But it is also part of every BASIC image of Labdoo (on the desktop of the user labdoo in the scripts folder). This is how you can do it after installing it on Labdoo laptops
Note for technical helpers: The tool is based on wget. Downloaded files that no longer exist on the FTP server are not automatically deleted by install-disk-maker. Every now and then it's worth clearing up "file corpses".
---------------------------------------------------------------------------------------------------------------------------
9. recommended folders or links
If you want you can mirror the whole FTP drive :) Maybe you should choose the content you really need? Here are some useful paths that might be of interest to you:
All data necessary for an installation: http://ftp.labdoo.org/download/install-disk/
English documents: http://ftp.labdoo.org/download/documents/english/
Graphics + logos: http://ftp.labdoo.org/download/documents/material/
If you have any questions send an e-mail to Labdoo Global Support team wall and a Labdooer will get back to you.
Windows is a registered trademark of Microsoft Corporation.
install-disk-maker
Install Disk Maker [in preparation]
Labdoo's install disk is used to distribute Labdoo images and educational content in order to install Labdoo systems. Despite the name Install Disk, images and educational content do not necessarily have to be on a hard drive. Local folders or shares on the local network can also be used. The installation is usually carried out using the installation scripts in the zzFM file manager in Labtix. After installation, additional educational content can be installed from Labdoo using the installscript_content.sh script in the “Scripts” folder on the Labdoo desktop.
In order for the Labdoo installers to work correctly, the following folder structure must be ensured:
For Images:
/install-disk/DE_German_images/22.04_LTS_EN_Basic
/install-disk/EN_Englisch_images/22.04_LTS_DE_Basic etc.
For Kiwix-Dateien:
/install-disk/wiki-archive/kiwix/wikis/DE/Lerninhalt.zim
/install-disk/wiki-archive/kiwix/wikis/EN/Learning_content etc.
For Offline-Wikis:
/install-disk/wiki-archive/wikis/DE/beispiel.tar.gz
/install-disk/wiki-archive/wikis/EN/example.tar.gz etc.
For control files ( content_lists ) :
/install-disk/wiki-archive/content_list/DE_120.txt
/install-disk/wiki-archive/content_list/EN_FR_80.txt etc.
The Content_Lists play a special role (see below). They serve as control files and contain the information about which additional content (wikis and Kiwix files) will be installed during the installation with the installer scripts in Labtix or after the installation with installscript_content.sh in Labdoo. Many Content_Lists already exist on the server. The name contains the minimum size of the hard drives on the devices to be installed. With every download, the contents of the content_lists folder are updated!
It is still possible to use Clonezilla in Labtix to create your own Labdoo images with a lot of content and save them anywhere and clone them using the Labdoo installer in zzFM or with Clonezilla in Labtix.
The Install Disk Maker tool is used to easily create an install disk or a corresponding folder using selection menus. Images and content can be saved specifically in a correct folder structure.
The advantage is that the entire install disk no longer has to be downloaded from the Labdoo servers, thereby significantly reducing download times and server utilization. In addition, individual compilations can be created more easily, e.g. if Labdoo installations with bilingual content are required. Simply download the relevant content to the install disk, create a corresponding Content_List (see below) and you have created the possibility for an individual Labdoo installation.
The install disk maker downloads the desired files from the Labdoo server (http://ftp.labdoo.org/download/install-disk/). A password is not necessary for this.
Of course the computer must be connected to the Internet!!!
The possibilities of the install disk maker:
- Reformat an empty hard drive and set it up as an install disk with content,
- set up a folder, hard drive or local share as an install disk with content,
- update an existing install disk or an existing install disk folder. The tool searches for existing files on the disk or in the folder and updates them if newer versions are available.
- update an existing install disk (or install disk folder) using an existing download list or repeat a download using a download list if there is an interruption. A download list is created with each complete run of the tool and stored in the target directory with a time stamp. The download list is a pure text file with a list of the ftp addresses used. It can therefore also be edited manually.
In general, if folders/files already exist in the target folder, only newer versions or versions with a different size will be downloaded. This also helps enormously to reduce download times and relieve the load on the FTP server.
The install-disk-maker
The Install Disk Maker is a shell script with Yad as the frontend for the dialogs. It should run on all Debian-based systems. The dependencies are yad, wget and sed. If not available, these should be installed later if necessary. Simply copy the script to your computer, make it executable, double-click it and run it in the terminal when asked. The script is already integrated into Labtix and Labdoo. It is only available with English user guidance.
Starting the script:
In Labtix: Double-click on the corresponding icon on the desktop (from Labtix 2.10)
In Labdoo: /Desktop/Scripts/install-disk-maker.sh , logged in as user labdoo
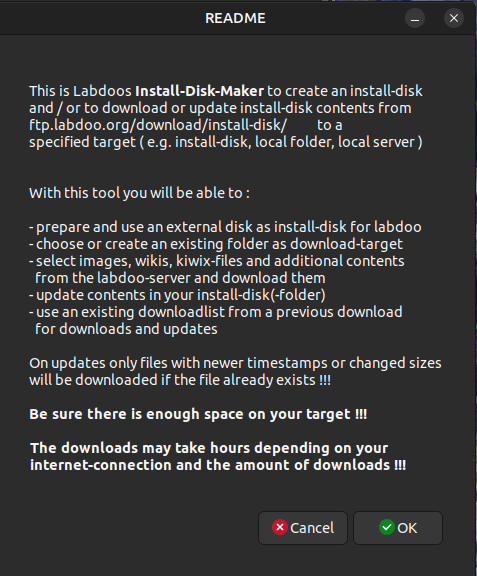
After a short README, a selection list appears in which the further procedure is determined.
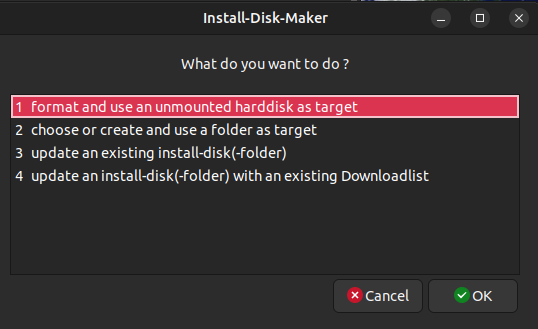
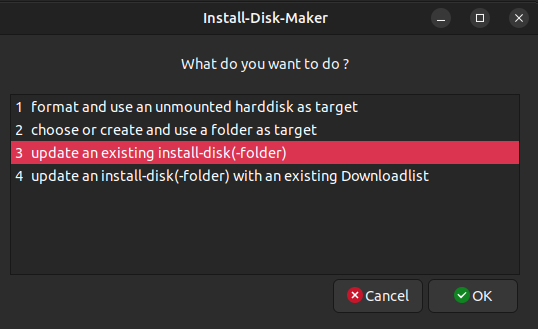
There are four options to choose from:
| 1 format and use an unmounted hard disk as target |
|
| 2 choose or create and use a folder as target |

|
| 3 update an existing install-disk(-folder) |
|
| 4 update an install-disk(-folder) with an existing Downloadlist |
|
Depending on your selection, you will be guided to your destination via self-explanatory dialogues. Only option 1 requires you to enter the sudo password in the terminal once under Labdoo.
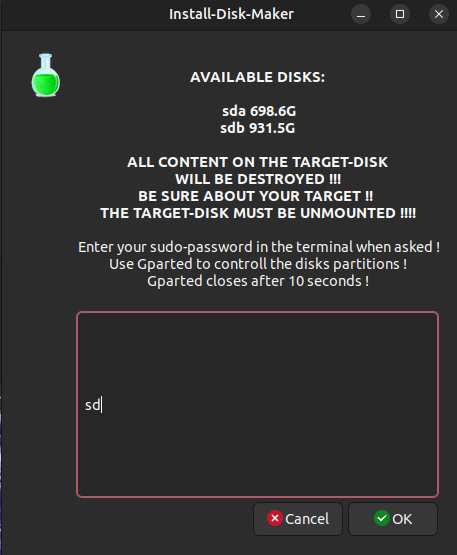
| Selection of the drive for the install disk. Often sda is your own system disk and sdb is the external drive; like in the screenshot. However, this can change depending on the configuration. |
|
| Entering the administrator password (sudo) |

|
| Should a download list from a previous download be used. Or should a new list be “clicked together” individually for download. |

|
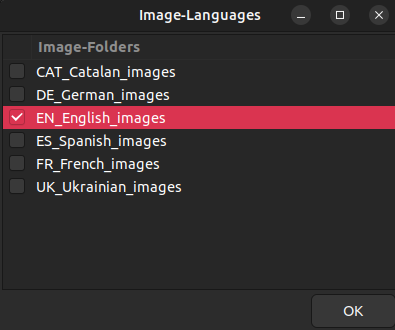
| Mark the images to download by language |
|
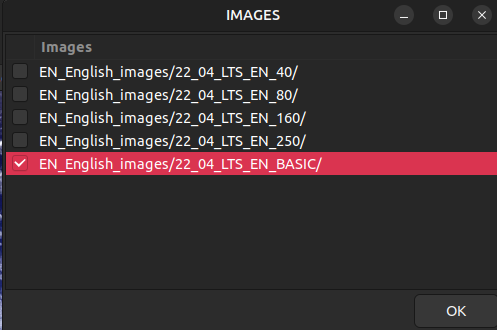
| Selection of images to load in the language folder |
|
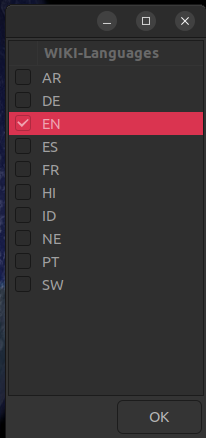
| Selection of wiki languages for browser-based content |
|
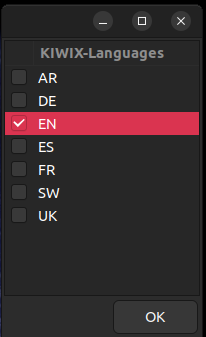
| Selection of wiki languages for Kiwix |
|
| Display of the selected content for confirmation |
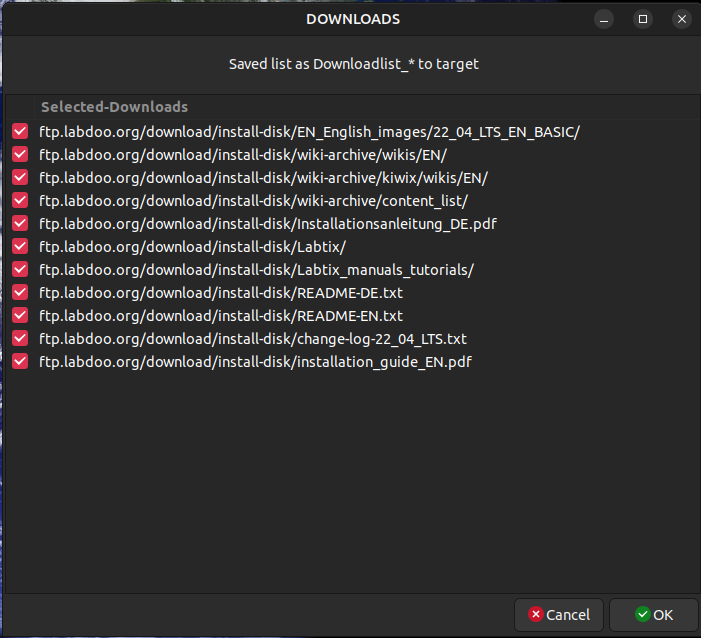
|
| Display of the download and progress in the terminal |
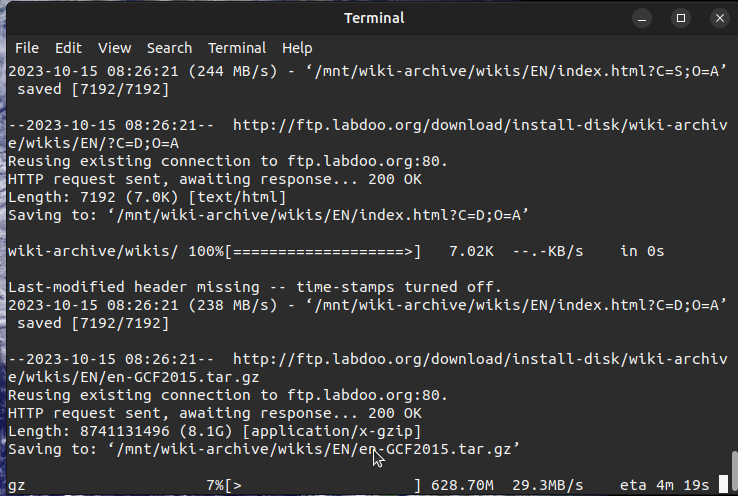
|
| Display of the download and the download list |
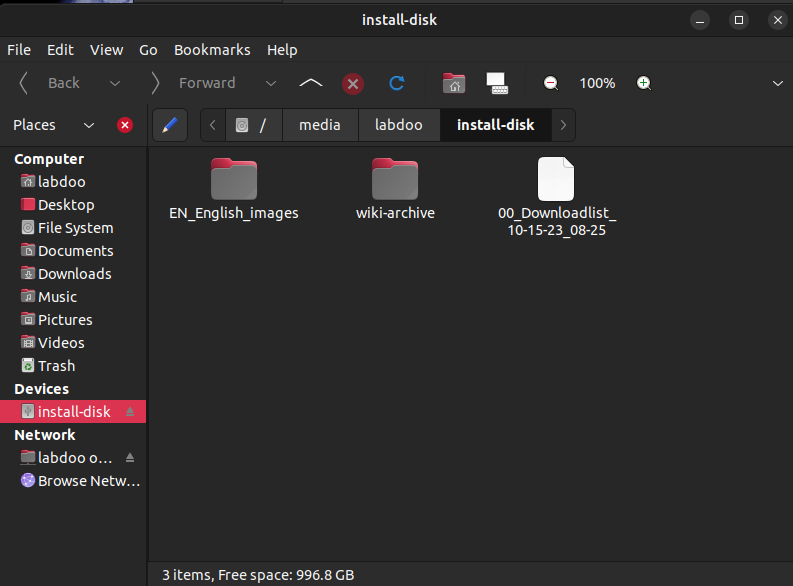
|
After closing the final “READY” dialog, the existing files and folders in the target folder or disk are displayed in the terminal. This is used to check the contents of the target folder or disk.
Pressing “Enter” in the terminal ends the script and the working folder is cleaned up.
While the script is running, it is possible to mount or unmount disks or shares using a file manager. It is not necessary to end the script.
If an external disk has been formatted, it must be removed from the device once after the script has ended and then reconnected in order to make it available to the system.
While the script is running, some auxiliary files are created in the working folder (or on the desktop in Labtix) which are deleted during the run. Some dialog windows allow you to abort the script and then delete these files. If the script hangs, for example because the connection to the server is interrupted, you can end it by closing the terminal in which the script is running. Some auxiliary files may be retained. To delete these, call the script again and end the "README" dialog with "Cancel". The work folder is cleaned up.
In rare cases, auxiliary files of the stream editor used sed with the name sed* appear in the working folder. These files cannot be edited, but disappear as soon as you close and reopen the file manager or restart the desktop in Labtix.
If you want to repeat the project, we recommend copying the resulting download list to a suitable location so that it is available at any time and/or can be passed on.
Building a control file (content_list)
The control files are pure text files that can be edited with any editor. Text processing is unsuitable for this!!!
Example EN_BS_80.txt (shortened):
=======================================================================
# Control file for automated post-installation of content, requires Labtix 2.09 or higher
# Control file for automated post-installation of content, requires Labtix 2.09 or higher
####lang_1
EN
# _80 = min. needed disk-size, 80 GB
####wikis_1
en-afristory.tar.gz
en-algebra2go.tar.gz
####kiwix_1
askubuntu.com_en_all_*.zim
ifixit_en_all_*.zim
wikibooks_en_all_maxi_*.zim
# Create new Firefox Tab for users labdoo and student to path labdoo/home/Public/wikis/EN (html file already exists in all Labdoo images)
####homepages_1
file:///home/labdoo/Public/wikis/EN/index-tutorials-en.html|file:///home/labdoo/Public/manuals/index-manuals.html|https://start.ubuntu-mate.org/|file:///home/labdoo/Public/wikis/EN/index-en.html
####lang_2
BS
# adds Bosnian content to an installation
# path /Public/kiwix/wikis
####wikis_2
####kiwix_2
phet_bs_*.zim
wikibooks_bs_all_maxi_*.zim
####homepages_2
file:///home/labdoo/Public/wikis/EN/index-tutorials-en.html|file:///home/labdoo/Public/manuals/index-manuals.html|https://start.ubuntu-mate.org/|file:///home/labdoo/Public/wikis/EN/index-en.html
======================================================================
It is important to adhere to the syntax of the tags (e.g. ####kiwix_2) so that the install scripts can evaluate the control file correctly. If you want to create your own control files, you will find many existing examples in the /install-disk/wiki-archive/content_list folder. These can be adapted to your own projects.
2 - Click Installation Method
Labtix 2
Sometimes the screen is very dark after booting and the screen cannot be brightened or darkened using the function keys. Then move the mouse to the upper left corner, if necessary "flying blind", click there and then tap on the arrow key to the right. Each time you press the arrow key, the monitor should get a little brighter.
- Double-click to start the file manager zzzFM (Labtix 2).
- Mount the drive on which the images for cloning are located.
- For external USB drives: plug it in, the drive appears with a - in front of it, then click on the entry and the "-" becomes a "+".
- Connect to the network, via LAN it is sufficient to plug in the LAN cable, for WLAN with Connman system tray, then open file manager zzzFM → in the input area (preset /home/labdoo/) den Enter the path to the server, e.g. smb://192.168.1.1/install-disk, if necessary enter the password in the terminal window. smb is the protocol required for Windows servers.
First it tries to establish a connection for the user guest, then for the user ladboo. Or you can enter a local user like this: smb://user@192.168.1.1/install-disk and then the password in the terminal window. - The drive / server is now mounted, i.e. the computer has access to it.
- Open the folder with the images.
- Right click on the folder containing the image to be installed.
- Click the displayed functions list on
- Labtix 2: labdoo-legacy-installer or labdoo-UEFI-installer (depending on system settings and boot)
- in the next window
- Labtix 2: Enter the path to the target disk, e.g. sda, nvmep1n or similar → set the number of delete runs,
- optional: enter the host ID if you already know it (otherwise it can be changed after the restart)
- The image will now being copied to the internal hard disk sda.
- At the end GParted opens for control to display the finished partition on sda. The whole hard disk should be available. Close GParted. In rare cases the automatic adjustment of the partition does not work. Then it can be adjusted manually.
- The window with the installation's confirmation will appear, confirm with "ok" and close.
- The installation will be confirmed in the terminal, then close with ''Enter''.
- The installation is complete. Labtix can be shut down with "Poweroff" or "Save Poweroff" and the computer can be restarted.
| Select your BASIC-image and content package |
 |
| Select the content package |
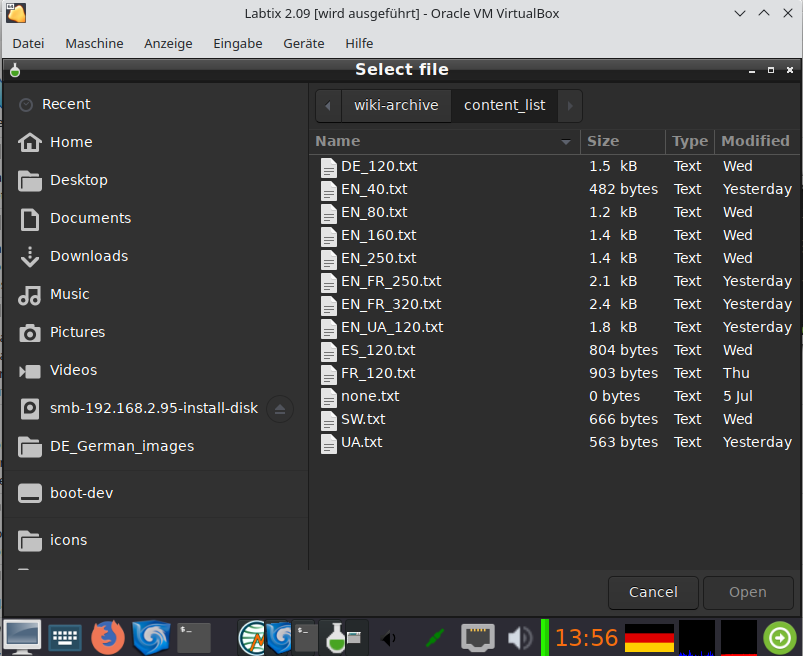 |
| (Example) Content package chosen and power off after installation activated |
 |
Installed tools for Labtix
Labtix comes with a number of useful tools preinstalled:
(partly smaller deviations between the Labtix versions possible)
| Application | Description |
|---|---|
| Arandr | A tool for configuring the screen layout. Very useful when your device has the internal monitor removed and an external display is connected. |
| Audacious | CD/DVD drive functionality test |
| Avahi network scanner | scans the network (please connect first) and shows e.g. the path to a server or similar. |
| Backlight Brightness | Sometimes the screen is too dark and cannot be made brighter with the keyboard (function keys). Then you can change the brightness with Backlight Brightness. Works most of the time, but not always. |
| battery-plugin | in the panel gives you information about the status of the battery when you mouse over it. The plug-in can be activated with a right mouse click and "Battery Monitor Settings", if not already done. |
| Conky | A tool for displaying system information on the desktop. The output window is in the upper right corner. The configuration file is in Labtix 1: /etc/conky/conky.conf, in Labtix 2: ~/conky.rc. In Labtix 2 with even more information, such as battery status, etc. |
| Firefox esr | is the "enterprise version" of Firefox, which is not updated as often. For example, Firefox can be used during installation to research the web. It can also display pdf files. By default it doesn't collect cookies and doesn't store data to avoid bloating Labtix with unnecessary data in persistence mode. |
| Gparted | a great tool for disk partitioning, file system repair and partition copying. |
| Gsmartcontrol / DiskCheck |
a tool to read the S.M.A.R.T data from a hard drive to see if the hard drive is healthy. If yours is "red" in the registers, you should use a different hard drive. Tip: If a Seagate disk shows thousands of reallocation reallocation events in the Attributes tab, the drive is not damaged. These hard drives have different firmware specifically for Lenovo computers that uses the memory bit for reallocation events for other purposes. |
| hard info | gives you extensive information about the hardware and software of the computer. |
| ISO Snapshot | a tool to create an ISO snapshot of the system. All changes to the system are saved in the snapshot. While running ISO snapshot, mark the directories NOT to be added to the snapshot, except for the "Desktop" directory which contains the .desktop files. You should move existing snapshots to a directory that you do not want to include in the snapshot. The snapshot is saved in /home/snapshot. If the snapshot is created on a non-persistent system (e.g. boots from CD-ROM), it should be saved on another device. If there is not enough disk space to save the snapshot, the save path can be e.g. to another USB stick. The snapshot can be installed to a USB stick using UNetbootin or burned to a CD-ROM or DVD-ROM using the IG Burn Tool plugin in SpaceFM. |
| Keyboard layout handler | With the Keyboard Layout Handler on the right side of the panel you can change the keyboard layout with a left mouse click. To make a permanent change, right click and use the "Keyboard Layout Handler Settings". The top keyboard layout in the list is preassigned at startup. With a left mouse click you can go through the pre-installed keyboard layouts (German, US English, French, Spanish). |
| Live USB Maker (Labtix 2) | to copy Labtix to other USB sticks. |
| Magnify | Magnifier on/off |
| Onboard | show/hide monitor keyboard. |
| SimpleScreenRecorder (Labtix 2 only) |
Tool to record videos of the session, e.g. for training purposes. |
| Psensor | A tool to control the temperatures of CPU, GPU and others. |
| SpaceFM (Labtix 1) / zzzFM (Labtix 2) |
is a file manager for the usual file actions and for integrating external devices. It has plugins to e.g. mount shares and burn CDs or DVDs. SpaceFM/zzzFM is highly configurable and can be modified with additional plugins. The trash can is disabled to prevent accumulation of too much data in persistence mode. If required, the trash can can be added as a plugin. It should not be removed as it is part of the desktop environment! |
| Speaker Test | Speaker test right / left. |
| UNetbootin (Labtix 1) | a tool to create bootable USB sticks. Start Unetbootin, enable "Diskimage", select the ISO snapshot (should be in /home/snapshot) and select the target USB drive. The USB stick should be formatted with fat32 and it should be mounted (use SpaceFM for this). After installation on a thumbdrive, Gparted should be used to check if the boot flag is set correctly! |
| wipefs | Fast deletion of the file system (but does not replace overwriting with random numbers). |
| Xfburn | to burn Labtix from CDs/DVDs. |
For more information, please use the man pages of the help function in the terminal (e.g. "man gparted" or
type "psensor --help" there and press (enter)) or use the Internet.
Desktop Settings:
The Labtix desktop environment is based on openbox with the additional lxpanel. If you right-click on the desktop, you can select "Desktop Settings" to make changes to the desktop. To install new program launchers on the desktop, copy them from /usr/share/applications to the desktop. To move icons on the desktop, use "Shift + Drag". Please note that in some cases SpaceFM moves the items out of the folder. If so, please copy it back.
Troubleshooting
We may need some tools for troubleshooting that make it easier for us to fix errors when installing or starting computers:
- Labtix on a USB stick :-) ,
- Labtix on USB stick, installed with "dd" with the Live USB Maker,
- Labtix on DVD,
- a finished standard Labdoo installation on a hard drive to test whether a device can / wants to boot with Labdoo,
- a finished legacy Labdoo installation on a hard drive to test whether a device can / wants to boot with Labdoo legacy,
- Super Grub 2 Disk (link) as a starting aid for Labtix or Labdoo,
- Clonezilla-Live or Parted Magic to install if nothing else works,
- Boot Repair Disk ( link ) to fix boot problems with Labdoo.
- optional: USB adapter for SATA to be able to "plug in" a hard drive externally,
- optional: USB hub for USB / USB-C slots if a laptop doesn't have enough slots
You don't have to create all of these tools directly. It is enough to create them when needed. But the more problem cases you have worked on, the more complete this tool collection becomes.
The easiest way can often be to install a hard drive with a finished Labdoo installation in a "problem" computer. This saves time and nerves!!!
Computer remains "dead":
When plugging in the power supply, the DC indicator light does not light up or the computer beeps:
- Power supply defective or not suitable? Make sure you have the correct DC plug.
- No RAM memory installed?
- Battery deeply discharged? If possible, try starting without a battery or powering the computer for a while. Depending on the device, it can take a few minutes to an hour until the device is bootable!
UEFI not accessible:
- Win 10 or 11 is started in installation mode and the UEFI is not accessible: remove the hard drive and delete it externally.
- If Windows is already installed and boots to the login screen: Click the power icon, click the "Restart" option with Shift/Shift key >>"Advanced options">> "Troubleshoot" >> "UEFI settings" . In the UEFI then put the Labtix stick first in the boot settings, deactivate secureboot if necessary.
- Common keys to get into UEFI: ESC, F1 (Lenovo), F2, F10, F12 (Dell), Del . Depending on the setting in the UEFI, the "Fn" key must be pressed at the same time.
- Some devices (some Lenovo or Sony) have their own button to boot into UEFI, sometimes quite hidden. A search on the Internet can be informative.
- If Labtix boots into the UEFI boot menu: Boot Rescue Menus >> Reboot into BIOS/UEFI Setup. Labtix may have to be booted via the computer's boot menu.
- If you have one, try a Labtix DVD and boot into the UEFI using the Boot Rescue Menu (see above).
- Boot into the UEFI boot menu with a Xubuntu USB Live stick. This contains the “UEFI Firmware Settings” option. Is also possible with some other *buntus. You may have to boot via the computer's boot menu.
- Sometimes it helps to consistently remove all drives and don't overlook the SD card slot.
- On some devices, removing the CMOS battery can force an error message from which access to the UEFI is often possible. Similarly, some devices have a reset button on the bottom that can be reached through a small hole.
Labtix does not boot into the Grub boot menu:
- Secureboot switched off in UEFI?
- USB boot not possible, e.g. by excluding USB boot in UEFI
- Some devices only boot Labtix in UEFI mode, others only in legacy mode, so it makes sense to try it out. The same applies to the installed images.
- "USB-always power on" activated in UEFI?
- A common problem is the poor connectivity of some USB sticks in USB sockets. If you pull the stick approx. 1mm outwards, the stick may have better contact. If the LED on the stick (if present) lights up or flashes, the contact should be OK.
- Use Labtix DVD?
- Use Labtix on a stick installed in Labtix with the Live USB Maker with the "dd" option?
- The device simply does not want to start with the bootloader used by Labtix or ignores it due to the computer firmware used (e.g. on some Acer laptops). If the device accepts the SuperGrub2Disk bootloader (from USB or CD), Labtix can be started using SuperGrub2Disk. https://www.supergrubdisk.org
- If all else fails, you can install a hard drive in the device on which you have installed Labdoo.
- If only Win 10 or 11 stubbornly boots, the only solution is to remove the hard drive to start Labtix and/or get into the UEFI. The hard drive should then be erased using an external USB adapter and checked for errors using DiskCheck in Labtix.
- (for Labdoo Germany) ...and if all else fails, then send the IT donation to the central post office https://platform.labdoo.org/de/hub?h=119075
Labtix hangs when booting:
- If Labtix hangs when booting, it is worth trying out the boot options “failsafe” (driver problems), “nomodeset” (graphics driver problems) or acpi=off (power management problems),
- A network search with the computer type, "Linux" and "Boot options" can lead to success in special cases,
- If the boot process hangs with the message "waiting for devs to be fully populated ..." you can cancel this process with Ctrl + C,
- sometimes a device just won't boot with Labtix. Alternatively, an image can be installed with Parted Magix or Clonezilla Live. The content can then be installed from Labdoo.
- There is always the option of installing a hard drive pre-installed with Labdoo.
Installation aborts:
- Destination disk damaged? Check with check disk.
- Contact to the install disk or the server used is not stable? Or files do not exist on the specified paths?
- The Labdoo images use a block size of 4096 bytes. This can cause problems with a few SSDs/NVMEs. Unfortunately, the only solution is to replace the hard drive.
- The target hard drive could be too small for the selected image and content.
- In general you should carry out an installation with a freshly booted Labtix. If the installation scripts were aborted or hard drives or shares were added or deleted in Labtix, artifacts in the operating system may prevent the installation scripts from running correctly.
- Some hard drives have write and/or read protection. The values in Disk-Check then look normal, but no partitions can be deleted or created. The only quick solution here is to replace the hard drive.
MacBooks:
Note: Labdoo Germany accepts MacBooks as IT donations. Labdoo Switzerland does not.
- If Labtix does not boot (which is the rule), hold down the Alt key immediately after pressing the power button until a selection of bootable media appears.
- The computer's NVRAM may need to be deleted first:
- Power button, then hold down "Alt", "P", "Cmd", "R" at the same time for approx. 30 seconds,
- In Labtix, pay attention to the clock frequency, if necessary limit it to approx. 2 Ghz with Cpupower-Gui to avoid overheating during the installation of Labdoo. Use the temperature_workaround in Labdoo!
- MacBooks with the T2 chip are unfortunately not compatible with Labdoo. The same applies to the new MacBooks with ARM processors.
Labdoo does not boot:
- Try booting via the computer's boot menu. Common keys: Esc, F9, F12 on tablets/convertibles Power + Vol"+" or Vol"-". If necessary, together with the Fn key.
- Use Gparted in Labtix to check whether the installation on the hard drive looks correct:
- Standard installation: grub2core.img, efi partition and Linux partition present and extended to the entire drive?
- Legacy installation: Linux partition present and extended to the entire drive?
- "Boot flag" and efi flag (standard installation only) set?
- Check the hard drive again with Disk Check in Labtix. By deleting hard drives with "shred" when installing Labdoo, they can be damaged if they were already on the brink anyway.
- The boot mode may need to be changed in UEFI. Sometimes Labtix only boots in UEFI mode on the same device, but Labdoo boots in Legacy or CMS mode or vice versa
- Move Labdoo up in the boot order in the UEFI,
- look in the boot menu of the computer to see whether the Labdoo installation appears there and whether it can be started from there,
- Start Labdoo using Super Grub 2 Disk (https://www.supergrubdisk.org). Connect to the Internet. Open a terminal with "Ctrl" + "Alt" + "T" and reinstall the bootloader with the command "sudo grub-install". This may cause Labdoo's bootloader to be entered into the computer's firmware.
- Start the computer with "Boot Repair Disk" ( link ), establish an internet connection and follow the instructions. Can solve one or two UEFI problems.
Get more messages:
In its default setting, Labdoo does not display the kernel boot messages during booting, but rather the Mate boot logo ("plymouth"). However, if booting or shutting down hangs or takes a long time, you can use the boot messages to diagnose possible sources of error.
To display the boot messages while Plymouth is displayed: press "ESC" + "F1"
If you want to show all messages:
- After switching on, use the shift key to make Grub's boot menu visible. If necessary, try several times, the default time window is 3 seconds!
- If you are in the boot menu and the first entry is activated, press the "E" key to enter editor mode.
Find the line withlinux /boot/vmlinuz....and replacequiet splashwithnoplymouth. The American keyboard layout applies! - Boot with F10.
The most recent boot messages can be used to search for errors on the Internet. When searching, always specify the device used.
The changed settings only apply once, so they have to be changed every time you boot.
When the computer boots into Labdoo, the "dmesg" command in the terminal displays the boot messages. Problems are usually displayed in red.
Secure boot activated and cannot be deactivated
Important note: Labtix does not boot with Secureboot!!! However, the Grub boot menu appears and the message “secureboot” appears at the bottom left. However, it is often possible to access the UEFI in order to deactivate Secureboot via the Boot Rescue Menus >> Reboot into BIOS/UEFI Setup entries.
On some computers, Secureboot can only be deactivated if an administrator password has previously been set in the UEFI.
There is a small trap with some Acer computers: if you deactivate Secureboot and set the boot mode to "UEFI", Secureboot is automatically activated again!
If the computer's UEFI is protected with an unknown password and Secureboot is activated, it is still worth trying to install. As a rule, all *buntus like Ubuntu Mate, the basis of the Labdoo images, can be installed easily with Secureboot.
Since Labdoo images are installed through cloning, the installation step in which the Ubuntu secureboot certificate is entered into the computer's firmware is no longer necessary. This means that, depending on the computer firmware or the secure boot settings, the computer is prevented from booting Labdoo. Nevertheless, it is worth a try to have the certificates subsequently entered into the firmware. Unfortunately, this doesn't always work.
Installation of Labdoo:
- The quickest way to work is to install a hard drive pre-installed with Labdoo.
- Does the computer still have to be installed, e.g. because of a soldered hard drive
- Installation with Clonezilla in Parted Magic, then install contents in Labdoo.
- If the Labdoo installation does not boot: see "Labdoo does not boot".
Once Labdoo has been made to boot (unfortunately this is not always possible), an update must be carried out:
- Connect to the Internet and open a terminal with "Ctrl" + "Alt" + "T" and enter the following commands one after the other:
sudo apt update>>> check for updates,sudo apt upgrade>>> run the updates.- If asked, answer yes and provide the Labdoo admin password.
During the update you should be asked whether you want to create a secureboot password. This must be answered in the affirmative and entered accordingly. Write on a piece of paper and keep it safe :-)) . It may be that if there are changes to the hardware (e.g. new WiFi card) the password will be requested! - Restart Labtix once, then enter
sudo apt autoremove>>> in the terminal to remove unnecessary files.
For very inflexible devices:
Unfortunately, this type of installation is not trivial, which is why the procedure can only be outlined superficially. If you really want to give it a go, you'll have to search online from time to time to get further:
- Install a hard drive pre-installed with Labdoo in the device,
- Install Xubuntu on the device in parallel. During the installation, the kernel or its secure boot certificate is entered into the UEFI partition and the firmware of the computer.
- In the corresponding window, select the option "Install Xubuntu alongside Ubuntu",
- during Xubuntu installation, set the partition size for Xubuntu to approximately 12 Gb,
- After installation, set the default boot entry of the Grub bootloader to the partition with Labdoo. Unfortunately it's not entirely trivial; it's best to use the Internet to find out,
- After booting into Labdoo for the first time, update the system once as described above.
...and if nothing works, send the IT donation to the central post office... ;) (Labdoo Germany only)
Labtix boot setting and persistence
Labtix has two boot menus. Once the menu for legacy boot and the menu for UEFI boot. Whether you boot into the legacy or UEFI boot menu depends on the settings in the UEFI. On many devices, both options can be selected via the computer's boot menu.
Legacy boot menu from Labtix:
Set the desired options using the corresponding function keys (e.g. F2 for language or F4 for kernel boot options) and, if desired, set them up permanently with F8. A reset is possible at any time with F8 > Reset. Alternatively, you can also enter it directly in the “Boot Options” line. After the next reboot, the boot menu contains the menu entry "Custom..."
Labtix UEFI boot menu:
The UEFI boot menu contains the “Advanced Options” entry through which options can be set up and saved using submenus.
Persistence mode
In persistence mode, all your changes are saved, such as . Network connections, Firefox bookmarks, changes within the Labtix environment, etc. . Installing programs and saving files is also possible.
- To do this, press F5 in the Labtix grub menu in legacy mode and select "persist_all",
- then press F8 and select "save",
- then you boot e.g. "antix-21 x64-base ...",
- When asked for the rootfs persistence file, press "Enter" for the default size,
- When asked for the homefs persistence file, press "Enter" for the default size,
- If you are asked for the live USB swap file, select "n" for "no",
- The question "Do you want to copy the files to the home persistence device?" answered with "y" for "yes",
- The question "Please choose auto-save mode" answered with "2" for semi-automatic,
If you wanted to use changes via persistence, you should not boot toram and remove the stick, because then Labtix cannot save your changes when you shut down.
Using the ISO Snapshot and Live USB Maker tools in Labtix, a new bootable stick can be created that includes all changes. The Unetbootin we previously recommended for creating live USB sticks uses the fat32 file system, which limits the maximum persistence size to 4 GB. The Live USB Maker uses ext4 as the file system and therefore allows for greater persistence. If the Live USB stick was created with the dd program or the "dd" option of the Live USB Maker, it is not possible to permanently set up boot options and set up persistence. The corresponding options do not appear in the boot menus.l
Terminal commands
Helpful terminal commands
Even if, contrary to popular opinion, the use of a terminal in Linux is not absolutely necessary, it does offer some advantages. Terminal commands give you output faster than pushing the mouse. Terminal commands can be controlled and linked in a variety of ways using arguments and are therefore the method of choice for more complex problem solving.
To open a terminal, click on the icon at the bottom left of the bottom menu bar or press Ctrl + Alt + t on the keyboard.
If a command is refused with the note "permission denied" or root rights are required, type "sudo" before the command used, e.g. "sudo zzzfm"
For further information use the --help option e.g. "apt --help" or the man pages "man apt"
| Application | Description |
|---|---|
| acpi (-V) | Information about the power system such as battery status, battery status, etc. |
| (sudo) apt | Package manager
Application: |
| dd | Bit-accurate copying
Example:
|
| eject -T | ejects CDs or DVDs if the button on the drive is defective. |
| grep | filters the output of commands
|
| (sudo) inxi | System information
|
| iwconfig | Displays information about WLAN connections. |
| lsblk | list block devices such as hard drives and their partitions. |
| lspci | lists all discovered PCI devices
|
| lsusb | lists all detected USB devices. |
| rfkill | Tool for radio modules such as Wifi, Bluetooth etc.
Unlock a hard-blocked device:
|
| (sudo) shred | Tool to securely wipe devices or partitions
Use: |
| sudo | Command to get root permissions
There is no sudo password set up in Labtix, so entering a password is not required. |
| wipefs | Quick deletion of file systems
Use: |
| xkill | Tool to close windows that don't respond
Use: |
| xrandr | Tool for setting the graphical (X) server
|
Labtix 1 [archive]
The Labtix 1 version of the Labtix installation tool is no longer being developed. For current images Labdoo recommends the current version Labtix 2 https://platform.labdoo.org/de/content/installation-mit-labtix.
Labtix 1 is still able to process older 32 bit images. However, these are no longer maintained.
Based on Antix 17 (2017), you get a complete set of refurbishment and installation tools. Labtix 1 runs on 32 bit and 64 bit CPUs. The drivers included in Labtix 1 work best on older hardware (ca. 2008 - 2018, difficult to delimit exactly, best you try it out).
You need for Labtix 1
- at least a 2 GB USB stick or a CD (750 MB) to install and run Labtix 1 on it,
- 1 GB RAM (besser mehr, speziell wenn ihr den Persistenzmodus nutzen möchtet).
| Version | until Ubuntu 20.04 LTS | from Ubuntu 22.04 LTS |
|---|---|---|
| Labtix 1 | |
|
| Labtix 2 |
Labtix comes with various tools and installation tools https://platform.labdoo.org/de/content/vorinstallierte-tools-labtix.
Most of them can be found directly on the desktop. You have to decide for yourself which tool suits you best:
- "2-click" installer - from the file manager SpaceFM (up to Labtix 1.02) / zzzFM (from Labtix 2.0) clone images with 2 clicks. From Labtix 2.0 the standard installation procedure.
- Labdoo Installer - with graphical user guidance (only Labtix 1)
- autodeploy and content installer - comprehensive, terminal-based installation tool that also automates the deployment of additional content in multiple languages
On the Labtix desktop, you will find a Docs folder containing manuals in PDF format. However, we recommend that you first watch the individual steps and tools as a YouTube video tutorial.
Labtix 1
https://www.youtube.com/watch?v=DkmrV3tvt-U
Nur für Labtix 1
Labdoo Installer - the compact installation tool with graphical user interface (English)
- Start by double click Labdoo Installer,
- 2 windows open; the terminal shows whether it is 32 and/or 64 bit CPU; the 2nd window shows the hard disk on which is installed (in most cases. sda. Confirm by ok.
- in the next window:
- shred = Number of deletion runs (from 0 to 3 possible, 3 preset)
- Target Disc sda (may not be mounted)
- Display the size of the hard disk (just for info, to better choose the appropriate image)
- Choose Image → click on the triangle next to home → Select Other... → then navigate to(!) the folder where the unpacked image is located (just marking the folder is not enough); confirm with "Open".
- optional: Enter Host_ID, if already known (but can also be entered after restarting the computer)
- click "OK" to start the installation.
In Labtix 2 this function has been integrated into the file manager zzzFM. A separate script could be dispensed with.
[Archiv, outdated / veraltet]
autodeploy and content installer - the comprehensive, terminal-based, script-driven installation tool (German)
the new version (since September 2018 part of Labtix,) also automates the deployment of learning content to multiple language (not seen in video)
Manual (pdf) http://ftp.labdoo.org/download/install-disk/labdoo%20autodeploy%20and%20...
Review of a donated laptop
Check the hardware with Labtix
To start, you should check a donated computer. After all, it makes no sense to send a laptop to hot countries that already overheats in cool regions. Or if the hard drive is already "crumbling", how is it supposed to survive transport and operation in hot regions? That's why Labtix comes with useful tools to check not only the hard drive, but also speakers, temperature sensors under load and much more. more to check, if necessary to clean fan, to renew thermal paste or foil.
BIOS settings
Some laptops require changing BIOS settings:
| BIOS settings | Comment |
|---|---|
| Secure Boot | Must always be off (disabled). Sometimes an administrator password must first be set in order to disable Secure Boot. The admin password can then be removed again. |
| Trusted Platform Module (TPM) | TPM is a security chip that secures a computer. In connection with Linux, however, TMP should always be switched off (deactivated). With some laptops, an administrator password must first be set in order to be able to deactivate the TPM. The admin password can then be removed again. |
| UEFI | Up to Ubuntu 20.04 LTS It is recommended to turn off UEFI and enable Legacy/CSM. However, there is also a concept for an UEFI-based installation for 20.04 LTS developed by Labdoo helpers. From Ubuntu 22.04 LTS a separate concept was developed for Ubuntu so that both UEFI and Legacy/CSM installations are possible. Note: Labtix starts on some computers and the installation of the image runs smoothly. But when you restart the laptop, you get notices like "Invalid Partition table!" or similar and the laptop won't boot. Then please set the UEFI mode or both (UEFI and Legacy) in the BIOS. In very stubborn cases, the tool uses SuperGrub2Disk https://www.supergrubdisk.org. |
Recommended hardware checks
| Tool | Check |
|---|---|
| GSmart | Please check the status of the target disk (sda) with the tool GSmartControl. The more "red" notes or icons and the darker they are, the sooner the hard drive should be replaced. |
| StressCpu / psensor | The maximum temperature should be around 55 to 65°C under normal load, depending on the CPU / GPU type and the ambient temperature. To load the CPU, the "Stress CPU" script starts on the desktop (triggers "stress --cpu -8" in a terminal). Observe the temperature display of the CPU sensors in psensor. Stress CPU starts after 10 seconds and runs at full CPU load for 60 seconds so as not to damage the CPU and cooling system.
The temperatures often rise to over 70°C under full load, less would be better. Many manufacturers indicate an acceptable maximum temperature (CPU under full load) of 75 degrees. If the temperatures rise to 80°C or higher under load, Stress CPU immediately stops to avoid damage to the processor and cooling system. Then the cooling system needs to be revised (e.g. cleaning the fan or replacing the cooler paste/cooling pads). An overheated cooling system can also be recognized by the fact that the copper-colored heat conductor has turned bluish.
For some devices with Intel i3/5/7 processors, it is helpful to switch off the "Intel Turbo Boost" (may have a different name for some devices!) in the BIOS/UEFI in order to get the temperature below 75°C under full load. |
| Speaker Test | Alternately checks the left and right speakers. |
UEFI Boot only or BIOS locked and UEFI set
[This page explains a solution in case a donated computer can only boot with UEFI or the BIOS is locked (password unknown) and UEFI is set as the boot option. If your computer can boot in legacy mode, you can skip this page].
Back in 2013/2014, there was a technical and legal discussion about SecureBoot and UEFI. The manufacturers argued that only UEFI boot on their computer provides security and therefore must only be used. However, the EU and NGOs went to court and the judges decided that the computer manufacturers had to re-open the BIOS settings so that users could choose whether to use the UEFI boot, the legacy boot (the "old" boot) or both as boot options. Computers that were produced before the "UEFI only" decision and after the old flexibility decision have no problem installing with Labtix and prepared Labdoo images.
However, if the computer was manufactured in the "UEFI only" period in 2013/2014, this may cause problems when installing a Lubuntu-based installation. Our Labdoo images are set up for legacy boot, not for UEFI boot (although Lubuntu could). We have described a solution for these specific UEFI-only machines here.
Another use case is a locked BIOS. A computer has been donated, but a BIOS password has not been removed and is unknown. If the boot option in the BIOS is set to "UEFI / Secure Boot Only" and cannot be switched to "Legacy Boot" because of the password lock, you can run the installation process described below and then use the computer for Labdoo.
If our solution is too difficult for you, please contact Labdoo helpers or hubs in your country / region and ask them for support.
You can use the installation tool Labtix (recommended, supports UEFI-Boot) or Parted Magic. PXE is not possible because you have to select certain options during the installation process and PXE does not allow access to these settings.
The installation sequence is rough:
- First install a small Xubuntu based image via cloning in a partition (Xubuntu is able to UEFI boot); a prepared image is available on FTP server http://ftp.labdoo.org/download/install-disk/special_images/,
- Next ,install in a second partition of one of our Labdoo images with slightly different settings than usual.
- Change the grub boot file.
- After that, the system will boot and a user will not even notice that this is a special "UEFI only" laptop.
- This solution only works for 80 GB disc-drives or bigger.
So here are the steps in details:
- Download the special UEFI-Boot image, available on our FTP-Server http://ftp.labdoo.org/download/install-disk/special_images/ and copy it to a local USB-drive or any local server.
- Start Labtix, run the Clonezilla tool (icon on the Labtix desktop) and make the drive with the special UEFI image available - Important: Use "expert mode" and "restoredisk", mark the option -icds . For experts: Or install Xubuntu (I think all other UEFI based * buntu do it too) in UEFI mode on the device.
- If you use the prepared UEFI image, the size of the partition sda2 is set to 80 GB by default. A Labdoo image for 80 GB fits. If you want to install an image for a 160 GB or 250 GB hard drive, you have to enlarge the partition sda2 with GParted.
- Shut down the computer and restart it with Labtix.
- Start Clonezilla to replace sda2(!) of the installed UEFI-Boot image / Xubuntu by replacing "restoreparts" with sda1 of the Labdoo-image you want to install. Make sure you choose the target-partition sda2 when asked and the "-icds"-option in "Clonezilla advanced extra parameters". Make sure the option "-k Do NOT create a partition table..." is checked.
- After installing sda2, use GParted to maximize sda2. Check if the "boot"- and "esp"-flags are set to sda1. To retrieve the UUID of sda2 right-click on it and select "Information". Mark the UUID and copy it with "Ctrl" + "C" to the clipboard.
- Edit /EFI/ubuntu/grub.cfg in the EFI-bootpartition ( usually sda1, the small partition with 512MB ) with the editor Geany and replace the given UUID with the UUID of sda2 you copied by GParted. E.g. open SpaceFM -> sda1 -> navigate to /EFI/ubuntu/grub.cfg -> right mouse click -> open > Geany editor -> in line 1 you will see a UUID -> mark and paste the new UUID from the clipboard. Don't forget to save the file before closing Geany editor.
- Shut down and restart the computer. Now it should start in UEFI mode and users will see the Labdoo login after a short time.
This description is very technical, but it works. If you know a simpler solution, please feel free to contact us.
A special thank you goes to helpers from hub Rhein-Ruhr (Germany) for noticing and solving this specific problem.
Helpful commands (shell, terminal)
Helpful comnands (shell, terminal)
To open a terminal click on the terminal icon in the menu bar or press the keys Ctrl and Alt and t.
If access to a command is denied ("permission denied") or root rigts are needed, add "sudo" in front of the command to be used, e.g. "sudo zzzfm"
For more information use the --help option e.g. "apt --help"
======================================================================
acpi (-V) >> information about the powersystem like battery-state, battery-condition etc.
======================================================================
(sudo) apt >> package manager
Usage:
sudo apt update >> create the needed package database
sudo apt install mousepad >> installs the program "mousepad"
Only usefull in the persistence mode. The device must be connected to the internet.
======================================================================
eject -T >> ejects CDs or DVDs
======================================================================
grep >> filters the output of commands
acpi -V | grep -i battery >> shows only the lines of acpi -V wich contain the term "battery"
======================================================================
(sudo) inxi >> system information
sudo inxi -v 5 >> informations with verbosity level 5 (1-8 possible)
inxi -B >> battery information
sudo inxi -M >> informations about the system
inxi -m >> informations about the memory
Sudo is only needed if informations inxi gathers need root permissions
======================================================================
iwconfig >> shows informations about wireless connections
======================================================================
lsblk >> lists blockdevices like harddisks
======================================================================
======================================================================
lspci >> lists all recognized pci-devices
lspci | grep -i Network ( or Wireless or WLAN ) >> shows Wifi-devices
======================================================================
lsusb >> lists all recognized USB-devices
======================================================================
rfkill >> tool for radio devices
rfkill list all >> lists the states of all radio devices
rfkill unblock all >> unblocks all softblocked devices
To unblock a hardblocked device:
- look for a hardware switch
- look for a keyboard function/binding
- look if the device is blocked in the UEFI/BIOS
======================================================================
(sudo) shred >> tool to securely delete devices or partitions
Usage:
sudo shred /dev/sdX -v -f -n 2 >> overwrites sdX 2 times
Shred will overwrite each single byte of the target device, so it might take a long time.
BE CAREFUL !!! BE SURE TO USE THE PATH TO THE DEVICE/PARTITION YOU REALLY WANT TO CLEAN !!!
======================================================================
sudo >> command to get root permissions
In labtix no sudo-password is installed, so typing in a password is not needed
======================================================================
wipefs >> tool to delete filesystems
Usage:
sudo wipefs -a -f /dev/sdX >> wipes the filesystem of sdX
BE CAREFUL !!! BE SURE TO USE THE PATH TO THE DEVICE / PARTITION YOU REALLY WANT TO CLEAN !!!
This is not a secure method of deleting any devices, it's the quick and dirty solution if you want to get rid of an installed system. For safe deletions use the command "shred"
======================================================================
xkill >> tool to kill windows that are not responsible
Usage:
Open a terminal, type "xkill" and press "Enter". The mousepointer will be shown as a skull. Leftclick with the skull inside the window you want to close. Xkill will only close windows. In some cases processes started by the killed window might still run in the background.
Do not click on the Desktop, it is a window too !!!
======================================================================
xrandr >> tool to manipulate the graphical-(x-)server
xrandr --output eDP-1 --scale 0.5x0.5 >> reduces the height and width resolution of output eDP-1 by the factor 0.5 . Very useful if the screen has a very high resolution.
To get the name of the actual output:
xrandr | grep primary
======================================================================
Dual boot MacOS and Ubuntu
Step-by-step instructions on how to install macOS and Ubuntu on a Mac computer.
There are four parts:
01: Prepare Your Stuff
Requirements
- A 4GB or larger USB flash drive to create a bootable image
- (Optional but recommended) Another 4+GB USB drive or external HD to store the files that you will download later
- At least 40GB free on the Mac HD
Downloading Files
Download the following files from labdoo@ftp.labdoo.org:/macOS-ubuntu:
- refind-bin-0.12.0
- ubuntu-mate-20.04-desktop-amd64.iso
- unetbootin-mac-681.dmg
It is strongly recommended that you install and use a download manager software (e.g. FileZilla) to download the files since the iso file is huge, and the download manager can resume the download just in case you lost the connection. Save the files to a USB drive or external HD. Below is a screenshot using FileZilla:
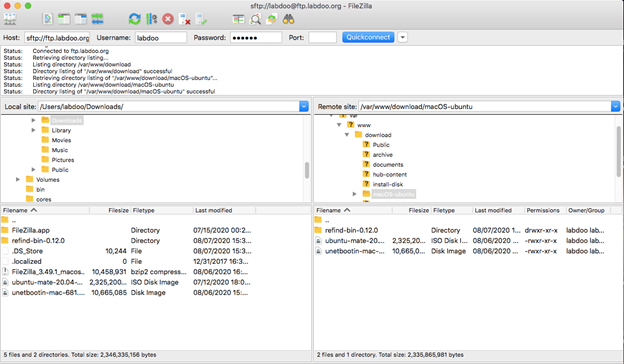
Create Bootable USB
Do the following on a working Mac. Otherwise, complete “The Mac Side” section and come back here.
- Insert a blank USB
- Double click on the file unetbootin-mac-681.dmg that you downloaded earlier
- Right-click and select Open
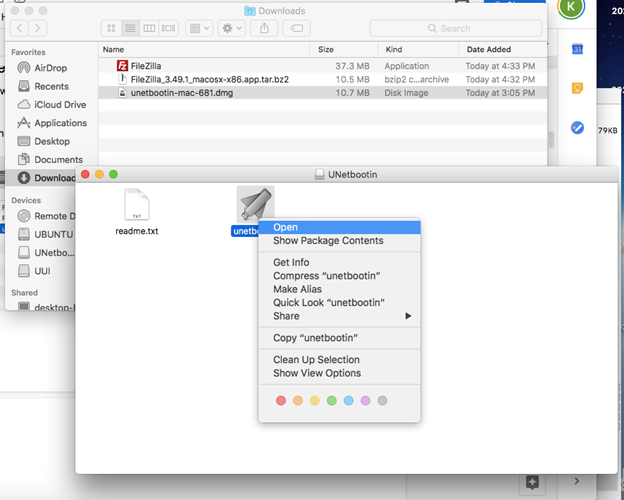
- Click the Open button
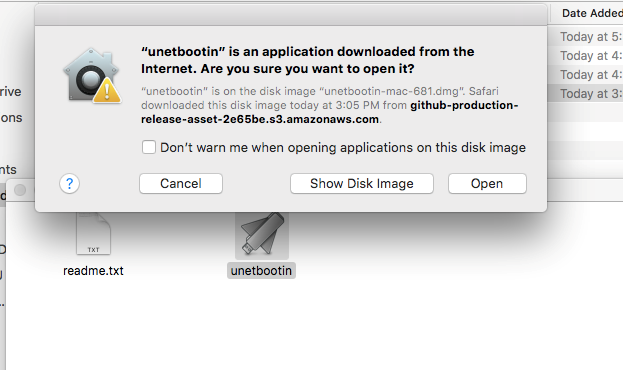
- Enter the password if prompted. The UnetBootin application will open. Select “Disk Image” option and the Ubuntu ISO file you downloaded earlier
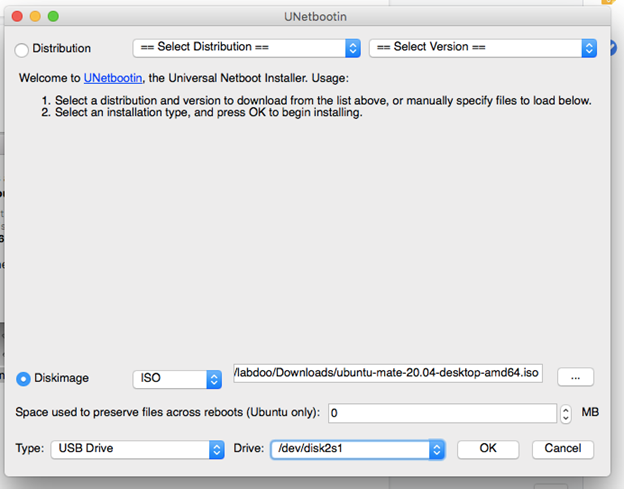
- Click OK. UnetBootin will extract and copy a bunch of files to the USB drive.
- When it’s done, eject the USB drive by clicking on the Eject icon:
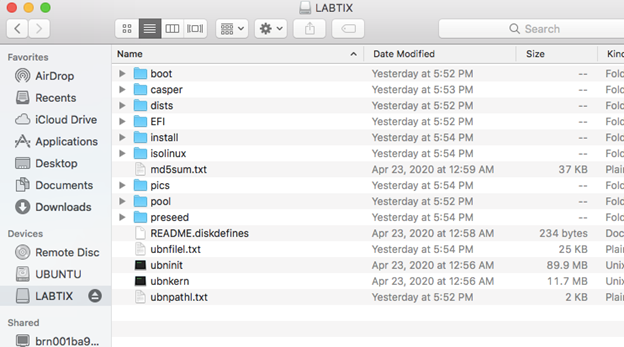
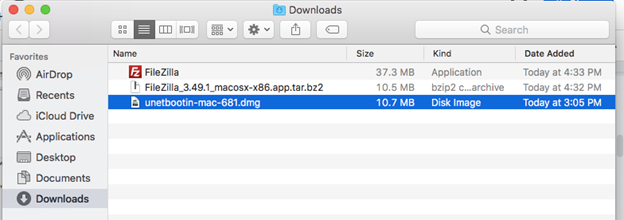
The USB drive now can be used to boot any Mac.
02: The Mac Side
If MacOS is missing
You will need to have Wifi and internet access to reinstall macOS.
- Booting the laptop.
- If it prompts you to install a new OS, simply connect to your WiFi and follow the screen
- Otherwise, reboot the laptop, holding both the Command and R keys until you see the Apple logo. Then select “Reinstall macOS” from the menu
If MacOS is present
If you know the password of the admin user, congratulations!. Otherwise, follow these steps to reset the password:
- Reboot the laptop, hold the Command + R keys until the Apple logo appears.
- Select Utilities -> Terminal to launch a terminal.
- Type resetpassword (yes, one word) at the terminal. Follow the screen to reset the password for each existing account.
- Restart and log in using the new password
“Labdooing” the Mac
Create Labdoo Accounts
You will use the existing admin account to create two new accounts: “student” and “labdoo” and then remove all non-labdoo accounts.
- Log in as the current admin account
- Select “System Preferences” -> “Users & Groups”
- Click the lock icon to unlock. Type password when prompted
- Click ‘+’ to add a new account. A new account form will pop up
- Create “labdoo” account - fill in the form with the following values:
- New Account: Administrator
- Full Name: labdoo
- Account Name: labdoo
- Password: labdooadmin
- Verify: repeat the password
- Password hint: can leave blank
- Create “student” account - fill in the form with the following values:
- New Account: Standard
- Full Name: student
- Account Name: student
- Password: labdoo
- Verify: repeat the password
- Password hint: can leave blank
Delete Non-labdoo Accounts
- Log in as “labdoo”
- Select “System Preferences” -> “Users & Groups”
- Click the lock icon to unlock. Type password when prompted
- Select a non-labdoo account, click the ‘-’ to remove the account
- Select “delete user directory” option. Confirm deletion when prompted
- Repeat step 4 and 5 for all remaining non-labdoo accounts
Change the Computer Name:
We will change the computer name to the labdoo Tag ID:
- Generate a tag ID for this computer if it doesn’t have one yet
- Click “System Preference” -> “Sharing”
- Change the computer name to labdoo-000xxxxxx, where xxxxxx is the tag ID.
Create a Partition for Ubuntu
- Run Disk Utility: Select Go -> Utilities -> Disk Utility

- Disk Utility screen
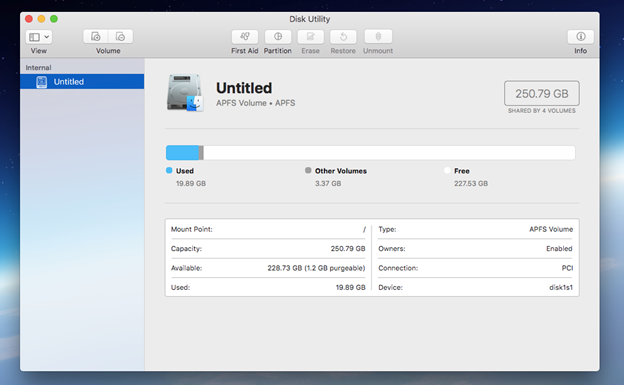
- Click “Partition”. A dialog box will pop up. Click Partition again

-
Click the ‘+’ sign. A new partition will be added. We now have 2 partitions, each occupies 50% of the disk space. Name the new partition “UBUNTU” and set its format to MS-DOS(FAT).
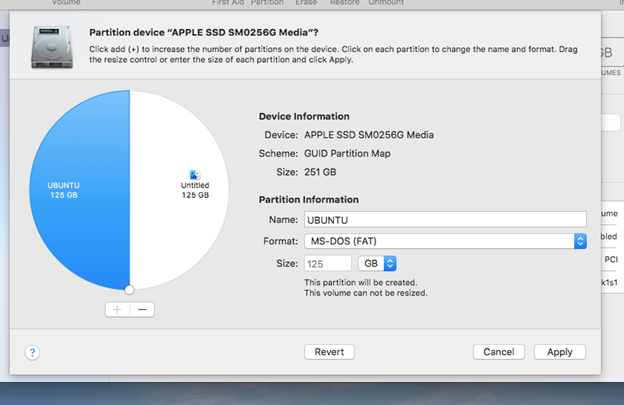
-
Click Apply
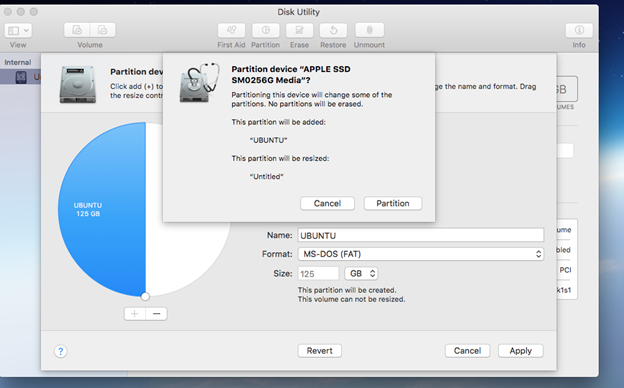
-
Click Partition
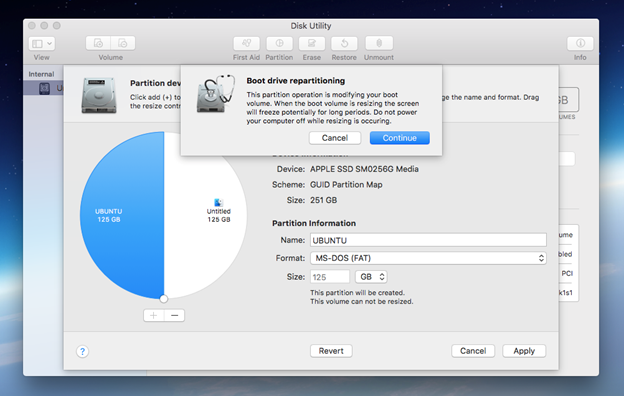
- Click Continue. The process may take a while.
We are now ready to install Ubuntu on the new partition. But there is one task left: to install a boot manager.
Install rEFInd Boot Manager
Disable SIP (System Integrity Protection)
SIP protects critical areas on the disk from being altered, and rEFInd needs to write to one of those areas. Thus, we need to disable SIP before installing rEFInd
- Check to see if SIP is enabled or disabled. Open a Terminal and type “csrutil status”
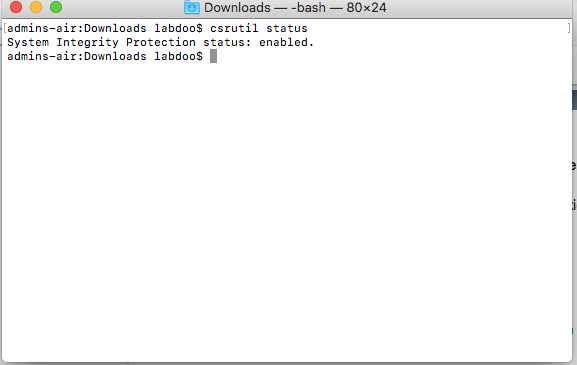
- Reboot and hold the Command + R key until you see the Apple logo. It will boot into Recovery mode.
- Select “Utilities” -> “Terminal”
- At the terminal, type csrutil disable
- Reboot and log back in as labdoo
If it says “enabled” like in the capture above, follow the steps below to disable it
Installing rEFInd
- Open a Terminal
- Open the folder where you downloaded the files earlier
- Arrange the Terminal window and the folder window so you can see both at the same time:
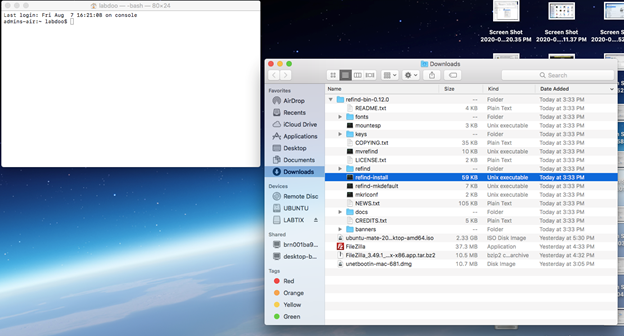
- Drag and drop the “refind-install” file into the Terminal folder
- In the Terminal window, hit Enter or Return key to execute the command. Enter the password when prompted
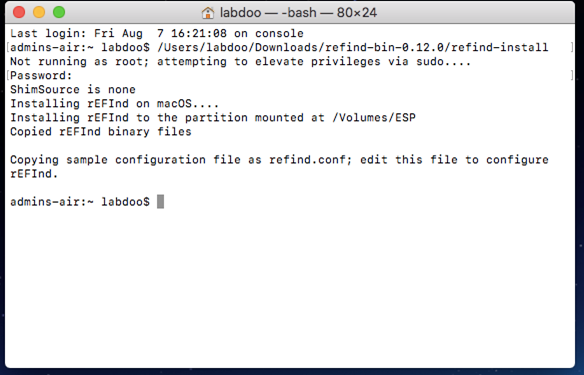
We are now ready to install Ubuntu.
03: Install Ubuntu Mate
- Insert the bootable USB drive that you created earlier
- Reboot. The rEFInd boot menu will show
- Select EFI\BOOT\grubx64.rfi from {your USB drive name} and hit Enter
- Select “Try Ubuntu MATE without installing”
- After a few minutes or so, you should see the Ubuntu desktop
- Click on Install Ubuntu MATE 20.04LTS
- Follow the screens to complete the installation. IMPORTANT:
- Under the “Updates and other software” screen, make sure you select “Install third-party software for graphics and WiFi hardware and additional media formats”. Click Continue. Then connect to your WiFi network when prompted.
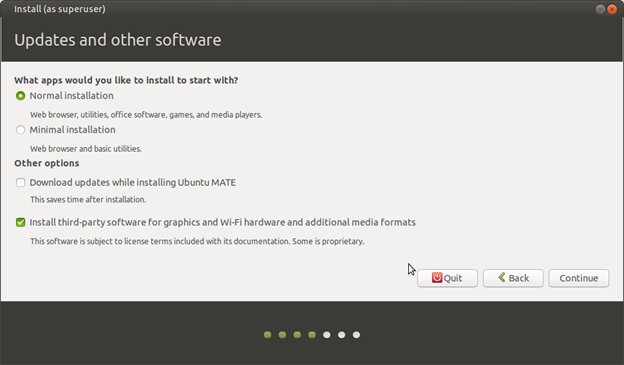
- Under the “Installation Type” select “Something else” option
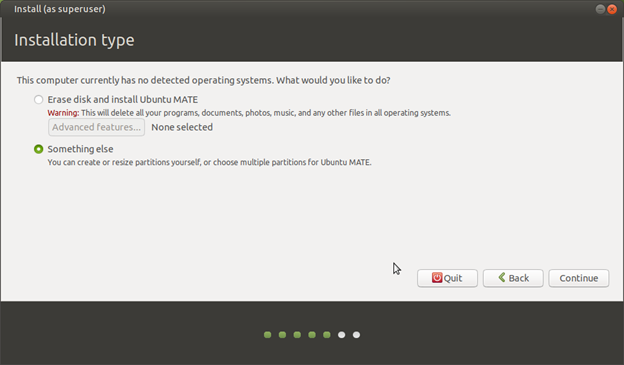
- Select the partition with format fat32 which we created earlier using Disk Utility
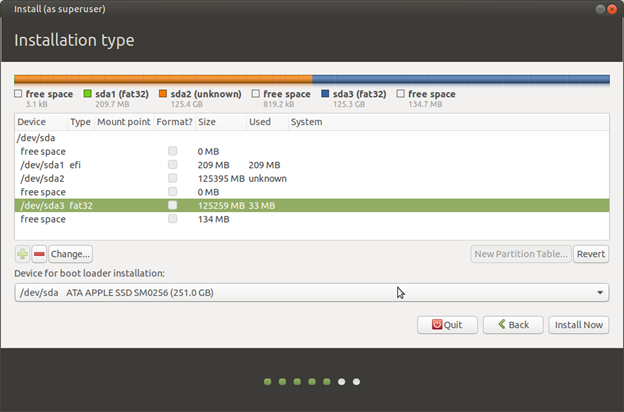
- Double-click the highlighted entry. A dialog box will pop up. Select:
Ext4 journaling file system
Check “Format the partition”
Mount point: /
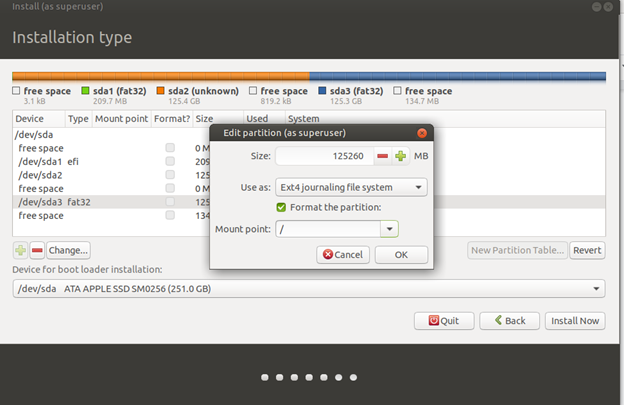
- Click OK
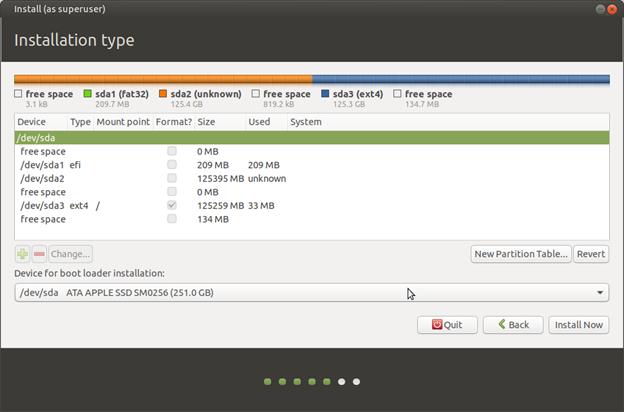
- Click “Install Now” and follow the screens to complete the installation. At the “Who are you” screen, create the labdoo account and use the tagID for the hostname:
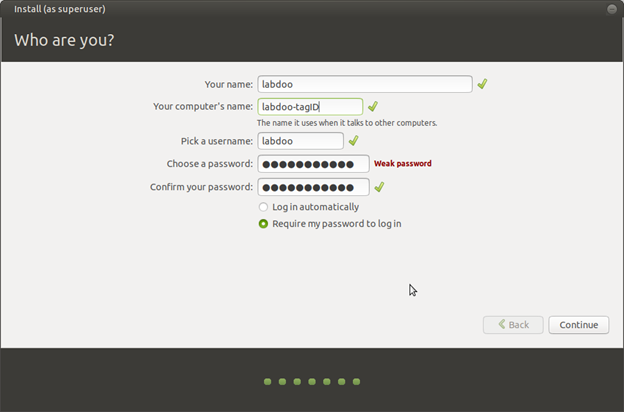
- When the installation completes, click restart to reboot the system. Hold the Option key while the system reboots until you see the original boot menu
IMPORTANT NOTE:
The installation of Ubuntu overwrites the EFI boot area that we created earlier in the “Installing rEFInd” section. But without the EFI boot area, the Ubuntu installation would fail for some reason that I haven’t figured out. Thus, we’ll have to install rEFInd again. - Select booting from macOS partition and hit Enter key
- Repeat the steps in the Installing rEFInd section again
04: Post Installation
Enable SIP
- Reboot into recovery mode: hold Command + R key while rebooting until the Apple logo appears
- Select Utilities->Terminal to open a terminal
- Type “csrutil enable” and hit Enter key
- Reboot
How to (Physically) Clean a Laptop to Make it Look New Again
The donated used laptops often come dirty in appearance. After making sure the laptop is not broken, the next step to take is to clean the laptop case. Here's how to properly clean a laptop.
What you need: some soft clothes, a small bottle of 91% isopropyl alcohol, a box of cotton swabs.
LCD Screen
LCD screens are pretty delicate, and you don't want to press hard on them, because that can burn out the pixels. Instead, grab a dry soft cloth and gently wipe the screen. If you need to, add a little bit of alcohol. In most cases, that should be all you need. Do not use anything paper-based, like paper towel, Kleenex, or toilet paper, since it can scratch up your screen.
Keyboard
Clean dirty keys with a swab of rubbing alcohol to remove oil, grime, and germs. Don't forget to turn the laptop's power off before you start cleaning.
A warning note
Isopropyl alcohol vapor is more dense than air and is highly flammable with a very wide combustible range. It should be kept away from heat and open flame.
Packaging the Laptops Ready for Traveling
Packaging the laptops ready for traveling
Once a laptop has been sanitized, we need to package it so it can travel to a destination school. The main goals of the packaging are two-fold: (1) the packaging should protect the laptop from any possible rough traveling conditions; (2) the packaging should make visible the Labdoo identifier of the laptop, for both its AC adapter and the laptop itself. A recommended approach is to use transparent, bubble plastic wrap and to tape the Labdoo identifier in big letters outside, for both the laptop and its AC adapter, as shown in the following pictures:
Figure. A good way to pack your dootronics: use a wrapping material to properly protect them and write the Labdoo IDs clearly outside both the devices and the AC adapters.

You are welcome to use other packaging approaches based on what's available to you, as long as the laptop is well protected and its Labdoo identifier is made visible externally.
Tips and Tricks, Suggested Solutions
The following section describes relevant learning experiences gained by Labdooers around the world who (like you) are helping to sanitize laptops and make them ready for needy schools. It will teach you tips and tricks that will be very handy when sanitizing your laptops. If you are not able to find a solution to your problem in this section, please ask your questions to the Labdoo QA team and another Labdooer there will provide an answer for you.
Configuring the Bios
How to change the booting order of a laptop from the bios
BIOS (Basic Input Output Subsystem) is a programmable chip that controls how information is passed to various devices in the computer system. A typical method to access the BIOS settings screen is to press ESC, F1, F2, F8 or F10 right after you start your computer.
BIOS settings allow you to run a boot sequence from a hard drive, a CD-ROM drive, the network, or an external device. You may configure the order that your computer searches these physical devices for the boot sequence.
The first device in the order list has the first boot priority. To install the Labdoo software you will need to ensure the CD-ROM, the USB or the network (depending on which method you use to install the software) are given the highest booting priority.
Note: in the case of a USB installation, before you set boot priority for the USB device, plug the device into a USB port to ensure the BIOS will be able to detect it.
To specify the boot sequence:
- Start the computer and press ESC, F1, F2, F8 or F10 (depending on the BIOS manufacturer, try them all if needed) multiple times during the initial startup screen. A menu may appear.
- Choose to enter BIOS setup. The BIOS setup utility page appears.
- Use the arrow keys to select the BOOT tab. System devices appear in order of priority.
- To give the CD/DVD, the USB or the Network the highest boot sequence priority, move such device to the first position in the list.
- Save and exit the BIOS setup utility.
- The computer will restart and will initiate its booting process by looking first at the device you gave the highest priority, allowing you to install the Labdoo software.
| Figure. Illustration of the BIOS boot menu where you can change the booting order. |

|
Troubleshooting potential issues with the bios.
In some rare cases the BIOS could be reset during the process of deleting the hard drive information from the system, or some times older laptops do not support internal and/or external USB keyboards during the booting process. It might happen that you are not able to use the arrow keys (up, down, right, left) to configure the BIOS. In such cases the USB control (and sometimes the internal keyboard) was deactivated. A possible solution is to connect an external PS/2 or USB keyboard, and continue to install or adjust the BIOS.
Installation of Restricted Codecs
Please notice that the usage of restricted codecs might depend on local laws. It might be illegal in some countries to install and use certain codecs (commercial/proprietary third-party packages) and multimedia extensions. Check your local regulations first prior to proceeding with the installation of the following software.
As in all software for Ubuntu, there are two ways to do the installation: via the Ubuntu Sofware Center or via the command line.
The installation via the Ubuntu Software Center is as follows. Open the Ubuntu Software Center (or the Synaptic Package Manager) and search for "restricted codecs". Select the package found and click on install. During the installation you will need to accept an EULA license agreement. To have full support to watch DVDs you must also install libdvdcss2 and non-free-codecs from the Medibuntu Repository. Please notice that in Europe these repositories are not allowed to be used. Further information can be read here: http://www.videolan.org/developers/libdvdcss.html
The same installation can be done via the command line through the following steps. Open a terminal by pressing at the same time the keys ALT+CTRL+T. Then type the following commands:
sudo apt-get install ubuntu-restricted-extras -y (Enter)
sudo apt-get install non-free-codecs -y (Enter)
sudo apt-get install curl -y (Enter)
curl ftp://ftp.videolan.org/pub/debian/videolan-apt.asc | (Enter)
sudo apt-key add -echo "deb ftp://ftp.videolan.org/pub/debian/stable ./" | (Enter)
sudo tee /etc/apt/sources.list.d/libdvdcss.list (Enter)
sudo apt-get update (Enter)
Manually create a guest account in Ubuntu20.04
Ubuntu20.04 has some problem with Guest Session. You can create a guest account with the following procedures
---
1. Select "Administration->Users and Groups ->Add" , to create a new "guest" user:
Name: guest
Username: guest
2. Select the "guest" user and go to the "Advance Setting"
1. Under "Advanced" tab, deselect "Disable account" box
2. Click on "Change" Password, and select "Don't ask for password on login" box
3. Edit "/etc/lightdm/lightdm.conf " file to disable the guest session created by Ubuntu20.04 and add logout procedure for new guest account
allow-guest=false

session-cleanup-script=/home/labdoo/Public/guest_logout.sh
4. Create a /home/labdoo/Public/guest_logout.sh file as followed
#!/bin/bash

if [ $USER = "guest"  ]

then

   rm -r /home/guest/*

   cd /home/guest

   mkdir Desktop Documents  Downloads  Music  Pictures  Public  Templates  Videos

  chown guest *

  chgrp guest *

   rm -rf /home/guest/.mozilla/firefox

fi
You can find more extense and precise information on how to create accounts and manage their permissions from the following Linux Users Tutorial
Samba / Windows Server
Starting from April 2018 and with the 18.04 LTS (L)Ubuntu release, a Samba server comes pre-installed on image cloned laptops. This means that a Labdoo laptop can be used as a server to other computer clients allowing these clients to access all the educational content in the server. This is a powerful configuration as it allows many types of devices (laptops, tablets, mobile phones, etc.) to access the educational content in the server without the need to have access to the Internet or the need to replicate the educational software in many devices.
Due to the speed of the server or the network, there are limitations in the number of computer clients that can be supported by one computer server. If too many clients are connected, the performance of the data transfer will become slow. So if you have many computer clients, it may be necessary to have more than one computer server.
This page describes how you can convert a Labdoo laptop into your own computer server to provide access to other computer clients. With a few simple steps a server can be set-up, check out the next instructions on how to do that!
Install Samba server
-
Install the package "samba" by running in a terminal
sudo apt-get install sambaor via the Linux package manager, e.g. synaptic. -
Type
smbd[Enter] in a terminal to start the Samba server manually. To avoid starting this program each time manually, you can add "smbd" as a command in menu → Preferences / Settings → Personal / Personal → StartUp Applicatons / Start Programs → with "Add" → Name: Samba / command: smbd / Comment: add start up of Samba Server.. This will start the Samba server every time you reboot the system. -
If necessary, install additional extensions to the system's file managers to bring a better use experience. For instance you can install "caja-share" by typing in a terminal
sudo apt-get install caja-shareor by using the synaptic package manager (this extension is also part of the Labdoo Image since April 2018).
Set up the Shared Folders
-
Open Caja as administrator/root by running
sudo caja[Enter] in a terminal and right click on the folder you want to share. Click in the context menu "Share". Please notice that if Caja is not started as root, the menu item "Sharing" will not appear. - Activate "Share this folder" and "Guest access", then enter your own "Share name".
- Close Caja.
- Alternatively for LXDE Desktop, install instead the File Manager PCManFM: Go → network → usually then the server is already recognized and displayed, otherwise Windows network → Workgroup → Server name select, usually labdoo-00000xxxx where xxxx is the Labdoo ID of the computer.
- Finally, don't forget that the computer must be connected to the network via LAN cable or WiFi.
Access to the server via tablet, mobile phone, laptop or PC clients
Depending on your client and operating system installed and in use (Android, iOS, Windows, Linux etc.) access to the server may be different. Below you will find some examples and tips. There are also useful programs such as file managers, browsers, pdf viewers or ebook readers on your device. Check if your file manager is able to connect to a server (not all apps are able to) or if additional extensions need to be installed.
Access to the Server Using a Client
- In a (L)Ubuntu officially cloned Labdoo laptop comes with the file manager Caja. Either use the Menu → Places or use Caja and in the left column go to "Browse the Network" to scan and show all the servers in the network.
- Android - open your file manager and click on "network". The network will be scanned for SMB-shares which will be shown in a file manager. If your installed file manager is not able to handle SMB, you have to install one with this ability. We recommend the file managers Ghost-Commander (to be installed using the apps store Google Play: both Ghost Commander and Ghost Commander - Samba Plugin need to be installed) or the X-plore add on.
- iOS (Work in Progress)
- Windows (Work in Progress)
- To open the "Public" shared folder just double-click it. Then confirm "Connect as anonymous" to get connected.
- For a faster experience, nearly all operating systems and file managers offer a way to bookmark favorite folders. Use it to bookmark the access to the server.
Connecting to the Server Using Ghost Commander in Android
The example Ghost Commander is similar to other file managers.
- Start Ghost Commander.
- Open "home" directory (arrow with dot right upper corner).
- Click on "Windows shares".
- In the window "Connect to Windows PC" click on "Search". No further input should be needed to connect to the server.
- Click on "Workgroup".
- Click on the name of the server you want to connect to.
- The shares of the server should be listed in your file manager.
To create a Bookmark Using Ghost Commander
- Click and hold on for about 2 seconds on the share you want to bookmark until a context menu opens.
- Click on the context menu "NAME_OF_THE_FOLDER as favorite".
- Now you will see the share at /Home (Arrow and dot upper right corner) /Favorites and have direct access, provided the SMB server is online and connected to the local network.
Note: Some file managers first store documents and pages locally before opening and displaying them. This can end up filling up the memory in your device. Cleaning up the memory can help.
Display Educational Content and Documents
- Off-line web content: can be shown in your client's browser. Local off-line content must be stored using relative links (not absolute links).
- pdf: to be displayed and read using a PDF viewer.
- Office documents: It does not matter if you want to open and read Microsoft Office, LibreOffice, OpenOffice documents etc. in all these cases a viewer software app must be installed which can handle the file content.
- Video / audio files: In this case the client must also have matching software / apps installed to watch videos or to listen to audio files.
Make Xowa Accessible from other Devices
Xowa comes with an http-server to help share Xowa wikis within a local network. Navigate to the folder /home/labdoo/Public/xowa and open a terminal (e.g. using the file manager Caja: File →open a terminal here). Run the Xowa-jar file in this folder as follows:
For 64 Bit installations: java -jar xowa_linux_64.jar --app_mode http_server [Enter]
For 32 Bit installations: java -jar xowa_linux.jar --app_mode http_server [Enter]
Don't close this terminal window, as otherwise the Xowa process will be stopped. So leave it open as long as Xowa is used by other client devices.
Some devices, operating systems and browsers can resolve the hostname into its IP address. The IP address is like the address number of a home, which controls the access to each device inside your LAN (Local Area Network).
If the IP address cannot be resolved automatically you can get it manually. From the server computer, first right mouse click on the network/WiFi symbol on the desktop → Connection Information → read IP address (often similar to 192.168.1.xxx). Notice: The IP address will change every time, when you reboot the server (if you run DHCP for dynamic IPs in your network). It might be helpful to assign a static IP address to your server.
Read Xowa Content on any Client
The following is based on the IP address 192.168.1.133 just to illustrate an example. Instead of this IP address, use your server's IP address. Open the browser of your choice on your device (tablet, mobile phone, PC) and type the address of the server:
SERVER_IP_ADDRESS:8080
In our example: 192.168.1.133:8080:8080
Related Links and References
https://en.wikipedia.org/wiki/Samba_%28software%29
https://help.ubuntu.com/community/Samba/SambaServerGuide
https://en.wikipedia.org/wiki/Ubuntu_MATE
https://en.wikipedia.org/wiki/PCMan_File_Manager
Using a Laptop as WiFi Hotspot to provide educational data to mobile devices
Introduction
If a Labdoo laptop is member of a LAN or WiFi network, it can provide data (educational content) to other devices of that network, e.g. to mobile phones or tablets. This can be done either by some network share – e.g. via samba (smb) or e.g. via a web server (e.g. Apache web server). In both cases, educational content on that laptop could be accessed by other mobile devices (mobile phones, tablets) via their web browser. This might be a reasonable use case if these mobile devices do not contain Labdoo educational content (e.g. due to having not enough disc space for this content)or no having internet connection.
In the case of a WiFi connection, we commonly assume that our laptop is connected to a WiFi router, to which all other mobile devices are connected.
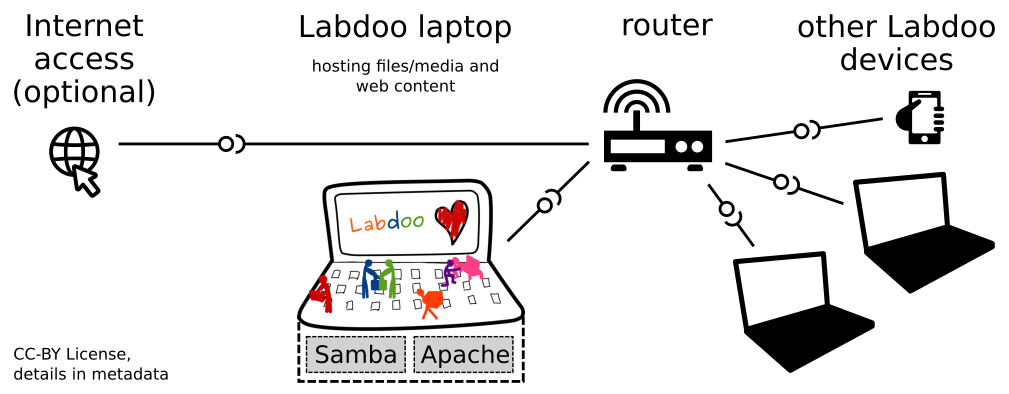
But what do we do if no WiFi router is available? If a WiFi USB-adapter or a built-in Wifi is available on it, is possible to use a laptop as hotspot and host a WiFi network. There a 2 options - use a Samba (smb) file server, which offers a Windows-compatible server (easy to start and handle). Or you can use Apache server, which is bringing a full web server to a laptop (more complex), being able to spread content and web-sites locally and world-wide (if connected to internet).
Such a setup is outline in this document.
using Samba (smb) server
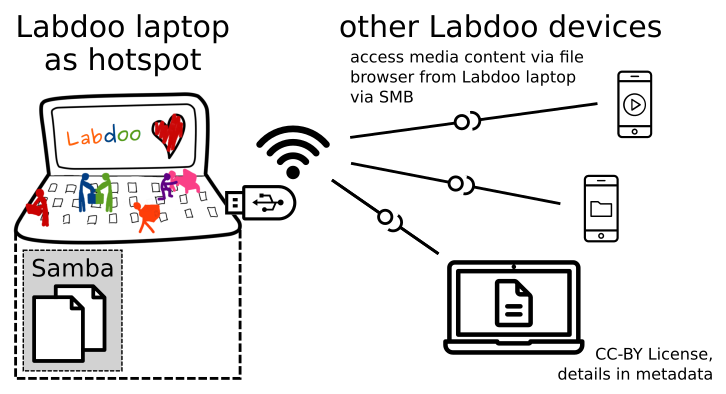
using Apache web server
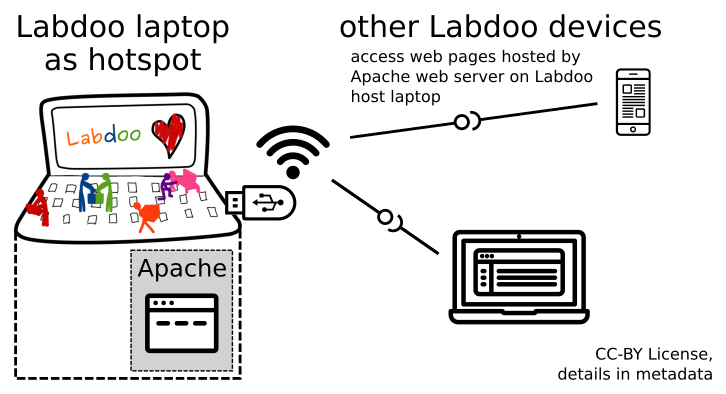
Target Group
The target groups are Labdoo schools, which do not have a running WiFi network, but need a network to provide file, content and/or Internet access to other mobile devices.
Example: The Labdoo school have tablets or smartphones, but no Labdoo content on them.
Then the school is able to use a Labdoo laptop as server and spread the educational content to mobile devices. The number of mobile devices to be provided by one laptop depends on its capacity, mainly speed of CPU, disc and WiFi connector. In our tests we found 3 - 10 devices a reasonable number of clients to be connected to one laptop.
Each Labdoo laptop comes with a preinstalled Samba server (smb). How to start the smb-server and how to connect mobile devices to it is explained here.
You will find most content on each laptop in the folder /home/labdoo/Public/wikis. Navigate in a browser of your mobile device to the sub-folder (language) needed. Search for the start file, in most cases index.html, start-here.html or similar. Then you can read and use links etc. on your mobile device as reading on a laptop. Please note that Xowa content does not work using a web browser.
Technical Aspects
Most modern smartphones can be used to host a WiFi network. However, not all WiFi chips of laptops or USB-sticks (and their drivers) support this feature. According to the Ubuntu Users Wiki [1], these WiFi chips do the job:
• chips driven by the hostap driver or
• chips working with a current mac80211/nl80211 sub-system
A detailed description on how to set up the laptop as a WiFi hotspot is given in the Ubuntu Users Wiki [1]. The procedure works with (L)Ubuntu 14.04 - 18.04 LTS.
• provide files access (e.g. via Samba, offering Windows-compatible file services) and / or
• run a webserver to provide browser based access on educational content (e.g. via Apache)
• share its Internet connection (e.g. if the Laptop has WWAN)
to mobile devices connected to the WiFi.
References
[1] https://wiki.ubuntuusers.de/WLAN_Router/
Thank you, Daniel Neumann, Labdoo Hubs Hamburg / Rostock, for contributing this text (hamburg-hub@labdoo.org).
User concept, add user student
When installing Lubuntu-Installation the first user created is labdoo (who is also administrator and should be reserved for the teachers, as this user may destroy the system by mistake). If you install via cloning or if you use the installation scripts the additional user student will be created automatically.
The user student kas less rights, e.g. is not able to install or delete software and is not able to destroy the system.
Here is the manuel way, how to create a user student:
Start here → System Tools → User + Groups → unlock → +add user → system password (labdoo) → student as name, e.g. withpassword labdoo → Account Type = Standard (as suggested) → Create → click on password (account disabled) → input of password labdoo and acknowledge → Change → optional: cahnge language of user student.
Open a terminal and type (by executing this zhe user student will become member of the group labdoo):
sudo usermod -aG labdoo student (Enter)
Please note:
Each new user takes disc space. So please do not create more users.
As a standard user you are not able to destroy a system by mistake (or at least it is very hard). The user labdoo (administrator) should only be used by teachers.
Each user has his own folder and files in the directory /home/....(name of the user). But the folder home/labdoo/Public is a public folder. All users should have access here. To go there open the file explorer → filesystem → home → labdoo → folder /Public (you can add a bookmark to navigate here more easily).
If you add content of your own in /Public there is a script http://ftp.labdoo.org/download/install-disk/installskripts/set-rights-fo... to ensure all rights are set correctly.
In addition there is the user guest. guest needs no password to log-in. But guest is not able to change or store anything. When logging out all his input will be deleted automatically.
Sanitizing Smartphones
Smartphones can also take a crucial role in enabling a path to education for children around the world. In many situations, a smartphone can be the lifeline that connects children with their school teacher, specially in rural areas. Without this lifeline, children often loose all chances to continue their school programs. Smartphones can be as computationally powerful (and can even be as expensive) as computers. Further, many smartphones tend to have large screens, which makes them suitable for education.
The Labdoo Smartphone Program focuses on enabling the circular economy of smartphones in order to help disadvantaged students from around the world gain access to educational content.
Minimum phone requirements:
As a Labdoo hub, when accepting smartphone donations, please make sure the phone satisfies the following minimum requirements:
- The phone must be in good shape. Make sure the screen is not broken and that the phone boots and runs correctly.
- The phone must be based on the Android software version 5 or above.
Sanitation Process:
When you receive an unused smartphone, please follow the next instructions to sanitize it and ensure all personal data is fully removed:
Step 1. Tag it.
Follow the usual instructions to tag a device: https://platform.labdoo.org/content/tagging-and-updating-state-dootronic.
As usual, tagging is a very important step to ensure the transparency and traceability of the devices globally. Please make sure the device is properly tagged through the Labdoo platform. This will also allow participants to receive automatic notifications of the state of the device as it makes its way to the destination school.
Step 2. Encrypt it.
Modern Android devices are always encrypted out-of-the-box. However, in the case of older Android models, the device may or may not be encrypted. If you are using an Android device running a version below 7.0, please follow the next steps to ensure the phone is encrypted.
For Android handsets and tablets running Android 5.0 Lollipop or newer, you can navigate straight to the “Security” menu under settings. Getting here might be slightly different depending on your phone, but with stock Android, this can be found under Settings > Personal > Security. Here you should see an option to “Encrypt phone” or “Encrypt tablet”.
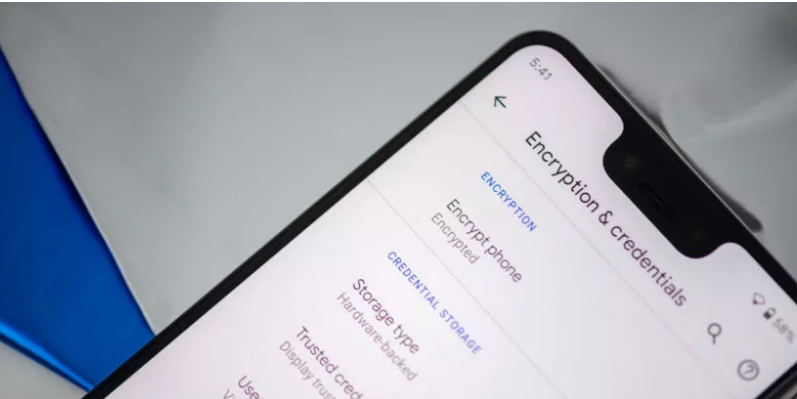
You’ll be asked to plug your phone in to charge while the process takes place, just to make sure that your phone doesn’t shut off and cause errors. If you haven’t done so already, you will be prompted to set a lock screen PIN or password, which you will need to enter when you turn your phone on or unlock it in order to access your newly encrypted files. Be sure to remember this password!
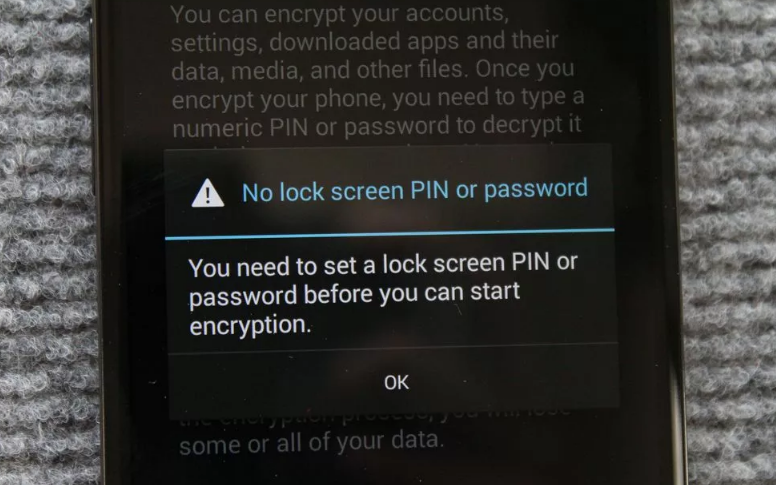
Step 3. Factory reset it.
To factory reset your phone, go to your phone's settings and look for a section called "Backup and reset." If you don't see that, open the System section of the settings and then look for "Backup and reset," "Reset," or "Reset options" — or, on Samsung devices, open the General Management section and then look for the "Reset" option there. In some cases, you might have to tap a line labeled "Advanced" before any reset-related options will show up.
Find and select the command to perform a full factory data reset and select any subsequent options to erase all types of data and accounts. The system will likely give you a confirmation screen or two and then ask you to input your PIN, pattern, or password for protection. Complete all those tasks, then sit back and wait while Android does its work.
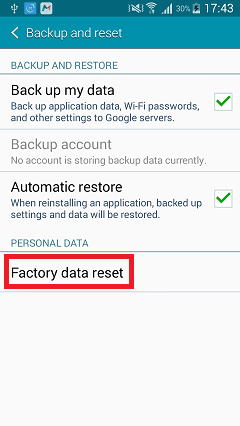
That's it! At this point the phone should have no sensitive information and it should be in the same state as when the phone was first bought out of the factory.
Note for the hubs:
When soliciting mobile phones to your local community, please make sure to ask donors that they perform a factory reset before accepting the phone. This will ensure that data has been erased and also that there is no password associated with the phone. You can forward the instructions in "Step 3. Factory reset it" to the donors prior to accepting the phones.
Labdoo Toolkit
The Labdoo Toolkit provides a set of tools to allow labdooers carry out their mini-missions. These tools include items such as flyers to run your own local awareness campaigns, slides to present the concept of Labdoo to your community or Labdoo logos that you can use to compose your own outreaching material, among many other items.
Labdoo Logos
If you are carrying out outreaching activities, you may want to use the Labdoo logos to create your own awareness material (flyers, announcements, etc.). You can download all the Labdoo logos from this page. Pick the one most appropriate to the message you want to convey.
Note: all the Labdoo content (inluding the following logos) can be freely downloaded as long as you make a fair usage of it. All content is released under the Creative Commons License (CC BY-SA 3.0): http://creativecommons.org/licenses/by-sa/3.0/
Labdoo logo: classic
Labdoo logo: 11 Year Anniversary

Labdoo logo: 10 Year Anniversary

Labdoo logo: laptop
Labdoo logo: word
Labdoo logo: word (alpha)
Labdoo mission statement: To bring education around the world through global collaboration

Labdoo slogan: tag a laptop

Labdoo slogan: build a lab

Labdoo global statistics

Labdoo logo: education 1

Labdoo logo: education 2

Labdoo logo: equation

Labdoo logo: steps 1

Labdoo logo: steps 2

Labdoo logo: Half Globe

[Download in scalable eps format]
Labdoo logo: Full Globe

[Download in scalable eps format]
Labdoo logo: social heart

Labdoo travel logo:
Labdoo steps with pictures:

Labdoo activity world map:


Labdoo Corporate Social Responsibility:

Labdoo map markers. You can use this if you compose your own maps.


Lasites/default/files/content/labdoo-toolkit/labdoo-steps-pictures.pngbdoo actions:

Labdoo DACH logo:
Labdoo Responses Templates
This wiki book includes a list of email templates that labdooers can use to help automate the process of replying to email requests. For instance, when a hub manager receives an edoovillage creation request from a destination school, the manager can automatically use the 'Response to Dootronics Solicitation' template. While each request will have its own specific requirements, using general templates to help automate responses to email requests help in two ways:
- They help standardize and unify the messages that all labdoeers provide to solicitors, making the process more globally consistent/coherent.
- They avoid labdooers having to re-write over and over emails that are identical or very similar.
Frequently Used Email Templates
Here are frequently used templates categorized by tasks.
Outreach/ Laptop donations -
Template for responding to laptops donors
Template for responding to tax receipt request
Template for responding to data deletion
Laptop requests -
Template for answering requests for a personal use laptop
Initial email response for laptop request from edoovillage
Second email response once laptop requester identifies school location
Template for laptops ready to be picked up
Template for laptop pickup reminder
Response to Dootronics Solicitation
English
1. Standard response.
Dear $SOLICITORNAME,
Thank you for contacting Labdoo and for all the work you've done to help spread education.
In order to evaluate if we can help your project, we need first to identify possible traveler(s) who will travel from any of the Labdoo hubs to $SOLICITORCOUNTRYNAME. Here is the list of Labdoo hubs for your reference: https://platform.labdoo.org/hubs?country=All&field_hub_status_value[]=open
Do you know any potential traveler(s) from your area to any of the Labdoo hubs in the following weeks or months? If so, please let us know and we can explore possible ways to bring laptops to your project. We look forward to hearing back from you.
Thank you and best wishes,
$MYNAME
Labdoo Team | www.labdoo.org
Tag a laptop, spread education

---
2. 'Cannot serve' response.
In some occasions, solicitors ask us to donate laptops to individuals or non-education projects, which is not part of Labdoo's mission. For such cases, you can use the following response.
---
Dear $SOLICITORNAME,
Thank you for contacting Project Labdoo.
Project Labdoo's mission is to bring laptops loaded with education software to well organized education centers. As such, we regretfully cannot donate laptops to individuals or to organizations outside the Project's mission scope and so, unfortunately, we cannot serve your request.
Alternatively, if you are enrolled in a school program, we could explore the possibility of bringing laptops to your school. If this is an option, you would be able to use the contributed laptops by borrowing them from the school in a time-shared basis together with the rest of your classmates. Notice that there is an involved process to create a project to receive laptops in a school, so this may not accommodate your immediate needs. Let us know if otherwise.
Thank you for reaching out.
$MYNAME
Labdoo Team | www.labdoo.org
Tag a laptop, spread education
Spanish
1. Respuesta estándar.
Hola $NOMBREDELSOLICITANTE,
Gracias por contactar con el Proyecto Labdoo.org.
Con el fin de entender si podemos ayudar a tu proyecto, primero tenemos que identificar posibles viajeros que irán desde cualquiera de los hubs Labdoo a $SOLICITORCOUNTRYNAME.
¿Conoces a alguien que viaje desde su área a cualquiera de los hubs Labdoo en las siguientes semanas o meses?
Aquí encontrarás la lista de los hubs Labdoo: http://www.labdoo.org/es/hubs
Si es así, podemos explorar las formas en que podemos tratar de llevar computadoras portátiles para su proyecto.
A la espera de saber de ti.
Atentamente,
$MINOMBRE
Labdoo Team | www.labdoo.org
Tag a laptop, spread education
---
2. Respuesta cuando no es posible servir computadoras.
En algunas ocasiones, los solicitantes piden computadoras portátiles para personas o proyectos que no tienen como objetivo la educación, y por lo tanto para objetivos que no son parte de la misión Laddoo.org. Para estos casos, puedes utilizar la siguiente respuesta.
---
Hola $NOMBREDELSOLICITANTE,
Gracias por contactar con el Proyecto Labdoo.org.
La misión del Proyecto Labdoo es llevar computadoras portátiles cargadas con software educativo a centros educativos bien organizados. Como tal, no podemos donar computadoras portátiles a individuos o a organizaciones que tienen otros objetivos diferentes a la educación y por ello, desafortunadamente, no podemos servir a su solicitud.
Alternativamente, si usted está vinculado a una escuela, se podría explorar la posibilidad de llevar computadoras portátiles a su escuela. Si esto es una opción, usted y sus compañeros serán capaces de utilizar los ordenadores portátiles aportados desde la escuela en régimen de tiempo compartido y desde la escuela, junto con el resto de sus compañeros de clase.
Gracias por contactar con el Proyecto Labdoo.org.
Atentamente,
$MINOMBRE
Labdoo Team | www.labdoo.org
Tag a laptop, spread education
Chinese
1. 標準回應.
親愛的 $SOLICITORNAME,
感謝您聯繫 Labdoo.
為了理解我們是否有能力贊助您的專案,我們首先需要找到可能從任何 Labdoo hubs到 $SOLICITORCOUNTRYNAME的旅客。
您有認識在最近幾周可能會從任何 Labdoo hubs旅行到您所在地區的人嗎? 以下是 Labdoo hubs的名單供您參考: http://www.labdoo.org/hubs
如果有的話,我們可以繼續計劃如何將捐贈的筆記本電腦帶到您的專案。期待你的囘覆。
謝謝!
$MYNAME
Labdoo 小組 | www.labdoo.org
---
2. '無法提供服務' 回應
在某些情況下,申請者希望捐贈筆電給個人或非教育專案,超越 Labdoo 服務的範圍。對於這種情況下,你可以使用以下的回應。
---
親愛的 $SOLICITORNAME,
感謝您聯繫Labdoo。
Labdoo的使命是捐贈裝有教育軟體的筆電到教育中心。因此,我們不能捐獻筆電給非教育專案的組織,因此,非常抱歉,我們無法處理您的請求。
如果你是學生,我們可以探討將筆電帶到你們學校的可能性。如果這個可以是一個變通的選擇,您將能與學校的其他同學一起共享Labdoo提供的電腦設施。筆電捐贈過程涉及在學校創建一個專案,所以這可能這不能立即提供您的需要。請讓我們知道您的決定,所以我們可以繼續討論進一步的合作。
謝謝!
$MYNAME
Labdoo 小組 | www.labdoo.org
Catalan
1. Resposta estàndard.
Hola $NOMDELSOL·LICITANT,
Gràcies per contactar amb el projecte Labdoo.org.
Amb la finalitat de veure si podem ajudar al teu projecte, primer hem d'identificar els possibles viatgers que aniran des de qualsevol dels centres Labdoo a $NOMPAÍSSOL·LICITANT.
¿Coneixes a algú que viatgi des de la seva zona a qualsevol dels hubs en les pròximes setmanes o mesos?
Aquí trobaràs la llista dels hubs de Labdoo: http://www.labdoo.org/ca/hubs
Si es així, podem mirar les formes en que podem tractar de fer arribar els dootronics (ordinadors portàtils, tablets, ...) per al projecte.
Estarem encantats de tornar a sentir de tu.
Atentament,
$ELMEUNOM
Labdoo Team | www.labdoo.org
Etiqueta un dootronic, regala l'educació
---
2. Resposta en el cas que el sol.licitant ja tingui un viatger i tot apunt (per exemple, ONGs que estan apunt de viatjar a una escola)
---
Hola $NOMDELSOL·LICITANT,
Moltes gràcies per contactar amb el projecte Labdoo.org.
Donat que ja teniu viatgers propis, caldria fer el següent:
1. Anuncia el teu viatge creant un dootrip seguint aquests passos: https://www.labdoo.org/content/how-register-dootrip
2. Un cop hagis creat el dootrip, algú de la xarxa mirarà d'assignar portàtils al teu dootrip.
3. Un cop tinguis portàtils, crearem la teva edoovillage: https://www.labdoo.org/ca/content/gestionar-una-edoovillage
Si us plau fes el pas 1 quan abans millor, per assegurar-nos que hi ha prou temps per assignar-vos portàtils sanejats amb les aplicacions educatives.
Trobaràs més informació de com funciona el Projecte Labdoo aquí: https://www.youtube.com/watch?v=KMLAoeq0T54
Gràcies,
$ELMEUNOM
Labdoo Team | www.labdoo.org
Etiqueta un dootronic, regala l'educació
---
3. Resposta quan no és possible portar ordinadors.
E algunes ocasions, els solicitants demanen dootronics (ordinadors portàtils, ...) per a persones o projectes que no tenen com a objectiu l'educació i, per tant, per a objectius que no són part de la missió de Laboo.org. Per aquests casos, pots utilitzar la següent resposta.
---
Hola $NOMDELSOL·LICITANT,
Gràcies per contactar amb el projecte Labdoo.org.
La missió del projecte Labdoo és portar dootronics (portàtils, tablets, ...) carregats amb programari educatiu a centres educatius ben organitzats. Així doncs, no podem donar dootronics a persones o organitzacions que tinguin altres objectius diferents a l'educació i, per tant, desafortunadament, no podem gestionar la teva sol·licitud.
De totes formes, si estàs vinculat a una escola, es podria mirar de portar dootronics a aquella escola. D'aquesta forma, podries utilitzar els dootronics donats a l'escola i compartir-los amb la resta d'alumnes d'aquesta. Pensa, però, que això requereix temps i, pert tant, és possible que no resolgui les teves necessitats immediates.
Gràcies per contactar amb el projecte Labdoo.org.
Atentament,
$ELMEUNOM
Labdoo Team | www.labdoo.org
Etiqueta un dootronic, regala l'educació
German
1. Standardantwort
Lieber Antragsteller, liebe(r) $SOLICITORNAME,
Vielen Dank für Ihre Kontaktaufnahme und Anfrage. Um Ihren Bedarf besser zu verstehen und prüfen zu können, benötigen wir Ihre Angaben z.B. zum Projekt und ob es potentielle Flugpaten zum Transport der IT-Spenden gibt.
Weitere Informationen und den Antrag (request) für IT-Spenden für Ihr „Edoovillage“ (so heißen bei Labdoo.org Schulen, Heime, Jugendprojekte usw.) finden Sie im Wiki.
Deutsch:
Übersicht: https://www.labdoo.org/de/content/information-edoovillages-projekte
Antrag: https://www.labdoo.org/de/content/antrag-f%C3%BCr-it-spenden-stellen
Englisch:
Übersicht: https://www.labdoo.org/content/information-edoovillages-schools
Antrag https://www.labdoo.org/de/content/start-laptop-request
(Den Antrag öffnen, im Browser → speichern unter → dann mit Editor oder Word öffnen, ausfüllen und einsenden, danke)
Bitte füllen Sie es soweit als möglich aus. Was Sie nicht wissen, lassen Sie frei. Bitte senden Sie es mit einigen Fotos vom Projekt zurück (für das Ausland bitte auch vom Umland, dem Ort, der Schule und den Kindern). Danach stellen wir es im Fall der Annahme auf unsere Homepage.
Im FAQ Forum http://www.labdoo.org/de/content/faq-forum finden Sie die häufigsten Fragen, auch zum Zoll usw. beantwortet.
Alle bisherigen Projekte stehen auf https://www.labdoo.org/de/content/edoovillages-dashboard. Sie können dort auch nach Ländern u.a. Kriterien filtern.
Wichtig ist auch, dass Antragsteller eine private oder staatliche Initiative / Projekt ist (Schule, Waisenhaus, Jugend-/Flüchtlingsprojekt). Die IT-Spenden können nicht an Einzelpersonen, sondern nur an Projekte gegeben werden, in deren Eigentum die IT-Spenden auch verbleiben. Die IT-Spenden sind gekennzeichnet und nummeriert. Daher ist jederzeit eine Kontrolle möglich, ob die erhaltenen IT-Spenden auch dort noch im Einsatz sind. Eine Weitergabe an Dritte ist nicht erlaubt.
Defekte IT-Spenden werden nur gegen Rückgabe der nicht mehr funktionierenden Geräte kostenlos ausgetauscht.
Eine Projektpräsentation finden Sie auf http://ftp.labdoo.org/download/documents/german/Unterlagen/labdoo-projec....
Für Projekte im Inland:
Projekte im Inland können eine PC-Spende beantragen oder selber aktiv werden, IT-Spenden sammeln und aufbereiten. Bei ca. 23 Mio. ausrangierten Computern in Privathaushalten plus den in Firmen ist der Pool riesig. Die Lernsoftware, Lerninhalte und Deutschkurse können leicht installiert und on- wie offline eingesetzt werden. Falls im Inland Laptops benötigt werden, brauchen wir eine kurze Begründung, warum keine PCs möglich sind.
Für Projekte im Ausland:
Auslandsprojekte erhalten i.d.R. Laptops. Wichtig für eine Entscheidung, ob ein Antrag angenommen wird, ist die Logistik, z.B. ob es Flugpaten gibt, die ab und zu das Projekt besuchen und IT-Spenden nach $SOLICITORCOUNTRYNAME mitnehmen können oder ob es Hilfsendungen gibt, bei denen IT-Spenden als Beipack mitgegeben werden können.
Bitte sagen Sie ca. 4 Wochen vor Abreise Bescheid, damit wir genügend Vorlauf haben, die IT-Spenden vorzubereiten und dem Flugpaten zuzusenden.
Wir können natürlich nur das weitergeben, was uns vorher gespendet wurde. Daher können wir auch nicht sagen, wann die IT-Spenden zusammengekommen sind. Sie können aber mithelfen, indem Sie z.B. ihr Netzwerk informieren selbst und zu IT-Spenden aufrufen oder die Presse informieren und einen Aufruf starten. Grafiken und Logos finden Sie auf http://www.labdoo.org/de/content/faq-forum#FAQ02.
Bei Fragen stehe ich gerne zur Verfügung.
$MYNAME
Labdoo Team | http://de.labdoo.org
IT-Spenden für Kinder und Schulen in der Welt

---
2. 'Wir können leider nicht helfen' Antwort
Manchmal bittet der Antragsteller um IT-Spenden für Einzelpersonen oder Projekte, die keinen Bildungsbezug haben. Da diese nicht zu Labdoos Zielgruppe gehören, kann in diesen Fällen die u.a. Antwort verschickt werden.
---
Lieber Antragsteller, liebe(r) $SOLICITORNAME,
Vielen Dank für Ihre Kontaktaufnahme und Ihre Anfrage. Labdoo.org ist eine gemeinnützige Organisation, die IT-Spenden nur an private oder öffentliche Institutionen (Schulen, Waisenhäuser, Flüchtlings-/Bildungsprojekte u.a.) vermittelt. Eine Weitergabe von IT-Spenden an Einzelpersonen ist uns nicht möglich.
Daher können wir Ihrer Anfrage leider nicht entsprechen. Wenn Sie einen Antrag für ein Projekt gemäß unseren Statuten einreichen möchten, melden Sie sich gerne erneut. So kann z.B. eine Schule einen Antrag stellen und dann IT-Spenden für eine gewisse Zeit an SchülerInnen ausleihen. Gerne prüfen wir gemeinsam mit Ihnen Möglichkeiten zu helfen.
Ansonsten kann ich Ihnen nur den Hinweis geben, dass es viele Millionen nicht mehr genutzte Computer in Privathaushalten gibt. Nutzen Sie ihr Netzwerk und fragen Sie im privaten oder beruflichen Umfeld nach ausgemusterten Computern, die man Ihnen vielleicht spenden kann.
$MYNAME
Labdoo Team | http://de.labdoo.org
IT-Spenden für Kinder und Schulen in der Welt
Response to Dootronics Donors
English
Dear $DONORNAME,
Thank you for your interest in contributing to the Labdoo.org cause.
In order to make your contribution, you can bring your laptop(s) to your nearest hub where it will be sanitized and installed with the education software making it ready to travel to a destination school. You will find the global list of Labdoo hubs where you can bring your laptop in the following link: https://platform.labdoo.org/content/hubs-dashboard?search=open
If you want to receive automatic emails of the status of your laptop as it makes progress to a destination school as well as pictures of the school once your laptop mini-mission is completed, you can do one of the following two options:
- Tag the laptop by creating an account at Labdoo.org and by following the instructions in this form: https://platform.labdoo.org/node/add/laptop
- While we encourage the first option, alternatively you can also attach a post-it to the laptop with your email address. The next person in the chain will tag the laptop and include your email address so that you can receive updates.
If you want to contribute even more to help spread education, you can also sanitize your laptop prior to bringing it to a hub. To sanitize a laptop, follow the steps described in this page: https://platform.labdoo.org/content/sanitation-guide-step-step-installat.... This step is only optional, if you don't want to sanitize the laptop, then you can simply bring it to your closest hub and the Labdoo team there will sanitize it for you.
For any additional questions, please do not hesitate to reply to this email and ask me.
Thank you once again for your contribution.
Best regards,
$MYNAME
Tag a laptop, spread education
Labdoo Team | platform.labdoo.org
https://www.youtube.com/watch?v=KMLAoeq0T54
--------
If the laptop does not satisfy the minimum requirements, use this response:
Dear $DONORNAME,
Thank you for your interest in contributing to the Labdoo.org cause.
Unfortunately, we can only accept laptops that work (that can boot up) and that at least have 1000MB of memory RAM. If you have any laptops that satisfy these two requirements and that you would like to contribute, kindly let us know.
For any additional questions, please do not hesitate to reply to this email and ask me.
Thank you once again for reaching out to us.
Best regards,
$MYNAME
Tag a laptop, spread education
Labdoo Team | platform.labdoo.org
https://www.youtube.com/watch?v=KMLAoeq0T54
Spanish
Reponse when we can accept the donation
Hola $NOMBREDELDONANTE,
Muchas gracias por tu interés en contribuir a la causa Labdoo.org.
Con el fin de llevar a cabo tu contribución, puedes traer tu(s) portátil(es) a tu Labdoo hub más cercano donde será saneado y donde se le instalará el software educativo poniéndolo apunto para viajar a una escuela destino. Encontrarás la lista global de hubs Labdoo donde puedes llevar tu portátil en el siguiente enlace: https://platform.labdoo.org/content/hubs-dashboard?search=open
Por favor, recuerda añadir los cargadores.
Si deseas recibir correos electrónicos automáticos del estado de tu ordenador portátil a medida que avanza hacia una escuela destino, así como fotos de la escuela una vez tu portátil ha llegado a la escuela, puedes llevar a cabo una de las dos opciones siguientes:
- Etiquetar el portátil mediante la creación de una cuenta en Labdoo.org y siguiendo las instrucciones de este formulario: https://platform.labdoo.org/es/node/add/laptop
- De forma alternativa, también puedes enganchar un post-it a la computadora portátil con tu dirección de correo electrónico. La siguiente persona en la cadena etiquetará el portátil e incluirá tu dirección de correo electrónico para que puedas recibir las actualizaciones de estado de tu portátil.
Si quieres contribuir aún más en la causa de donar educación a escuelas necesitadas, también puedes sanear tu ordenador portátil antes de traerlo a un hub. Para sanearlo, sigue los pasos descritos en esta página: https://platform.labdoo.org/es/content/sanitation-guide-step-step-instal.... Este paso es opcional, si no quieres o no puedes sanear el portátil, puedes llevarlo directamente a tu hub más cercano y el equipo Labdoo de allí lo saneará para ti.
Para cualquier pregunta adicional, por favor no dudes en responder a este mensaje y preguntar.
Gracias una vez más por tu contribución.
Atentamente,
$MINOMBRE
Labdoo Team | platform.labdoo.org
Tag a laptop, spread education
Reponse when we cannot accept the donation
Hola $NOMBREDELDONANTE,
Muchas gracias por tu mensaje y por tu voluntad de contribuir en la causa Labdoo.
Desafortunadamente, solo podemos aceptar portátiles y tabletas que funcionen (que puedan arrancar) y que al menos tengan 1000MB de memoria RAM. Si tiene alguna computadora portátil que satisfaga estos dos requisitos y que le gustaría contribuir, háganoslo saber.
Para cualquier pregunta adicional, no dude en responder a este correo electrónico y preguntarme.
Gracias una vez más por comunicarse con nosotros.
Cordialmente,
$MINOMBRE
Equipo Labdoo | platform.labdoo.org
Dona un portátil, regala educación
Catalan
Benvolgut/da $NOMDELDONANT,
Moltes gràcies pel teu interès en contribuir a la causa Labdoo.org.
Per tal de fer la teva contribució, pots portar el teu portàtil(s) al teu Hub més proper on serà sanejat i on se li instal·larà el programari educatiu posant-lo a punt per viatjar a una escola destí. Trobaràs la llista global de Hubs Labdoo on pots portar el teu portàtil al següent enllaç: https://platform.labdoo.org/content/hubs-dashboard?search=open
Si desitges rebre correus electrònics automàtics de l'estat del teu ordinador portàtil mentre fa el seu camí cap a una escola necessitada, així com fotos de l'escola una vegada que el teu ordinador portàtil hagi arribat al seu destí, pots dur a terme una de les dues opcions següents:
- Etiquetar el portàtil mitjançant la creació d'un compte a Labdoo.org i seguir les instruccions d'aquest formulari: https://platform.labdoo.org/ca/node/add/laptop
- Si bé encoratgem aquesta primera opció, de manera alternativa també pots adjuntar un post-it a l'ordinador portàtil amb la teva adreça de correu electrònic. La següent persona en la cadena col.laborativa Labdoo etiquetarà el teu portàtil i inclourà la teva adreça de correu electrònic perquè puguis rebre les actualitzacions.
Si vols contribuir encara més a fer arribar l'educació a escoles d'arreu del planeta, també pots sanejar el teu portàtil abans de portar-lo a un hub. Per sanejar-lo, segueix els passos explicats en aquesta pàgina: https://platform.labdoo.org/ca/content/sanitation-guide-step-step-instal.... Aquest pas és opcional, si no vols fer la tasca de sanejar l'ordinador portàtil, porta'l directament al teu hub més proper i l'equip de voluntaris Labdoo d'aquest hub el sanejarà per tu.
Per a qualsevol dubte, em pots fer arribar les teves preguntes responent directament a aquest missatge.
Gràcies un cop més per la teva contribució.
Cordialment,
$ELTEUNOM
Labdoo Catalonia | platform.labdoo.org
Dóna un portàtil, regala educació
https://www.youtube.com/watch?v=KMLAoeq0T54
Response to a Dootrip Offering
English
Dear $TRAVELERNAME:
Thank you for contacting Project Labdoo and for your interest in contributing to the cause of helping to bring a laptop loaded with educational applications to schools in need.
We have Labdoo schools in $DESTINATIONCOUNTRY and it would be very positive if your trip can be used to carry one or more laptops there. To make this possible, we ask you to help us with two things:
- As soon as you can, please register your trip (we call it a "dootrip") through this link: https://www.labdoo.org/node/add/dootrip (if you have not created a Labdoo account yet, you can do so through this other link first: https://www.labdoo.org/user/register)
- Four or more weeks before your trip, please contact me and I'll help you coordinate the delivery of one or more laptops so that you can carry them to a destination school in your trip.
For any questions, please do not hesitate to reach back to me by replying to this email.
Thank you once again for your contribution.
Best regards,
$MYNAME
Tag a laptop, spread education
Labdoo Team | www.labdoo.org
https://www.youtube.com/watch?v=KMLAoeq0T54
Spanish
Apreciado $TRAVELERNAME:
Gracias por contactar al Proyecto Labdoo y por tu interés en contribuir a la causa de ayudar a llevar una computadora portátil cargada con aplicaciones educativas a las escuelas que lo necesitan.
Tenemos escuelas de Labdoo en $ DESTINATIONCOUNTRY y sería muy positivo que tu viaje se pueda utilizar para llevar allí una o más computadoras portátiles. Para que esto sea posible, te pedimos que nos ayudes con dos cosas:
- Tan pronto como puedas, registra tu viaje (lo llamamos "dootrip") a través de este enlace: https://www.labdoo.org/es/node/add/dootrip (si todavía no te has creado una cuenta de Labdoo, puedes hacerlo a través de este otro enlace primero: https://www.labdoo.org/es/user/register)
- Cuatro o más semanas antes de tu viaje, contáctame y te ayudaré a coordinar la entrega de una o más computadoras portátiles para que puedas llevarlas a la escuela de destino en tu viaje.
Para cualquier pregunta, no dudes en ponerte en contacto conmigo respondiendo a este correo electrónico.
Gracias una vez más por tu contribución.
Cordialmente,
$MYNAME
Tag a laptop, spread education
Labdoo Team | www.labdoo.org
https://www.youtube.com/watch?v=KMLAoeq0T54
Catalan
Benvolgut/da $NOMVIATGER:
Moltes gràcies per contactar amb el Projecte Labdoo y pel teu interès en contribuir a la causa ajudant a portar un ordinador portàtil carregat d'aplicacions educatives a una escola necessitada.
Tenim escoles Labdoo al $PAISDESTI i per tant seria molt positiu poder utilitzar el teu viatge per tal de transportar-hi algun ordinador portàtil. Per tal de fer-ho possible, et demanem que ens ajudis amb dues coses:
- Així que puguis, registra el teu viatge (en diem "dootrip") a través d'aquest enllaç: https://www.labdoo.org/ca/node/add/dootrip (si no t'has creat un compte Labdoo, et demanem que ho facis a través d'aquest altre enllaç: https://www.labdoo.org/ca/user/register)
- 4 setmanes o abans del teu viatge, posa't en contacte amb mi i t'ajudaré a coordinar l'entrega d'un o més portàtils per tal que els puguis portar a l'escola destí durant el teu viatge.
Per a qualsevol dubte, em pots fer arribar les teves preguntes responent directament a aquest missatge.
Gràcies un cop més per la teva contribució.
Cordialment,
$ELMEUNOM
Dóna un portàtil, regala educació
Labdoo Catalonia | www.labdoo.org/ca
https://www.youtube.com/watch?v=KMLAoeq0T54
Response to Tax Receipt Request
English
Dear $DONORNAME,
Thank you for helping to give children a better education with your laptops.
As you may know, Labdoo runs as a distributed / humanitarian social network platform. The donation process propagates from one volunteer to the next, until the laptop reaches its school destination. Our system provides a communication platform for volunteers across more than 100 nations and financial boundaries. Labdoo does not need monetary donations to sustain itself thanks to our collaborative approach. Our no-money approach also implies that there is no chance of financial corruption. With over $CURRENT_NUMBER_OF_LABDOO_LAPTOPS laptops delivered to $CURRENT_NUMBER_LABDOO_SCHOOLS different schools, this model demonstrates the efficacy of running an organization just through collaboration and without the need for funding.
Because of the above reason, Labdoo does not issue tax receipts. By registering your laptops in the Labdoo system, you can be assured that the working laptops are properly delivered via the platform-generated email notification that you receive from the recipient schools, which you can use as proof of your donation to that school. You will also receive email notifications on the status of broken laptops as they make their way to the recycling facility.
Thanks for your understanding and for your joint effort in making the Labdoo system transparent and efficient.
Best regards,
$MYNAME
Response When You Cannot/Did Not Meet Delivery Deadline
Dear SOLICITORNAME,
I apologize for the inconvenience created by the laptops not arriving in time for your needs.
Despite our best efforts to deliver the laptops on time, our reliance on factors beyond our control (such as the service provided by the courier, flight schedules, etc.) meant that we were unable to meet your expectations for delivery in the time period allotted.
We are sorry that your plans have been disrupted and we will work with you to determine next steps so that we can resolve the issue together. Furthermore, we will assess the situation to deduce measures we can adopt to help minimize issues of this nature in the future.
Thank you for your understanding.
Sincerely,
YOURNAME
Labdoo Team | www.labdoo.org
Tag a laptop, spread education
Response to an Unreasonable Request
Dear SOLICITORNAME,
I am writing with reference to your request for (STATE THE REQUEST).
As you may know, Labdoo is a humanitarian social network that connects people around the world to provide those in underdeveloped regions with a chance at a better education. To serve the schools we partner with, we rely on the generosity of this global team of volunteers who donate their time and energy to make our world a better place.
Due to the limitations of our resources and capabilities, we unfortunately are unable to meet your request for (STATE THE REQUEST). Given the situation, the best we can do is to (PROVIDE AN OPTION SUCH AS REFERRING THEM TO ANOTHER ORGANIZATION).
Thank you for the work that you do to (STATE THEIR MISSION).
Sincerely,
YOURNAME
Labdoo Team | www.labdoo.org
Tag a laptop, spread education
Response when Applicant does not fulfil Labdoo Requirements
Dear SOLICITORNAME,
I am writing in reference to your application to register as a Labdoo edovillage.
Labdoo is an all-volunteer, humanitarian social network that connects people around the world to provide those in underdeveloped regions with a chance at a better education. We applaud the work you are doing to … (STATE THEIR MISSION); however, we are unable to accept your application as your work does not fall within the parameters of our mission.
Should our resources grow in the future and we are able to expand our criteria for edovillage registrations, we would be happy for you to resubmit your application.
Thank you for the work that you do to help make our world a better place.
Sincerely,
YOUR NAME
Labdoo Team | www.labdoo.org
Tag a laptop, spread education
Response to Request for Information
If you need to provide a brief description of Labdoo to someone else (for instance, to a potential volunteer(s) interested in creating a Labdoo hub), you can use the following template.
Note: if you would like to help translate the following description of Labdoo to another language, please reach us out at contact@labdoo.org and we will help you incorporate your translation.
Access to the Labdoo description doc: https://docs.google.com/document/d/1BxXJdJkhLBBy9rGSePAPLtqIj_IVi2JsscIh...
Forwarding a Response
When solicitors send us a request for laptops for a school in a country COUNTRY_DESTINATION, the first response is to ask back if they know of travelers from any country COUNTRY_SOURCE where Labdoo has hubs (see the Labdoo response to laptop solicitors: https://www.labdoo.org/content/response-dootronics-solicitation). If the solicitors find travelers from a country COUNTRY_SOURCE which has Labdoo hubs, then the next step is to ask them to forward their own request to the Labdoo hubs in country COUNTRY_SOURCE. Here is Labdoo's standard response to help forward solicitors' request to the right country:
English
Hi $NAMEOFSOLICITOR,
That's good news. Since you found traveler(s) from a region where we have Labdoo hubs, please do the following:
(1) Go to https://www.labdoo.org/ and click on "Request Laptops" button. This will take you to this page:
https://platform.labdoo.org/content/contact-labdoo?re=3
(2) Fill in your information, you can copy and paste the original message you sent me. Please tell them also that you have a traveler that can help bring the laptops. Most important, please make sure you select $COUNTRY in the Country field. This will ensure your request will be routed to Labdoo hubs from this country.
Upon doing this, someone from Labdoo $COUNTRY will be reaching back to you.
Wishing you best of luck in finding travelers and Labdoo hubs that can help bring educational laptops to your shool.
Warm regards,
$MYNAME
Labdoo Team | www.labdoo.org
Tag a laptop, spread education
Informative Message to Your Regional Hubs
From time to time, it is a good habit to send out an email to hubs in your area reminding them about the Labdoo tools that are available to help organize their laptop campaigns and sanitation events. For instance, for school hubs this message can be send out around early September as their yearly coursework starts. For other hubs (company, NGO, or home hubs) this message can be sent out anytime.
In this page you will find templates for such type of message in various languages that you can re-use for your convenience.
English
![]()

The world buys every year more than 400 million laptops and electronic tablets, yet 5000 million people still don't have access to powerful online and free sources of education. Whether we have 5 minutes, one hour, or a day of our time, here are a few things we can all do together or on our own to help spread education around the world:
- Tag a laptop. Do you have a laptop or a tablet that you no longer use? Then consider donating it to a Labdoo school to help bring education to a child. All you need to do is 'tag it' by going to the this link and filling in the form. This will only take you 5 minutes.
- Sanitize a laptop. Do you have one hour of your time? then help sanitize a laptop by cleaning an unused laptop or tablet, installing the education software, and making it ready so that the laptop can travel to a needy school. Follow the step by step instructions in the Labdoo wiki to sanitize your unused laptop from this link: sanitation steps.
- Help carry a laptop in your next trip. Are you traveling? then consider bringing one or two sanitized laptops/tablets in your luggage to your destination. By re-purposing your trip to help move laptops around the globe, at Labdoo we accomplish our mission of spreading education to schools without adding any new CO2 emissions to the Planet and without any economic cost. We call this collaborative way of transporting objects around the world 'dootrips'. Here is a list of Labdoo hubs from where you can pick up sanitized laptops, and here is a list of target school destinations where they can be delivered. You can register your dootrip by going to this link.
- Rescue and recycle a broken laptop. It is as important to spread education using laptops as making sure we keep our planet clean from electronic waste. Do you know of a laptop that is broken and that it can no longer be fixed nor used for education purposes? then it is time to recycle it! Find the closest recycling facility to your place and bring the laptop so its components can be properly disposed, starting a new cycle of life.
- Don't forget to register your dootrips. This is very important because: (1) it allows volunteers and helpers to know when the laptops need to be ready to be transported as well as to know how many laptops can be carried; (2) it allows schools to know when the laptops are scheduled for their arrival, and (3) it allows Labdoo to compute the amount of CO2 savings derived from re-purposing a trip and to keep a historical record. The rule of thumb is simple: every time a laptop travels to a destination school, you should register a dootrip. Find all you need to know about dootrips (including how to register them) from this page.
- Create your own hub. If you have not done so already and if you have more time and determination to help children reach education, you can also create your own Labdoo hub. Labdoo hubs can be created at home, at work, at high schools, at universities, at your NGO, you name it. The idea is simple: with your own hub, you will be able to create your own local campaigns to collect unused laptops and to host your own laptop sanitation events. If you are interested in creating a hub, email Labdoo at contact@labdoo.org.
- Keep your hub semaphore up to date The hub semaphore allows hub managers to announce whether their hub is currently active (accepting laptops and/or performing sanitation tasks), temporarily inactive (e.g. for vacation reasons) or closed. Don't forget to keep your semaphore up to date. You can find more information about hub semaphores from this page.
- Communicate with other Labdooers using Team Walls. Using email is good, but we encourage all of you to use the Labdoo Team Walls to communicate as much as possible. Walls are a great way to share information and communicate because they allow all of us to openly see the conversations that are going on, and they also provide a historical record of all the conversations which is very useful to help build the knowledge base. Using the Team Walls is very simple, read these wiki pages to learn how.
- Do you own or work for a company? check out Labdoo's CSR package. Companies can play a key role when it comes to helping those that are most in need. If you own or work for a corporation, consider helping the cause of spreading education around the globe by implementing one of the modules described in the Labdoo Corporate Social Responsibility Package.
- Help to translate the Labdoo.org social network to other languages. The goal of Labdoo is to break barriers so that education can reach out to all the regions of the world. A key to overcoming these barriers is the capability to write documents and tools in as many languages as possible. Whether you have just 5 minutes, 1 hour, or more time, you can help the platform by contributing a translation. Even if you only have a little bit of time, you can still help with the translation of a small portion, as the sum of many little efforts can make a big difference. Everything counts when it comes to spreading education. If you are interested, contact the Labdoo Team at contact@labdoo.org. See also the Translations Brochure.
- Help spread the word. Even if you can't do any of the above, there is still a lot of people in the world who can. So a great way to help spread education is by explaining the Labdoo story to your friends, family, class mates, or co-workers. You can read the About Labdoo page and you can watch this video to learn how the Labdoo Aid Social Network works and to get an idea of how together we can help make Education a universal right. You can also create your own local campaigns to spread awareness and mobilize your local community by using the material (logos, flyers, posters, etc.) that you will find in the Labdoo Toolkit.
The Labdoo Team

Catalan
![]()
Benvolguts participants del Projecte Labdoo:
Amb el retorn a les activitats escolars i laborals, us volem fer arribar les eines que trobareu a la plataforma Labdoo.org per tal que pugueu continuar organitzant les vostres campanyes de mobilització de portàtils i tauletes en desús i fer arribar educació als llocs més necessitats.
Us volem primerament informar que gràcies al treball de molts voluntaris, inclosa la vostra tasca, així com també a la transparència del projecte i la seva component col.laborativa, les donacions de portàtils individuals i empreses a la plataforma humanitària estan en augment. Per tant si necessiteu portàtils per fer els vostres tallers de sanejament i no en disposeu, si us plau escriviu-nos al mur de Labdoo Catalonia (https://www.labdoo.org/content/labdoo-catalonia/activities) o be per email per tal que us puguem ajudar a rebre'n. Igualment, us encoratgem a que continueu les vostres pròpies campanyes de sensibilització i recollida de portàtils i tauletes en desús a traves de les vostres xarxes d'amistats i familiars ja que aquestes activitats tenen efectes molt positius també.
Al "Labdoo Toolkit" hi trobareu eines generals: https://www.labdoo.org/ca/content/labdoo-toolkit
Podeu baixar-vos els logos de Labdoo per crear els vostres fulletons de mobilització des d'aquí: https://www.labdoo.org/ca/content/labdoo-logos
Aquí teniu la guia simple explicant els passos de sanejament de portàtils: https://www.labdoo.org/ca/content/sanitation-guide-step-step-installatio...
El pòster de Labdoo: https://www.labdoo.org/content/labdoo-story-poster
El vídeo oficial explicatiu del Projecte Col.laboratiu Labdoo: https://www.youtube.com/embed/KMLAoeq0T54
Si sou una empresa, en aquesta pàgina hi trobareu el paquet de Responsabilitat Social Corporativa: https://www.labdoo.org/content/labdoos-corporate-social-responsibility-c...
Si sou part d'un Hub Escola, en aquesta pàgina hi trobareu exemples de cartes per enviar als pares: https://www.labdoo.org/ca/content/sample-outreach-letters-school-hubs
Aquí hi trobareu un resum de les bones pràctiques Labdoo: https://www.labdoo.org/ca/content/glits-good-labdoo-habits
I recordeu com sempre que l'etiquetatge de portàtils es fa anant a "Dootronics" - "Tag it": https://www.labdoo.org/ca/node/add/laptop
Volem compartir també amb vosaltres un llibre que vam editar sobre algunes de les histories Labdoo que vam presentar durant la conferencia Global Labdoo que es va cel.lebrar aquest passat Setembre a Barcelona. Trobareu també fotos de la conferencia en aquest àlbum on hi reconeixereu escoles i nens rebent portàtils els quals gràcies a les vostres activitats poden ara tenir accés a un ordinador amb continguts educatius d'alta qualitat.
Us desitgem a tots i totes molts èxits en les recollides d'ordinadors portàtils i tauletes i gràcies un cop més per participar en el Projecte Labdoo per fer arribar l'educació a escoles d'arreu del món.
Per a qualsevol pregunta, no dubteu a contactar-nos.
Labdoo Team Catalonia | www.labdoo.org/ca
Spanish
![]()
Estimados participantes del Proyecto Labdoo:
Con el regreso a las actividades escolares y laborales, os hacemos llegar las herramientas que se encuentran en la plataforma colaborativa Labdoo.org para que podáis continuar organizando campañas de movilización de portátiles y tabletas en desuso y hacer llegar educación a los lugares más necesitados.
Os queremos primeramente informar que gracias al trabajo de muchos voluntarios, incluida vuestra tarea, así como también a la transparencia del proyecto y su componente colaborativa, las donaciones de portátiles individuales y empresas en la plataforma humanitaria están en aumento. Por lo tanto si necesitáis portátiles adicionales para hacer vuestros talleres de saneamiento, por favor escribid al muro de Labdoo Spain (https://www.labdoo.org/es/content/labdoo-spain/activities) o bien enviadnos un email para que os podamos ayudar a recibir portátiles en desuso. Igualmente, os animamos a que continuéis vuestras propias campañas de sensibilización y recogida de portátiles y tabletas a través de vuestras redes de amistades y familiares ya que estas actividades tienen efectos muy positivos también.
En el "Labdoo Toolkit" encontraréis herramientas generales: https://www.labdoo.org/es/content/labdoo-toolkit
Podéis descargaros los logos de Labdoo para crear vuestros propios folletos de movilización desde aquí:https://www.labdoo.org/es/content/labdoo-logos
Aquí tenéis la guía simple explicando los pasos de saneamiento de portátiles: https://www.labdoo.org/es/content/sanitation-guide-step-step-installatio...
El póster de Labdoo: https://www.labdoo.org/es/content/labdoo-story-poster
El vídeo oficial explicativo del Proyecto Colaborativo Labdoo: https://www.youtube.com/embed/KMLAoeq0T54(link is external) (link is external)
Si sois una empresa, en esta página encontraréis el paquete de Responsabilidad Social Corporativa: https://www.labdoo.org/es/content/paquete-labdoo-de-responsabilidad-soci...
Si sois parte de un Hub Escuela, en esta página encontraréis ejemplos de cartas para enviar a los padres: https://www.labdoo.org/es/content/sample-outreach-letters-school-hubs
Aquí encontraréis un resumen de las buenas prácticas Labdoo: https://www.labdoo.org/es/content/glits-good-labdoo-habits
Y recordad como siempre que el etiquetado de portátiles se hace a través del menú de "Dootronics" y seleccionando la opción "Tag it": https://www.labdoo.org/es/node/add/laptop
Queremos también compartir en esta ocasión con vosotros un libro que editamos sobre algunas de las historias Labdoo que presentamos durante la conferencia Global Labdoo que se celebró este pasado Septiembre en Barcelona. Encontrareis fotos de la conferencia en este álbum donde también reconoceréis escuelas y niños recibiendo portátiles los cuales gracias a vuestras actividades pueden ahora tener acceso a un ordenador con contenidos educativos de alta calidad.
Os deseamos a todos y todas muchos éxitos en vuestras recogidas de ordenadores portátiles y tabletas y gracias una vez más por participar en el Proyecto Labdoo para hacer llegar la educación a escuelas de todo el mundo.
Para cualquier pregunta, no dudéis en contactarnos.
Labdoo Team Spain | www.labdoo.org
Namaqua Kalahari Children's Hope
1. Project title or name of your school, project, or NGO - A short title or description for your project(*):
2. Project Description - Please explain about your project and how you will use the laptops (*):
3. Number of students(*): 60
4. Number of teachers(*): 5
5. Claimed IT equipments (*)
5.1 Number of Laptops needed(*): 30
5.3 Others needed (Tablet-PCs etc):
5.4 Additional comments:
6. On Site Contact Information / project manager. Please provide at least one way to contact (*):
6.1 Full Name(*): Sergio Giménez Antón
6.2 Phone(*): +34 630 41 19 27
6.3 Email(*): hi@sergiogimenez.com
6.4 Physical address of Organization (street, city, zip code, country...)(*): Vierde Laan 48/49, P.O. Box 40, Gochas, Namibia
6.5 GPS coordinates (click the link to find the coordinates: 24°51'40.2"S 18°48'46.5"E
7. Language
7.1 Local / Preferred language(s)(*): Afrikaans, English
7.2 Additional information about language(s):
8. Project Location - street, city, state/province, country, zip code(*): Vierde Laan 48/49, P.O. Box 40, Gochas, Namibia
9. Access to Internet(*)?
9.1 Access to internet (yes)
9.2 Wired/cable (no)
9.3 Wireless (yes)
10. Conditions about the room where the laptops will be installed:
10.1 Is the room secure? [yes]
10.2 Can the room be locked in a way that the supervisors (e.g. teachers) can control access? [yes]
10.3. Is the room weather-proof? (e.g. does the room protect the laptops from rain, sand, etc?) [yes]
11. How did you hear about Labdoo?:
--Other (please describe): Been involved in Labdoo activities since 2019.
12. Picture(s) of the school, students, teacher, etc with this Request Form. Please send as file(s) (*):
The picture will be uploaded to your project site
13. The data provided in this form will be made available from the Labdoo.org website to allow other web users to locate and contact your school. This data can be updated, modified, or deleted by logging to the platform with your Labdoo account username and password.
Do you allow to make this information available to other web users? (yes) (*).
***The solicitation of a Labdoo laptop request implies that, upon receiving the laptops, the recipient agrees with the "Labdoo Laptop Recipient Agreement".
----------------------------------------------------
Labdoo Laptop Recipient Agreement:
----------------------------------------------------
Dear Laptop receiver:
We are very pleased to have the opportunity to contribute to your project by providing technology to help bridge the digital divide.
With every right comes responsibilities. Technology, when adequately used, can provide very powerful means to aid those that are most in need. But if used improperly, it can also damage our environment. By receiving the above items, you are automatically accepting to abide by the following Labdoo global responsibilities:
(1) The items received will be used only for the purpose described by your organization at the time you solicited this donation.
(1.1) If you intend to use it for a different purpose, you will contact first the Labdoo team at contact@labdoo.org.
(1.2) Only schools and projects may claim for Labdoo computer donations and not by individuals.
(1.3) Donated items may only be removed from school ground with admittance of Labdoo (example, teachers cannot take laptops outside school). If Labdoo reviser visit your project and discovered donated items are missing, your school / project will be excluded from Labdoo support and CANNOT receive any further donation.
(2) In the case that an incidence occurs to any of the received items, you will contact the Labdoo team at contact@labdoo.org, including in your email the tagging number of the item(s) related to the incidence and a brief explanation. The following incidences must always be reported:
(2.1) At the end of life of any of the received items, so that the item can be properly recycled.
(2.2) When an item breaks, malfunctions or any change in its status.
(3) Every six months, please send an email to contact@labdoo.org with the list of laptops that you have and their status (working or not working).
(4) Labdoo laptops are offered for free to you for education purposes. In return, you agree to not use the laptops for commercial reasons and you agree not to charge any fee for the usage of the laptops.
(4.1) The donated items cannot be resold to make money or exchange with other valuable items.
(4.2) If discovered donated items are missing, your school / project will be excluded from Labdoo support and CANNOT receive any further donation.
(5) By returning this form filled in, the solicitor confirms owning all rights on sent materials (current or in the future) submitted to Labdoo.org and allowing such content to be publicly available from Labdoo.org. In addition, the solicitor confirms having approval for taking pictures of the children and/or any person benefiting from Labdoo laptops, tablets or any Labdoo donations, from their parents and/or legal guardians. Labdoo.org explicitly points to the fact that sent materials and pictures/photos may be used online and/or offline, and hence that they can be accessed by third parties, and that such pictures are used to help preserve the transparency and accountability of the projects.
We thank you for your commitment to make our world a better place and we wish you best of luck in your humanitarian mission.
The Labdoo Team.
Sample Outreach Letters for School Hubs
In this page you will find several examples of letters written by high school students. These sample letters are used to make the calls to collect unused laptops and tablets from parents, relatives and friends. The letters are sent to the parents via the school's mailing system. Upon receiving the letter, parents bring their unused laptops to the school. Then the students organize a workshop to sanitize the laptops and install the education software, making them ready for other needy schools. If you have other sample letters (in any language) and would like to share them, please add them to the bottom of this page.
Language: Catalan | Sample letter #1.
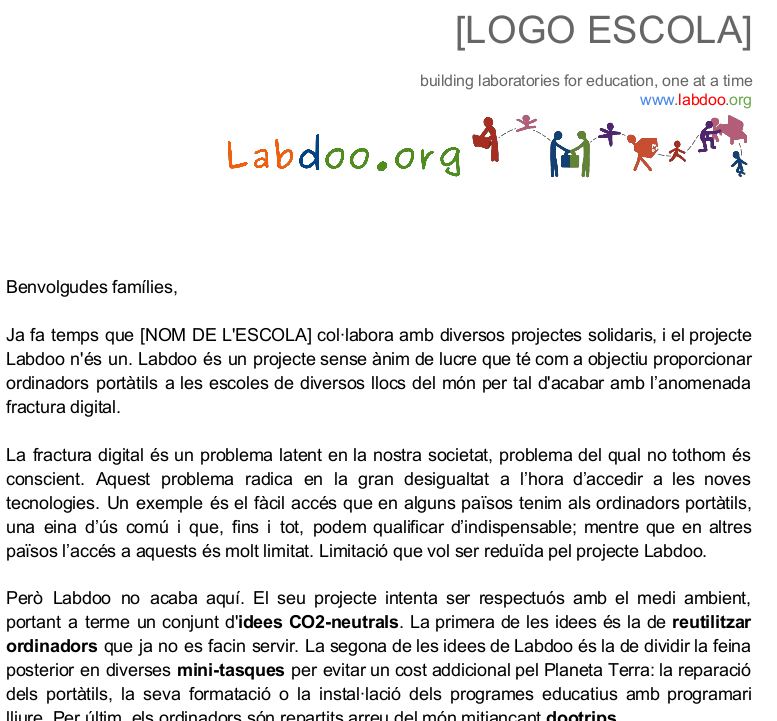
Dootripper's Travel Letter
If you are doing a dootrip and would like to carry with you a letter describing the objective of your trip in case you need to justify your cargo to customs upon arriving at the destination country, please download the following template and modify it with your personal information.
[Dowload template letter in Open Office]
[Dowload template letter in Word format]
[Google Doc template]
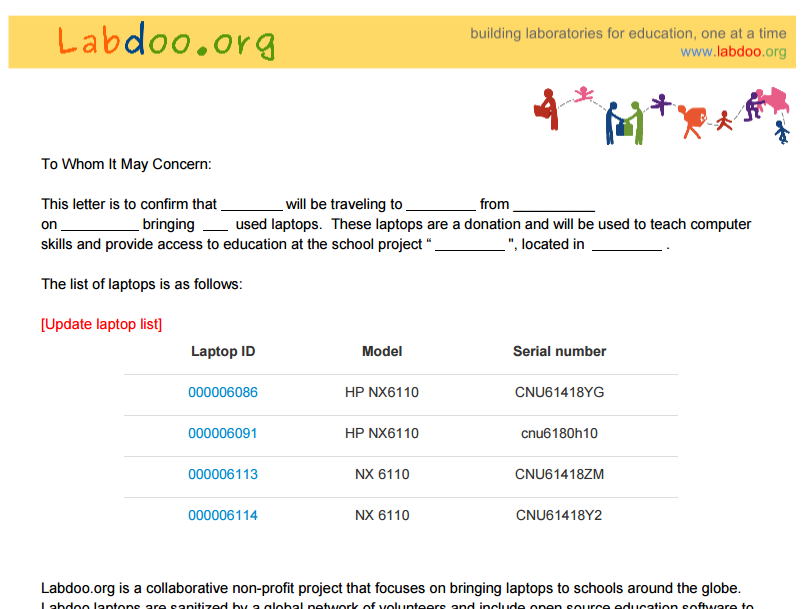
Donation Letter
If you are a hub manager and need to provide a letter to a laptop donor, you can use our standard template. Please reach out to your superhub manager so she/he can provide the template to you. Thank you.
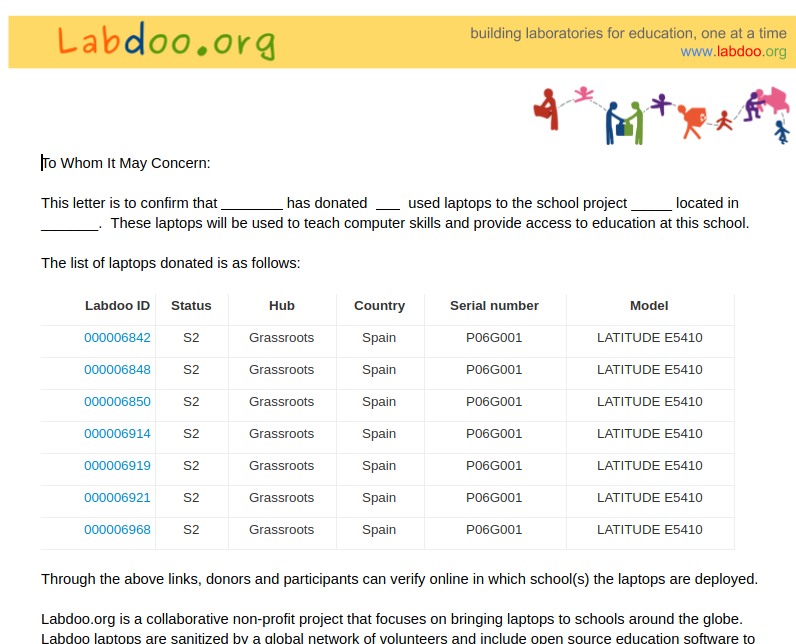
Template for Laptop Ready to be picked up
Dear $SOLICITATORNAME,
We have arranged for the delivery of two laptops to the mail store. Please inform your traveler to either visit the store or contact them for the delivery of the laptops. It is important to note that if the traveler cannot pick up the laptops in person, they will be responsible for the shipment cost.
The mail store information is as follows:
Name: Mailboxes and More
Hours: Monday-Friday 11am-5pm
Address: 92 Corporate Park, Unit C, Irvine, CA 92606
Phone number: (949) 863-7071
To verify your identity, kindly provide the necessary information to the mail store.
=============================
1. Your name.
2. The credit card information to be charged for the laptop FedEx ground shipping fee
3. Name, Phone number, and address for the laptops to be delivered (Shipment can only be made within US only)
4. The Labdoo ID number for the box. Your ID number is #ID_NUMBER_ON_ THE_BOX
Feel free to let us know if you have any questions.
Thanks!
Template for answering requests for a personal use laptop
Dear $LAPTOPREQUESTER,
Thank you for contacting Labdoo.
Labdoo is a small organization with limited resources. Therefore, our laptop donations are currently prioritized for schools. By doing so, the maximum number of students can benefit from the limited resources. Should our resources grow in the future and we can expand our service, we would be happy for you to resubmit your application.
Sorry for not being able to provide you with the laptop resource, and I wish you all the best in your future.
Sincerely yours,
$YourName
Template for laptop pickup reminder
Reminding the edoovillage to pick up the laptops if their volunteers haven't picked them up after 2 weeks is good. Following is a template for the email.
Dear $SOLICITATORNAME,
The laptops assigned to your project have not yet been collected. Since we have many projects waiting for laptop donations, these laptops will be reassigned to another project if they don't get picked up by next week.
Please inform your traveler to either visit the store or contact them for the delivery of the laptops as soon as possible. It is important to note that travelers who cannot pick up the laptops in person will be responsible for the shipment cost.
The mail store information is as follows:
Name: Mailboxes and More
Hours: Monday-Friday 11am-5pm
Phone number: (949) 863-7071
To verify your identity, kindly provide the information to the mail store.
=============================
1. Your name.
2. The credit card information to be charged for the laptop FedEx ground shipping fee
3. Name, Phone number, and address for the laptops to be delivered (Shipment can only be made within the US only)
4. The Labdoo ID number for the box. Your ID number is #ID_NUMBER_ON_ THE_BOX
Feel free to let us know if you have any questions. Thanks!
Welcome Message to Labdoo Hubs
When creating a new hub, send this welcome message to the new hub managers. Copy the message below into an email, substitute the keywords $HUBMANAGERNAME and $LINKTOTHENEWHUB for the name of the hub managers and the URL link to their newly created hub, respectively, and then send the message to the hub managers.
------
Dear $HUBMANAGERNAME,
Thank you for joining Project Labdoo as a Hub Manager and welcome aboard. Here is a link to your hub:
$LINKTOTHENEWHUB
Please review the following information to make sure it is correct.
- If there is any mistake in your hub page, please edit it yourself by clicking on the icon "Edit this hub" that you will find on the right column of your hub page above.
- Feel free to include additional information about your hub under the field "About this hub" that you will also find when clicking on the "Edit this hub" page.
- Take one or more pictures of your Labdoo hub team (for instance, take pictures about your hub location and the people that form the hub) and upload them under your hub photo album. The following page explains how to upload pictures to your hub: https://www.labdoo.org/content/uploading-pictures-your-hub
As a hub manager, you will have access to additional tools within the Labdoo system to help you manage your dootronics/edoovillages/dootrips inventories and to help organize your outreaching campaigns.
Here is some information to get you started:
- General information on how to manage your hub: https://www.labdoo.org/content/information-labdoo-hubs-laptop-collection...
- The general Labdoo toolkit will give you access to flyers, automated template responses, logos, etc: https://www.labdoo.org/content/labdoo-toolkit
- As a hub manager, you can configure notifications to detect activity in your area such as tagged laptops or dootrips being registered. Follow the instructions in this page to configure these automatic notifications: https://www.labdoo.org/content/managing-your-hub-notification-triggers
- You can download logos to create your Labdoo outreaching campaigns from here: https://www.labdoo.org/content/labdoo-logos
- The laptop sanitation guide: https://platform.labdoo.org/content/labdoo-km0
- If you are a dropping point, in this link you will find the tagging protocol you need to follow: https://www.labdoo.org/content/dropping-point-hubs-tagging-protocol
- The Labdoo poster: https://www.labdoo.org/content/labdoo-story-poster
- The hubs quick brochure: https://www.labdoo.org/content/labdoo-hub-brochure
- The official video explaining the collaborative project Labdoo: https://www.youtube.com/watch?v=KMLAoeq0T54
- If you are a business, on this page you will find the Corporate Social Responsibility package: https://www.labdoo.org/content/labdoos-corporate-social-responsibility-c...
- If you are a school Hub, on this page you will find examples of letters you can send to parents to help mobilize unused laptops: https://www.labdoo.org/content/sample-outreach-letters-school-hubs
- Here is a summary of the 'Good Labdoo Habits' (GLITs): https://www.labdoo.org/content/glits-good-labdoo-habits
For any questions, do not hesitate to reach out to Labdoo via the various teams wall or directly to contact@labdoo.org.
Thank you once again for joining the Labdoo cause and happy tagging to you and all your hub teammates!
Best regards,
$MYNAME
The Labdoo Team
Asking your friends for a dootrip
If you are looking for travelers that go from one city to another to help bring one or more laptops (we call this a dootrip), you can reuse this template to send out an email, text it or post it in your favorite social network to find travelers that might be willing to help out.
English
Dear friends,
As many of you already know, I collaborate with Labdoo, the NGO that brings clean unused computers and educational software to schools where they need them, using sustainable resources (and without the need for money) based on the work and collaboration of volunteers around the world. To solve the transportation problem, we repurpose the trips made by people like you, so we do not divert resources that should go to more important things and so that we can help to reduce CO2 emissions to the planet.
To bring computers to [FINAL DESTINATION] we have a traveler that often goes from [INTERMEDIATE POINT], so now we only need to carry laptops from [OUTPUT POINT] in [INTERMEDIATE POINT]. The first trip will do so soon, within a week or so.
If you are planning a trip to [INTERMEDIATE POINT], could you help us with one or two healthy laptops?
(Or if you know someone who is going to)
Here you will find information and pictures of the [FINAL DESTINATION] school, which suffered the terrible effects of the [Pam Cyclone in March 2015 and that is already enough to receive the computers]. (PERSONALIZE AS YOU CONSIDER TIMELY)
Https://www.labdoo.org/edoovillage?e=16269
Thank you for your cooperation,
$MYNAME
Labdoo Team | www.labdoo.org
Tag a laptop, spread education
Catalan
Aneu a [DESTINACIÓ FINAL]?
Hola amics,
Com potser sabeu col.laboro amb Labdoo per portar ordinadors en desús sanejats i amb software educatiu a escoles on els necessiten, tot amb recursos sostenibles existents, sense diners. El transport el fem aprofitant viatges de gent com ara vosaltres, així no desviem recursos que han d'anar a coses més importants com la salut.
Per portar ordinadors a [DESTINACIÓ FINAL] tenim un viatger que hi va sovint des de [PUNT INTERMEDI], així que ara sols ens cal portar portàtils de [PUNT DE SORTIDA] a [PUNT INTERMEDI].
El primer viatge el farà aviat, d'aquí una setmana aproximadament, però també hi va sovint.
Si aneu cap a [PUNT INTERMEDI] ens podreu portar un o dos portàtils sanejats i amb software educatiu?
(o si coneixeu algú que hi va)
Aquí trobareu info i fotos de l'escola de [DESTINACIÓ FINAL], que va patir els terribles efectes del [cycló Pam al març del 2015 i que ja està suficientment refeta per rebre els ordinadors]. (PERSONALITZEU COM CONSIDEREU OPORTÚ)
https://www.labdoo.org/edoovillage?e=16269
Gràcies per la vostra col·laboració,
$ELMEUNOM
Labdoo Team | www.labdoo.org
Tag a laptop, spread education
Spanish
Queridos amigos,
Como muchos ya sabéis colaboro con Labdoo, la ONG que llevar ordenadores en desuso saneados y con software educativo a escuelas donde los necesitan, para esto se aprovechan recursos ociosos, es decir sin dinero, a base del trabajo y colaboración de voluntarios. El transporte por ejemplo lo hacemos aprovechando viajes de gente como vosotros, así no desviamos recursos que deben ir a cosas más importantes como la salud.
Para llevar ordenadores a [DESTINO FINAL] tenemos un viajero que va a menudo desde [PUNTO INTERMEDIO], así que ahora sólo necesitamos llevar portátiles de [PUNTO DE SALIDA] en [PUNTO INTERMEDIO]. El primer viaje lo hará pronto, dentro de una semana aproximadamente.
Si tienes previsto un viaje a [PUNTO INTERMEDIO] ¿podrías ayudarnos llevando uno o dos portátiles saneados?
(O si conoce a alguien que va a )
Aquí encontrarás información y fotos de la escuela de [DESTINO FINAL], que sufrió los terribles efectos del [Ciclón Pam en marzo de 2015 y que ya está suficientemente repuesta para recibir los ordenadores]. (PERSONALICE COMO CONSIDERA OPORTUNO)
https://www.labdoo.org/edoovillage?e=16269
Gracias por su colaboración,
$MINOMBRE
Labdoo Team | www.labdoo.org
Tag a laptop, spread education
Request of more information to solicitors
Dear $NAME:
Thank you for contacting Labdoo and for all the work you've done to help spread education.
In order to evaluate if we can help your project, we need first to have some more information about your school: could you please tell us more about your project? What are your goals? What are you going to do with the laptops? How many teachers and pupils do you have? How do you plan to train your teachers? How will you maintain your laptops?
If you have a website, could you send it to us? Any pictures?
Please also send us the certificate of registration of your school or non-profit organization.
If you have any further questions please get back to us. Thank you and best wishes,
Response to Data Deletion
Dear $DONORNAME,
Thank you for your interest in contributing to the Labdoo.org cause.
At Labdoo, we want to ensure all data stored in every donated computer is properly erased. Erasing data on the computer hard drive is the required first step in the standard Labdoo laptop sanitation process. Volunteers shall erase data with the “shred” command before installing the new Ubuntu operating system.
Please visit the Labdoo website for detailed information on how to erase data from the computer hard drive ( https://platform.labdoo.org/content/delete-all-data-hard-disk )
Thank you for helping us spread the Labdoo awareness so more used laptops can have a second meaningful life before fully retired.
Sincerely,
$YOURNAME
Dootronic Packaging Print Outs
If you are packaging dootronics into boxes, you can print the following 'fragile drawings' and stick them to each of the sides of your box.
[Download in printable format]


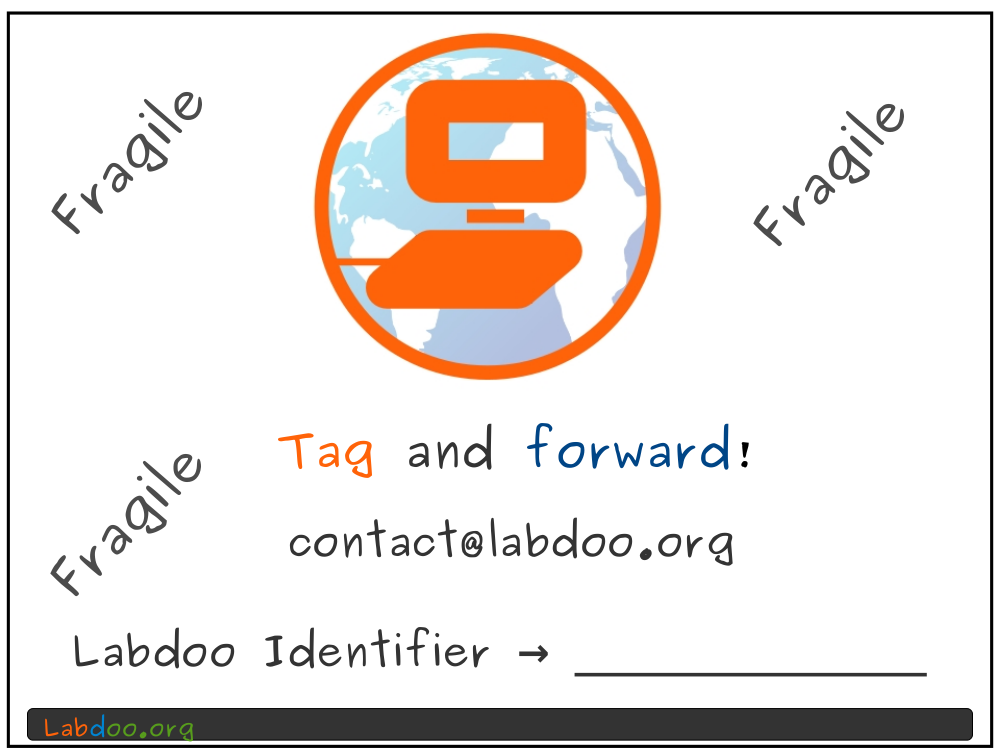
Labdoo Desktop Image
Once you have sanitized a dootronic, you can optionally set its desktop image to the following image to give it a friendly look.
[Download in printable format]
Labdoo Roll Up
You can use this to make your own Labdoo Roll Up and help reach out your local community.
[Download in printable format]

The Labdoo Story Poster
You can use this poster to help explain the Labdoo circle of life workflow.
[Download in printable format]

Labdoo Student Diary
In addition to the guidelines described in the Labdoo School Hub Booklet, it is often suggested by teachers that students performing Labdoo activities take the initiative of writing a report or a diary of their activities. This allows students to enhance their writing and communication skills while at the same time they share their social activities and their learning lessons with the rest of the classmates and the local community.
Here is a great example of a diary that one of the high school students from one of the Labdoo School Hubs wrote and that you can use as a reference example:

Dootronics Welcome Package
When bringing laptops and tablets to a school, make sure you also deliver one printed copy of the "Dootronics Welcome Package".
The following links will allow you to download each of the documents that are part of the welcome package. Please print each of these three documents, put them inside an envelope and deliver them at your destination school together with the laptops/tablets.
-
Please print the "Labdoo Welcome Letter":
English | Catalan | Chinese | French | German | Korean | Spanish. -
Please print the "Labdoo Quick Start Guide":
English | Catalan | Chinese | French | German | Korean | Spanish. -
Please print the "Reasons why Labdoo uses Linux" document:
English | Chinese | French | Korean | Spanish -
Please print the "Basic Packages that Come with Edubuntu":
English | Chinese | French | Korean - Please go to the LGS Welcome Sheet, click on "Printer-friendly version" at the bottom of that page, and print the sheet to ensure the recipient is aware about the Labdoo Global Support Program.
Outreaching Personalized Cards
You can download these templates to create your own personalized Labdoo outreaching cards.
[Front - Download in editable Open Office file format]

[Back - Download in editable Open Office file format]
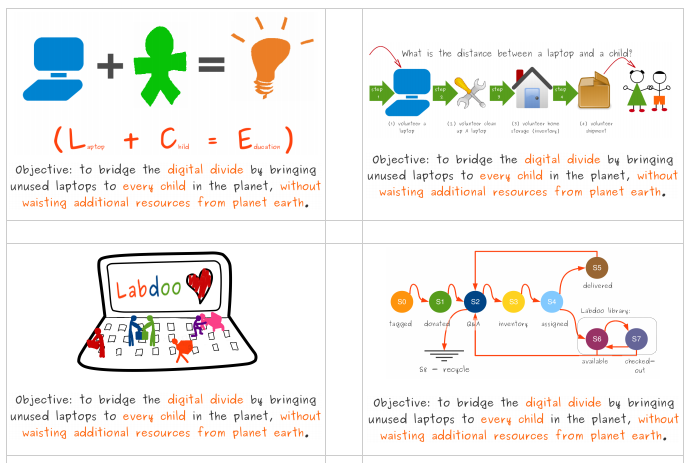
Labdoo Videos
The following videos can be used for your own Labdoo campaigns. Let's say you need to explain a potential laptop donor how Labdoo works? you can use the 'Circle of Life' video. Need to illustrate Labdoo's grassroots growth? you can use the 'Growth Video'. As we develop more videos, they will also be added to this page.
Labdoo's 5 Step Process to Spread Education
English | French | German | Spanish | Catalan

The Labdoo Process (English)
The Labdoo Process (German)
The Circle of Life (English)
The Circle of Life (Catalan)
The Circle of Life (Chinese)
The Circle of Life (German)
The Circle of Life (Italian)
The Circle of Life (Spanish)
The Circle of Life (Spanish/Mexican)
Organic Growth
Edoovillage Success Story Form
Labdoo Outreaching Guide
On this page you will find the guides or parameters under which we have defined the process of communication of the information that we want to communicate in Labdoo through our communication channels.
We invite you to read it carefully and put it into practice in those moments when you are related to the communications of the organization. It is important to note that this content is open to suggestions and subject to modifications to improve it more and more.
Call for Laptops Brochure
You can use this brochure to launch your outreaching campaign to collect unused but working laptops and tablets from your local community.
This brochure is just one example. You will need to adapt it to change the title of the project and the location from where you are running your campaign. You will find the source of this file under this link.
If you want to create your own version of this brochure, please email us at contact@labdoo.org and we will create a replica file that you can edit and use for your own campaign.
English

Dootrip Brochure
You can use this brochure to ask your friends and close network if they would be willing to contribute a dootrip to help bring a laptop or tablet to a needy school using CO2 neutral means.
English
[Download in printable format]

Catalan
[Download in printable format]
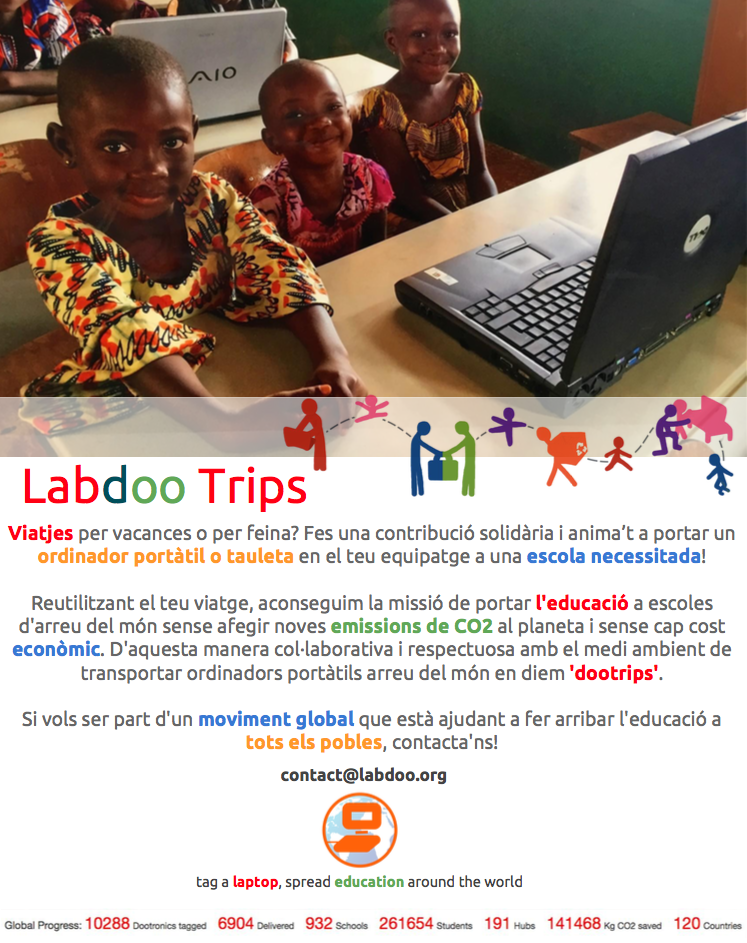
French
[Download in printable format]
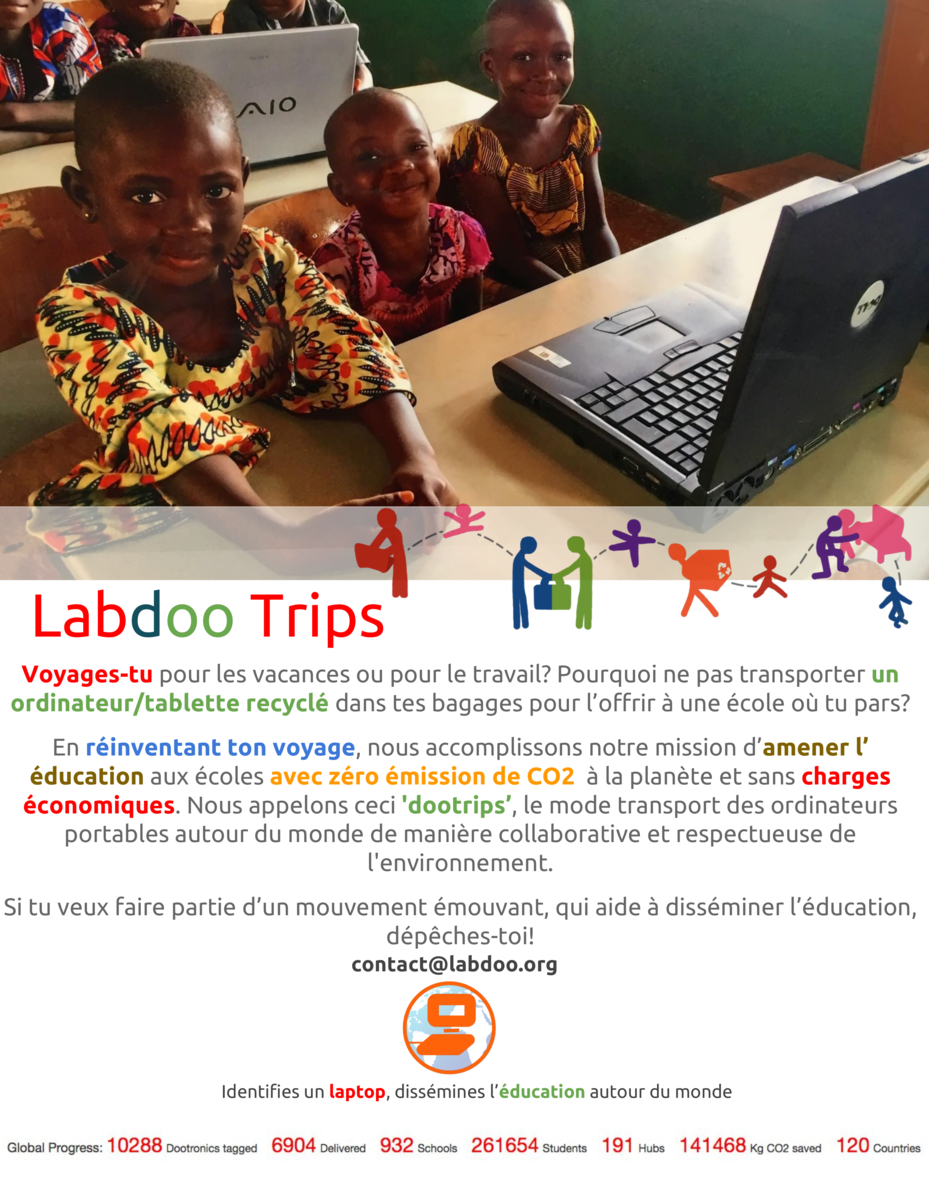
German
[Download in printable format]

Spanish
[Download in printable format]

Labdoo Hub Brochure
You can use this to help explain what a hub is and/or to announce the creation of a new hub.
[Download in printable format]
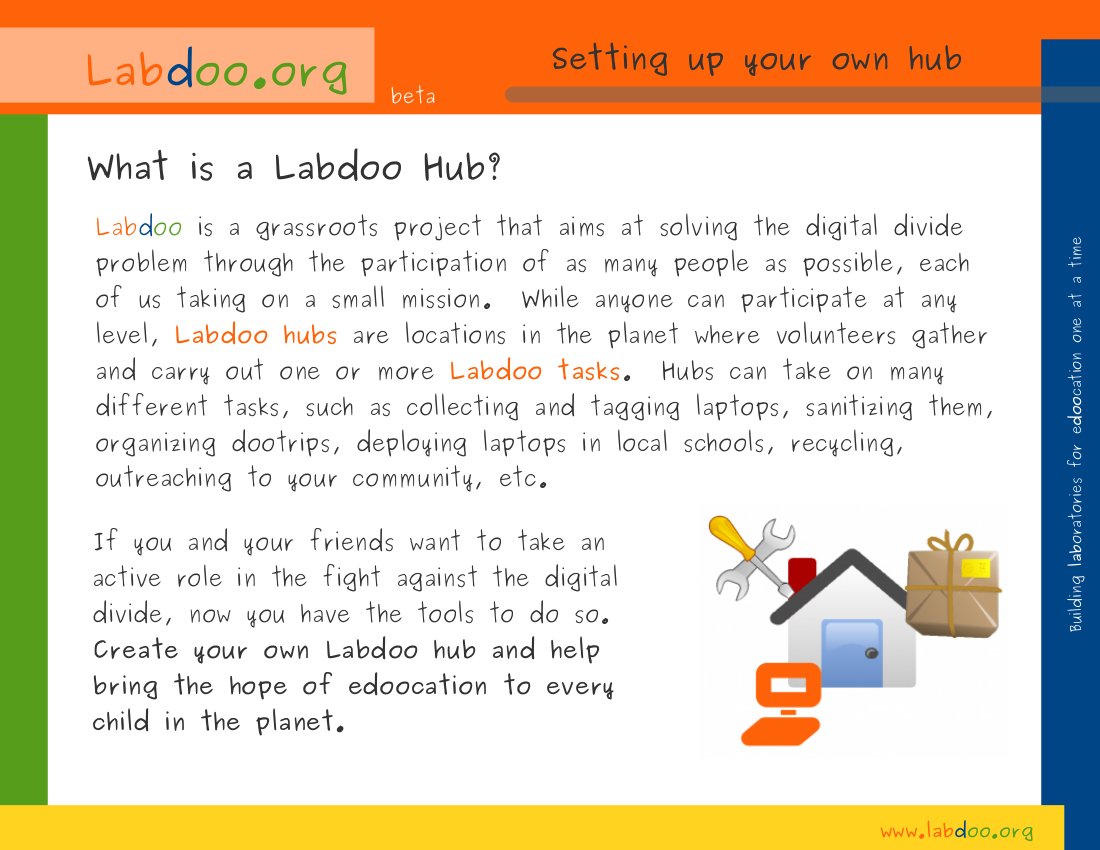
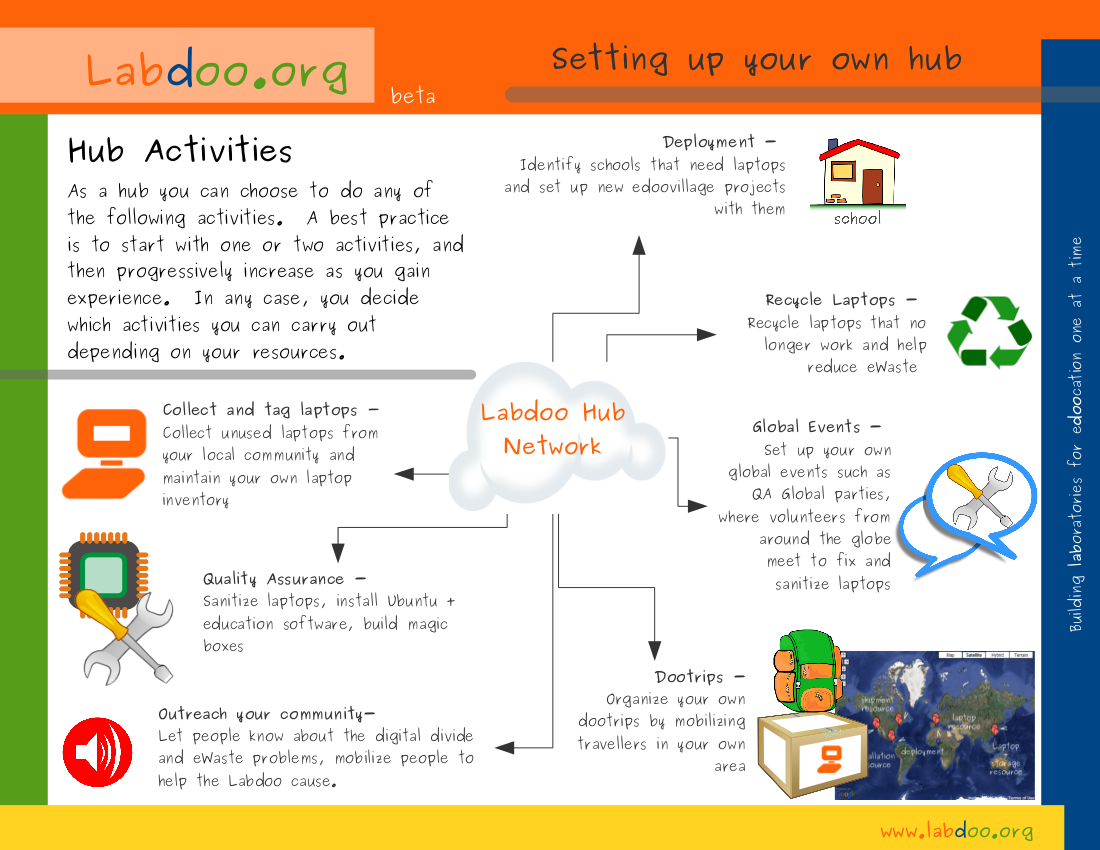
Labdoo Brochure

Labdoo Dropping Point Hub Poster
This is a poster that you can print and display near your hub to give you more visibility. The poster will allow people walking by your hub to know that in your location they can bring their unused laptops.
If you would like to translate this poster to a different language or to modify it in some way, please reach out to the Labdoo team at contact@labdoo.org.
English:
[Download in printable format]
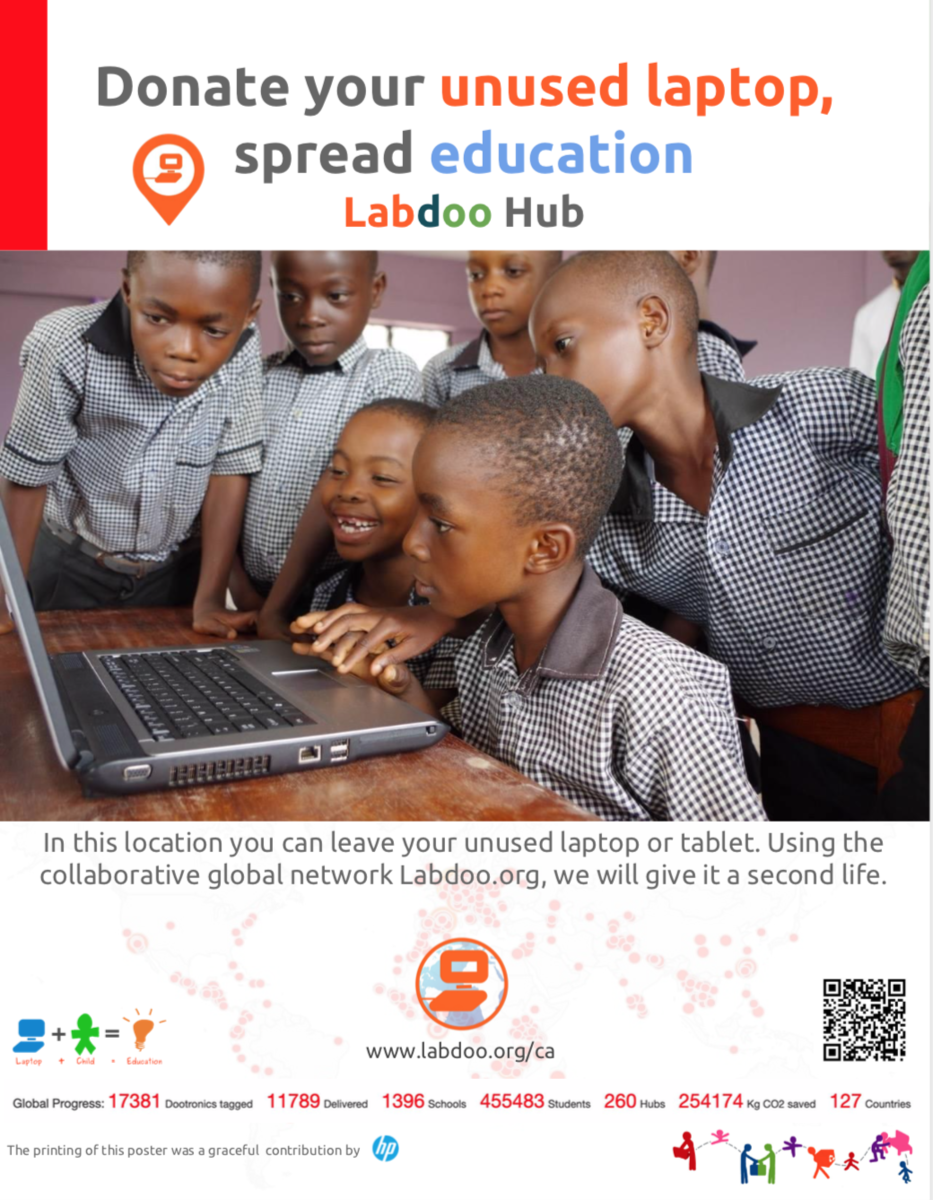
[Download in printable format]

Catalan:
[Download in printable format]

[Download in printable format]

Labdoo CSR Package - Flyer
As a company implementing the Labdoo Corporate Social Responsability Package you can create your own flyer and distribute it away to other companies and/or your employees. If you need to generate your own flyer, contact the Labdoo team at contact@labdoo.org and we can help you out.
| Example of Labdoo CSR flyer. |

|
Labdoo Translations Brochure
You can use this brochure to ask your friends and close network if they can help translate the Labdoo platform to another language.
[Download in printable format]
![]()
Labdoo Presentation Slides
If you need to present Project Labdoo in front of your audience (at your school, at your work, in a conference, anywhere), feel free to use these slides. If you'd like to modify the slides, send us an email at contact@labdoo.org and we will send you the original sources so that you can adjust the content.
[Download in printable format]
The source document for this presentation can be found under this link. If you want to modify it and create your own version, please email us at contact@labdoo.org and we will give you access.
The Labdoo Comic
Written and illustrated by a 15-year-old student, the Labdoo Comic tells an incredible story of how we are all connected by an invisible network of favors that are paid forward. While the connection between the story's protagonists, Felix and Maxim, may seem unbelievable, it is very real. Every day at Labdoo, similar stories unfold, with thousands of people performing small acts of kindness to help provide access to education for children around the world. You, too, can join Labdoo and be part of this inspiring movement!
The Labdoo comic is being translated into many languages and is freely available to everyone. You can download it from the following links. A special thank you to everyone who is making this project possible without expecting anything in return, including the main author, editors, translators, and many others.
List of Labdoo Comics available by language: Arabic, Catalan, Chinese, English, Euskera, French, Galician, German, Hindi, Italian, Japanese, Korean, Spanish, Swahili.
Labdoo Comic in Arabic:

Labdoo Comic in Catalan:
Labdoo Comic in Chinese:

Labdoo Comic in English:
Labdoo Comic in Euskera:
Labdoo Comic in French:

Labdoo Comic in Galician:

Labdoo Comic in German:
Labdoo Comic in Hindi:

Labdoo Comic in Italian:
Labdoo Comic in Japanese:
Labdoo Comic in Korean:

Labdoo Comic in Spanish:

Labdoo Comic in Swahili:
Things You Can Do To Spread Education
![]()
The world buys every year more than 400 million laptops and electronic tablets, yet 5000 million people still don't have access to powerful online and free sources of education. Whether we have 5 minutes, one hour, or a day of our time, here are a few things we can all do together or on our own to help spread education around the world:
- Tag a laptop. Do you have a laptop or a tablet that you no longer use? Consider donating it to a Labdoo school to help bring education to a child. All you need to do is 'tag it' by going to the this link and filling in the form to register your donated laptop. Then contact your closest Labdoo Hub and bring your laptop there so it can be sanitized and installed with education packages. Tagging a laptop will only take you 5 minutes, but if you don't have that time, then simply drop your laptop at your closest Labdoo Hub and a Labdoo volunteer will tag it for you!
- Help carry a laptop in your next trip. Are you traveling? then consider bringing one or two sanitized laptops/tablets in your luggage to your destination. By re-purposing your trip to help move laptops around the globe, at Labdoo we accomplish our mission of spreading education to schools without adding any new CO2 emissions to the Planet and without any economic cost. We call this collaborative way of transporting objects around the world 'dootrips'. Here is a list of Labdoo hubs from where you can pick up sanitized laptops, and here is a list of target school destinations where they can be delivered. You can register your dootrip by going to this link.
- Help spread the word. A great way to help spread the Labdoo awareness is to explain the Labdoo story to your friends, family, class mates, or co-workers. You can read the About Labdoo page and you can watch this video to learn how the Labdoo Aid Social Network works and to get an idea of how together we can help make Education a universal right. You can also create your own local campaigns to spread awareness and mobilize your local community by using the material (logos, flyers, posters, etc.) that you will find in the Labdoo Toolkit. Lastly, you can share the journey of your 'dootrips' (delivering the laptops to local schools or 'edoovillage') through your social media like Instagram - follow and tag @labdoo_org in Instagram!
- Do you own or work for a company? Check out Labdoo's CSR package. Companies can play a key role when it comes to helping those that are most in need. If you own or work for a corporation, consider helping the cause of spreading education around the globe by implementing one of the modules described in the Labdoo Corporate Social Responsibility Package.
- Create your own hub. If you have more time and the determination to help children reach education, you can also create your own Labdoo hub. Labdoo hubs can be created at home, at work, at high schools, at universities, at your NGO, you name it. The idea is simple: with your own hub, you will be able to create your own local campaigns to collect unused laptops and to host your own laptop sanitation events. If you are interested in creating a hub, email Labdoo at contact@labdoo.org.
- Rescue and recycle a broken laptop. It is as important to help education by using laptops as to keep our planet clean from electronic waste. Do you know of a laptop that is broken and can no longer be fixed, nor be used for educational purposes? Then it is time to recycle it! Find the closest recycling facility to your place and bring the laptop so its components can be properly disposed, starting a new cycle of life.
- Help translate the Labdoo.org social network into other languages. The goal of Labdoo is to break barriers so that education can reach out to every corner of the world. A key to overcoming these barriers is the capability to write documents and tools in as many languages as possible. Whether you have just 5 minutes, 1 hour, or more time, you can help the platform by contributing a translation. Even if you only have a little bit of time, you can still help with the translation of a small portion, as the sum of many little efforts can make a big difference. Everything counts when it comes to spreading education. If you are interested, contact the Labdoo Team at contact@labdoo.org. See also the Translations Brochure.
The Labdoo Team
Labdoo Buttons
Learn how it works (en)

Learn how it works (de)

Learn how it works (zh-hans)

Learn how it works (zh-hant)

Learn how it works (ca)

Learn how it works (es)

Join Labdoo (en)

Join Labdoo (de)

Join Labdoo (zh-hans)

Join Labdoo (zh-hant)

Join Labdoo (ca)

Join Labdoo (es)

Download data (ed)

Become a labdooer (en)

Contact Labdoo (en)

Create a school (en)

Contribute computer (en)

Contribute dootrips (en)

Learn how it works (en)

Become a labdooer (de)

Contact Labdoo (de)

Create a school (de)

Contribute computer (de)

Contribute dootrips (de)
