 If you have any questions about this page or if you find any errors,
please write a message to the
If you have any questions about this page or if you find any errors,
please write a message to the
If MacOS is missing
You will need to have Wifi and internet access to reinstall macOS.
- Booting the laptop.
- If it prompts you to install a new OS, simply connect to your WiFi and follow the screen
- Otherwise, reboot the laptop, holding both the Command and R keys until you see the Apple logo. Then select “Reinstall macOS” from the menu
If MacOS is present
If you know the password of the admin user, congratulations!. Otherwise, follow these steps to reset the password:
- Reboot the laptop, hold the Command + R keys until the Apple logo appears.
- Select Utilities -> Terminal to launch a terminal.
- Type resetpassword (yes, one word) at the terminal. Follow the screen to reset the password for each existing account.
- Restart and log in using the new password
“Labdooing” the Mac
Create Labdoo Accounts
You will use the existing admin account to create two new accounts: “student” and “labdoo” and then remove all non-labdoo accounts.
- Log in as the current admin account
- Select “System Preferences” -> “Users & Groups”
- Click the lock icon to unlock. Type password when prompted
- Click ‘+’ to add a new account. A new account form will pop up
- Create “labdoo” account - fill in the form with the following values:
- New Account: Administrator
- Full Name: labdoo
- Account Name: labdoo
- Password: labdooadmin
- Verify: repeat the password
- Password hint: can leave blank
- Create “student” account - fill in the form with the following values:
- New Account: Standard
- Full Name: student
- Account Name: student
- Password: labdoo
- Verify: repeat the password
- Password hint: can leave blank
Delete Non-labdoo Accounts
- Log in as “labdoo”
- Select “System Preferences” -> “Users & Groups”
- Click the lock icon to unlock. Type password when prompted
- Select a non-labdoo account, click the ‘-’ to remove the account
- Select “delete user directory” option. Confirm deletion when prompted
- Repeat step 4 and 5 for all remaining non-labdoo accounts
Change the Computer Name:
We will change the computer name to the labdoo Tag ID:
- Generate a tag ID for this computer if it doesn’t have one yet
- Click “System Preference” -> “Sharing”
- Change the computer name to labdoo-000xxxxxx, where xxxxxx is the tag ID.
Create a Partition for Ubuntu
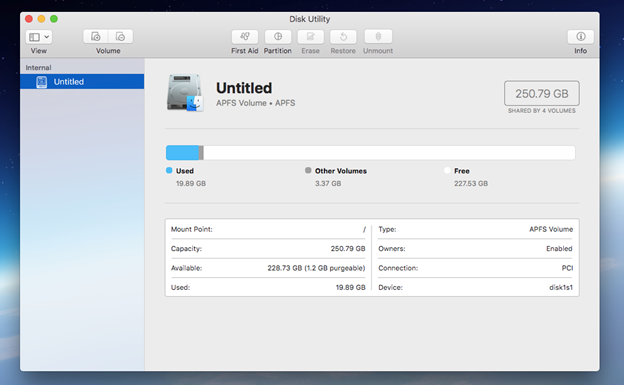
- Run Disk Utility: Select Go -> Utilities -> Disk Utility

- Disk Utility screen
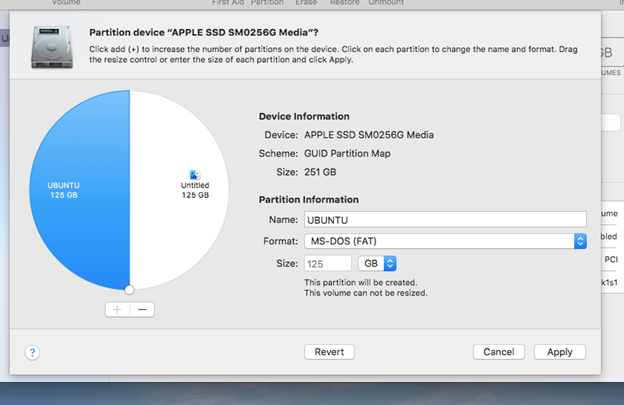
- Click “Partition”. A dialog box will pop up. Click Partition again

-
Click the ‘+’ sign. A new partition will be added. We now have 2 partitions, each occupies 50% of the disk space. Name the new partition “UBUNTU” and set its format to MS-DOS(FAT).
-
Click Apply
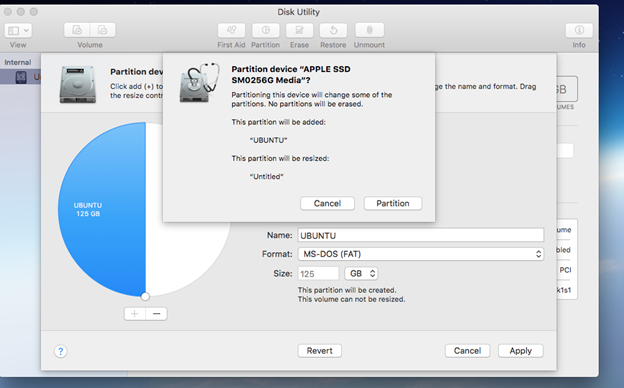
-
Click Partition
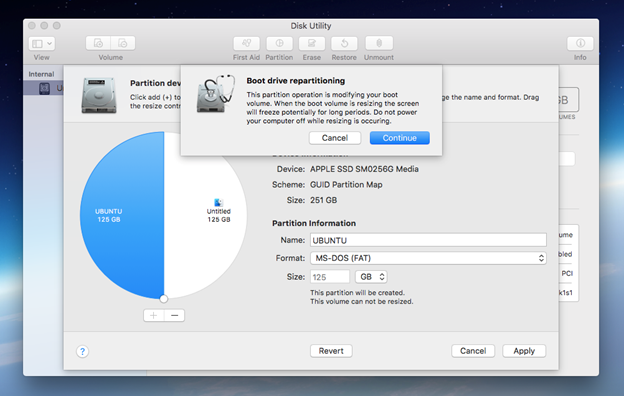
- Click Continue. The process may take a while.
We are now ready to install Ubuntu on the new partition. But there is one task left: to install a boot manager.
Install rEFInd Boot Manager
Disable SIP (System Integrity Protection)
SIP protects critical areas on the disk from being altered, and rEFInd needs to write to one of those areas. Thus, we need to disable SIP before installing rEFInd
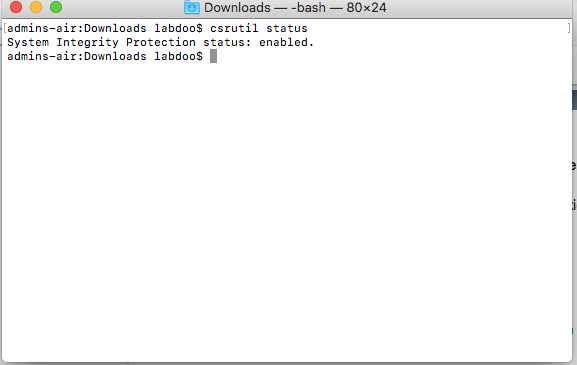
- Check to see if SIP is enabled or disabled. Open a Terminal and type “csrutil status”
- Reboot and hold the Command + R key until you see the Apple logo. It will boot into Recovery mode.
- Select “Utilities” -> “Terminal”
- At the terminal, type csrutil disable
- Reboot and log back in as labdoo
If it says “enabled” like in the capture above, follow the steps below to disable it
Installing rEFInd
- Open a Terminal
- Open the folder where you downloaded the files earlier
- Arrange the Terminal window and the folder window so you can see both at the same time:
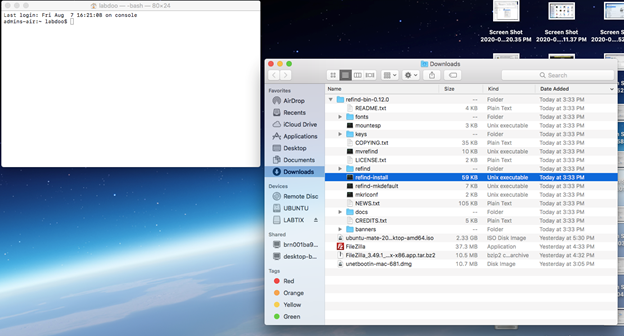
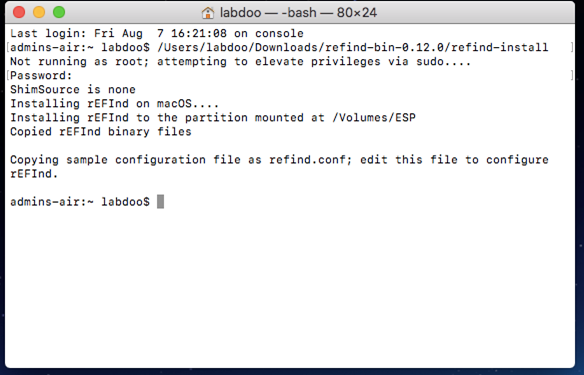
- Drag and drop the “refind-install” file into the Terminal folder
- In the Terminal window, hit Enter or Return key to execute the command. Enter the password when prompted
We are now ready to install Ubuntu.
Continue reading to the next page:
03: Install Ubuntu Mate
Go back to read the previous page:
01: Prepare Your Stuff